Install Upwind on Kubernetes
Overview
This topic provides instructions on installing the Upwind Sensor in a Kubernetes environment. By default, the Upwind Sensor runs as a DaemonSet.
Generate Credentials
This step is relevant only if you want to create new client credentials. If you already have client credentials, you can skip this step.
Select the + (plus) symbol at the top of the screen and select Connect Kubernetes Cluster. Select Generate a new one to create a new client ID and client secret. Provide a name and select Generate.
Alternatively, you can generate it in the Credentials page in the console.
Provide Client Credentials
There are two ways to provide the credentials to the Sensor: pre-create a Kubernetes Secret (recommended), or pass them inline to helm install. The install commands below adapt to whichever you pick here.
- Kubernetes Secret
- Inline Values
Pre-create a Secret in the upwind namespace. This keeps the client secret out of shell history, out of ps / /proc/<pid>/cmdline, and out of the Helm release storage Secret (where any user with namespace read access could otherwise recover it):
kubectl create namespace upwind
There are two ways to create the Secret itself. Both produce an identical Secret in the cluster.
- kubectl create secret
- kubectl apply (manifest file)
The leading space before each export keeps the credentials out of your shell history.
# Upwind Client Credentials
 export UPWIND_CLIENT_ID="<redacted>"
 export UPWIND_CLIENT_SECRET="<redacted>"

kubectl create secret generic upwind-secret -n upwind \
  --from-literal=clientId="$UPWIND_CLIENT_ID" \
  --from-literal=clientSecret="$UPWIND_CLIENT_SECRET"
Friendlier for GitOps workflows. Write a manifest using stringData so Kubernetes encodes the values for you — no manual base64 step required:
apiVersion: v1
kind: Secret
metadata:
  name: upwind-secret
  namespace: upwind
type: Opaque
stringData:
  clientId: "<UPWIND_CLIENT_ID>"
  clientSecret: "<UPWIND_CLIENT_SECRET>"
Apply it:
kubectl apply -f upwind-secret.yaml
This manifest contains your client secret in plain text. Delete it after applying, keep it out of version control, and do not place it in a directory that's synced to a cloud backup (iCloud, Dropbox, etc.). For long-term GitOps storage, use a tool like Sealed Secrets or External Secrets Operator instead of committing the file as-is.
The Amazon EKS Add-on requires the Secret to be named exactly upwind-operator-client-credentials instead of upwind-secret. See the EKS Add-on tab below for the EKS-specific instructions.
Export the credentials in your shell so the install commands below pick them up:
The leading space before each export keeps the credentials out of your shell history.
# Upwind Client Credentials
 export UPWIND_CLIENT_ID="<redacted>"
 export UPWIND_CLIENT_SECRET="<redacted>"
Passing credentials via --set credentials.clientSecret=... exposes the client secret in ps / /proc/<pid>/cmdline while helm install runs, and stores it base64-encoded in the Helm release Secret (sh.helm.release.v1.upwind.v1 in the upwind namespace). Any user with get secret permission on the namespace can recover it. Prefer the Kubernetes Secret approach above for production clusters.
Install
By default the Upwind Operator connects to the US region. If your Upwind tenant is in another region, set the region as part of the install:
- Survey tool: pass
--region eu(or--region me) to theupwindctl kubernetes surveycommand. - Manual / Helm: set the top-level
regionHelm value, for example--set region=eu(or--set region=me), or addregion: euto your values file.
The default is us, which points the operator at the US backend.
- Helm Operator (Recommended)
- Helm Operatorless
- Helm Umbrella Chart
- Amazon Elastic Kubernetes Service (EKS) Add-on
- Google Kubernetes Engine (GKE) Autopilot
Prerequisites
- Helm installed.
- Review Upwind charts.
If you are deploying the Upwind agent on an AWS EC2 container instance instance in AWS and using IMDSv2, it is necessary to set the hop limit to 2. This configuration allows the agent to successfully query the instance metadata service.
Step 1. Upwind Operator Deployment
To deploy the Upwind Operator, you can either use our survey tool to guide you through the process or manually deploy the operator. We highly recommend using the survey tool to ensure that you have the correct configuration for your environment.
- Survey
- Manual
A prerequisite for using the survey tool is to have access to the Kubernetes cluster by having a kubeconfig and set to the correct context.
The Kubernetes Survey will check your cluster for size, internet connectivity, and other factors to determine the best way to deploy the Upwind Operator. It will generate the installation instructions for you to follow.
Make sure to fill in the UPWIND_CLIENT_ID and UPWIND_CLIENT_SECRET fields with the values you generated in Step 1.
- Cloud
- BYOC
curl -s https://get.upwind.io/upwindctl.sh | bash -s -- kubernetes survey \
  --client-id=${UPWIND_CLIENT_ID} \
  --client-secret=${UPWIND_CLIENT_SECRET}
curl -s https://get.upwind.io/upwindctl.sh | bash -s -- kubernetes survey \
  --client-id=${UPWIND_CLIENT_ID} \
  --client-secret=${UPWIND_CLIENT_SECRET} \
  --cloud-provider=byoc \
  --cloud-account-id=${YOUR_BYOC_ACCOUNT_NAME} \
  --byoc-zone=${YOUR_BYOC_ZONE}
For EU or ME tenants pass --region eu (or --region me). Default is us. Omitting the flag generates Helm values with region: us, which points the operator at the US backend.
The Survey command passes the client secret on its argv. While the variable name ${UPWIND_CLIENT_SECRET} is what your shell history sees, the expanded value is briefly visible in ps / /proc/<pid>/cmdline while the command runs. Run it on a trusted host. The output of upwindctl kubernetes survey is a set of Helm install instructions — when you run those, you can choose the Kubernetes Secret approach in Provide Client Credentials to keep the secret out of further command lines.
Add our Helm repository:
helm repo add upwind https://charts.upwind.io/
helm repo update
Cluster Agent recommended resources:
| Cluster Size | CPU Cores | Example Node Count |
|---|---|---|
| Small | Up to 1,000 | ~30 |
| Medium | Up to 3,000 | ~90 |
| Large | Up to 10,000 | ~300 |
| XLarge | 10,000+ | 300+ |
Note:
- "CPU Cores" refers to the total number of allocatable vCPUs across all nodes in the cluster.
- The node count is based on an estimated average of 16-32 cores per node.
- For XLarge clusters, we recommend reaching out to our support team to discuss your specific use case.
| Resource | Small Cluster | Medium Cluster | Large Cluster |
|---|---|---|---|
| Replicas | 1 | 1 | 3 |
| CPU Request | 1000m | 4000m | 4000m |
| CPU Limit | 2000m | 6000m | 6000m |
| Memory Request | 2Gi | 6Gi | 6Gi |
| Memory Limit | 2Gi | 6Gi | 6Gi |
Note:
mstands for millicores (e.g., 500m = 0.5 CPU core).- Adjust the below values based on your cluster's workload and available resources.
- Cloud
- BYOC
- Openshift
With the Upwind Helm repository added, you can now deploy Upwind to your cluster. If you are reusing a credential be sure to add it into the UPWIND_CLIENT_ID & UPWIND_CLIENT_SECRET fields.
To install the helm chart, you should execute the install command as follows:
- containerd
- CRI-O
- Kubernetes Secret
- Inline Values
helm install upwind upwind/upwind-operator \
  --namespace upwind \
  --create-namespace \
  --set credentials.create=false \
  --set credentials.name=upwind-secret \
  --values - <<EOF
agent:
    values:
        agent:
            extraArgs:
                - --cluster-agent-protocol-version=6
        scanAgent:
            extraArgs:
                - --cluster-agent-protocol-version=6
clusterAgent:
    values:
        replicas: ${RECOMMENDED_CLUSTER_AGENT_REPLICAS}
        resources:
            limits:
                cpu: ${RECOMMENDED_CPU_LIMIT}
                memory: ${RECOMMENDED_MEMORY_LIMIT}
            requests:
                cpu: ${RECOMMENDED_CPU_REQUEST}
                memory: ${RECOMMENDED_MEMORY_REQUEST}
EOF
helm install upwind upwind/upwind-operator \
  --namespace upwind \
  --create-namespace \
  --set credentials.clientId="${UPWIND_CLIENT_ID}" \
  --set credentials.clientSecret="${UPWIND_CLIENT_SECRET}" \
  --values - <<EOF
agent:
    values:
        agent:
            extraArgs:
                - --cluster-agent-protocol-version=6
        scanAgent:
            extraArgs:
                - --cluster-agent-protocol-version=6
clusterAgent:
    values:
        replicas: ${RECOMMENDED_CLUSTER_AGENT_REPLICAS}
        resources:
            limits:
                cpu: ${RECOMMENDED_CPU_LIMIT}
                memory: ${RECOMMENDED_MEMORY_LIMIT}
            requests:
                cpu: ${RECOMMENDED_CPU_REQUEST}
                memory: ${RECOMMENDED_MEMORY_REQUEST}
EOF
- Kubernetes Secret
- Inline Values
helm install upwind upwind/upwind-operator \
  --namespace upwind \
  --create-namespace \
  --set credentials.create=false \
  --set credentials.name=upwind-secret \
  --values - <<EOF
agent:
    values:
        containerd:
            enabled: false
        crio:
            enabled: true
        agent:
            extraArgs:
                - --cluster-agent-protocol-version=6
        scanAgent:
            extraArgs:
                - --cluster-agent-protocol-version=6
clusterAgent:
    values:
        replicas: ${RECOMMENDED_CLUSTER_AGENT_REPLICAS}
        resources:
            limits:
                cpu: ${RECOMMENDED_CPU_LIMIT}
                memory: ${RECOMMENDED_MEMORY_LIMIT}
            requests:
                cpu: ${RECOMMENDED_CPU_REQUEST}
                memory: ${RECOMMENDED_MEMORY_REQUEST}
EOF
helm install upwind upwind/upwind-operator \
  --namespace upwind \
  --create-namespace \
  --set credentials.clientId="${UPWIND_CLIENT_ID}" \
  --set credentials.clientSecret="${UPWIND_CLIENT_SECRET}" \
  --values - <<EOF
agent:
    values:
        containerd:
            enabled: false
        crio:
            enabled: true
        agent:
            extraArgs:
                - --cluster-agent-protocol-version=6
        scanAgent:
            extraArgs:
                - --cluster-agent-protocol-version=6
clusterAgent:
    values:
        replicas: ${RECOMMENDED_CLUSTER_AGENT_REPLICAS}
        resources:
            limits:
                cpu: ${RECOMMENDED_CPU_LIMIT}
                memory: ${RECOMMENDED_MEMORY_LIMIT}
            requests:
                cpu: ${RECOMMENDED_CPU_REQUEST}
                memory: ${RECOMMENDED_MEMORY_REQUEST}
EOF
With the Upwind Helm repository added, you can now deploy Upwind to your cluster. If you are reusing a credential be sure to add it into the UPWIND_CLIENT_ID & UPWIND_CLIENT_SECRET fields.
- containerd
- CRI-O
- Kubernetes Secret
- Inline Values
helm install upwind upwind/upwind-operator \
  --namespace upwind \
  --create-namespace \
  --set credentials.create=false \
  --set credentials.name=upwind-secret \
  --values - <<EOF
extraArgs:
    - --cloud-provider=byoc
    - --cloud-account-id=${YOUR_BYOC_ACCOUNT_NAME}
agent:
    values:
        byoc:
            accountID: ${YOUR_BYOC_ACCOUNT_NAME}
            zone: ${YOUR_BYOC_ZONE}
        agent:
            extraArgs:
                - --cluster-agent-protocol-version=6
        scanAgent:
            extraArgs:
                - --cluster-agent-protocol-version=6
clusterAgent:
    values:
        replicas: ${RECOMMENDED_CLUSTER_AGENT_REPLICAS}
        resources:
            limits:
                cpu: ${RECOMMENDED_CPU_LIMIT}
                memory: ${RECOMMENDED_MEMORY_LIMIT}
            requests:
                cpu: ${RECOMMENDED_CPU_REQUEST}
                memory: ${RECOMMENDED_MEMORY_REQUEST}
        byoc:
            accountID: ${YOUR_BYOC_ACCOUNT_NAME}
            zone: ${YOUR_BYOC_ZONE}
EOF
helm install upwind upwind/upwind-operator \
  --namespace upwind \
  --create-namespace \
  --set credentials.clientId="${UPWIND_CLIENT_ID}" \
  --set credentials.clientSecret="${UPWIND_CLIENT_SECRET}" \
  --values - <<EOF
extraArgs:
    - --cloud-provider=byoc
    - --cloud-account-id=${YOUR_BYOC_ACCOUNT_NAME}
agent:
    values:
        byoc:
            accountID: ${YOUR_BYOC_ACCOUNT_NAME}
            zone: ${YOUR_BYOC_ZONE}
        agent:
            extraArgs:
                - --cluster-agent-protocol-version=6
        scanAgent:
            extraArgs:
                - --cluster-agent-protocol-version=6
clusterAgent:
    values:
        replicas: ${RECOMMENDED_CLUSTER_AGENT_REPLICAS}
        resources:
            limits:
                cpu: ${RECOMMENDED_CPU_LIMIT}
                memory: ${RECOMMENDED_MEMORY_LIMIT}
            requests:
                cpu: ${RECOMMENDED_CPU_REQUEST}
                memory: ${RECOMMENDED_MEMORY_REQUEST}
        byoc:
            accountID: ${YOUR_BYOC_ACCOUNT_NAME}
            zone: ${YOUR_BYOC_ZONE}
EOF
- Kubernetes Secret
- Inline Values
helm install upwind upwind/upwind-operator \
  --namespace upwind \
  --create-namespace \
  --set credentials.create=false \
  --set credentials.name=upwind-secret \
  --values - <<EOF
extraArgs:
    - --cloud-provider=byoc
    - --cloud-account-id=${YOUR_BYOC_ACCOUNT_NAME}
agent:
    values:
        containerd:
            enabled: false
        crio:
            enabled: true
        byoc:
            accountID: ${YOUR_BYOC_ACCOUNT_NAME}
            zone: ${YOUR_BYOC_ZONE}
        agent:
            extraArgs:
                - --cluster-agent-protocol-version=6
        scanAgent:
            extraArgs:
                - --cluster-agent-protocol-version=6
clusterAgent:
    values:
        replicas: ${RECOMMENDED_CLUSTER_AGENT_REPLICAS}
        resources:
            limits:
                cpu: ${RECOMMENDED_CPU_LIMIT}
                memory: ${RECOMMENDED_MEMORY_LIMIT}
            requests:
                cpu: ${RECOMMENDED_CPU_REQUEST}
                memory: ${RECOMMENDED_MEMORY_REQUEST}
        byoc:
            accountID: ${YOUR_BYOC_ACCOUNT_NAME}
            zone: ${YOUR_BYOC_ZONE}
EOF
helm install upwind upwind/upwind-operator \
  --namespace upwind \
  --create-namespace \
  --set credentials.clientId="${UPWIND_CLIENT_ID}" \
  --set credentials.clientSecret="${UPWIND_CLIENT_SECRET}" \
  --values - <<EOF
extraArgs:
    - --cloud-provider=byoc
    - --cloud-account-id=${YOUR_BYOC_ACCOUNT_NAME}
agent:
    values:
        containerd:
            enabled: false
        crio:
            enabled: true
        byoc:
            accountID: ${YOUR_BYOC_ACCOUNT_NAME}
            zone: ${YOUR_BYOC_ZONE}
        agent:
            extraArgs:
                - --cluster-agent-protocol-version=6
        scanAgent:
            extraArgs:
                - --cluster-agent-protocol-version=6
clusterAgent:
    values:
        replicas: ${RECOMMENDED_CLUSTER_AGENT_REPLICAS}
        resources:
            limits:
                cpu: ${RECOMMENDED_CPU_LIMIT}
                memory: ${RECOMMENDED_MEMORY_LIMIT}
            requests:
                cpu: ${RECOMMENDED_CPU_REQUEST}
                memory: ${RECOMMENDED_MEMORY_REQUEST}
        byoc:
            accountID: ${YOUR_BYOC_ACCOUNT_NAME}
            zone: ${YOUR_BYOC_ZONE}
EOF
With the Upwind Helm repository added, you can now deploy Upwind to your cluster. If you are reusing a credential be sure to add it into the UPWIND_CLIENT_ID & UPWIND_CLIENT_SECRET fields.
Openshift clusters use the CRI-O container runtime so the values for the helm chart need to be adjusted to use CRI-O instead of containerd.
- Kubernetes Secret
- Inline Values
helm install upwind upwind/upwind-operator \
  --namespace upwind \
  --create-namespace \
  --set credentials.create=false \
  --set credentials.name=upwind-secret \
  --values - <<EOF
extraArgs:
    - --cloud-provider=byoc
    - --cloud-account-id=${YOUR_BYOC_ACCOUNT_NAME}
agent:
    values:
        containerd:
            enabled: false
        crio:
            enabled: true
        byoc:
            accountID: ${YOUR_BYOC_ACCOUNT_NAME}
            zone: ${YOUR_BYOC_ZONE}
        agent:
            extraArgs:
                - --cluster-agent-protocol-version=6
        scanAgent:
            extraArgs:
                - --cluster-agent-protocol-version=6
clusterAgent:
    values:
        replicas: ${RECOMMENDED_CLUSTER_AGENT_REPLICAS}
        resources:
            limits:
                cpu: ${RECOMMENDED_CPU_LIMIT}
                memory: ${RECOMMENDED_MEMORY_LIMIT}
            requests:
                cpu: ${RECOMMENDED_CPU_REQUEST}
                memory: ${RECOMMENDED_MEMORY_REQUEST}
        byoc:
            accountID: ${YOUR_BYOC_ACCOUNT_NAME}
            zone: ${YOUR_BYOC_ZONE}
EOF
helm install upwind upwind/upwind-operator \
  --namespace upwind \
  --create-namespace \
  --set credentials.clientId="${UPWIND_CLIENT_ID}" \
  --set credentials.clientSecret="${UPWIND_CLIENT_SECRET}" \
  --values - <<EOF
extraArgs:
    - --cloud-provider=byoc
    - --cloud-account-id=${YOUR_BYOC_ACCOUNT_NAME}
agent:
    values:
        containerd:
            enabled: false
        crio:
            enabled: true
        byoc:
            accountID: ${YOUR_BYOC_ACCOUNT_NAME}
            zone: ${YOUR_BYOC_ZONE}
        agent:
            extraArgs:
                - --cluster-agent-protocol-version=6
        scanAgent:
            extraArgs:
                - --cluster-agent-protocol-version=6
clusterAgent:
    values:
        replicas: ${RECOMMENDED_CLUSTER_AGENT_REPLICAS}
        resources:
            limits:
                cpu: ${RECOMMENDED_CPU_LIMIT}
                memory: ${RECOMMENDED_MEMORY_LIMIT}
            requests:
                cpu: ${RECOMMENDED_CPU_REQUEST}
                memory: ${RECOMMENDED_MEMORY_REQUEST}
        byoc:
            accountID: ${YOUR_BYOC_ACCOUNT_NAME}
            zone: ${YOUR_BYOC_ZONE}
EOF
Step 2. Test Connectivity
It is recommended to validate that none of the resources deployed by Upwind are in a Pending/Failed or any other error state, which will prevent Upwind from operating as expected.
Run the following command to validate that all the resources are in a Running state:
kubectl get agent,clusteragent --namespace upwind
Prerequisites
- Helm installed.
- Regsync installed.
- Review Upwind Agent Charts.
- Review Upwind Cluster Agent Charts.
- Already authenticated with your target registry
Step 1. Sync Images to Your Registry
Set your credentials and target registry, then run the script to authenticate with the Upwind registry and sync the images
#!/usr/bin/env bash
set -euo pipefail

UPWIND_CLIENT_ID=<clientID>
UPWIND_CLIENT_SECRET=<clientSecret>
TARGET_REGISTRY=<localhost:5001> # your private registry

# Obtain an access token
UPWIND_REGISTRY_PASSWORD=$(
  curl -s \
    --url https://auth.upwind.io/oauth/token \
    --header 'content-type: application/x-www-form-urlencoded' \
    --data grant_type=client_credentials \
    --data audience=https://registry.upwind.io \
    --data client_id=$UPWIND_CLIENT_ID \
    --data client_secret=$UPWIND_CLIENT_SECRET | \
    jq -r '.access_token'
)

# Authenticate with the Upwind registry
echo $UPWIND_REGISTRY_PASSWORD | \
docker login registry.upwind.io \
  --username upwind \
  --password-stdin

# Add Helm repository
helm repo add upwind https://charts.upwind.io/ --force-update && helm repo update

# Get version information
UPWIND_CLUSTER_AGENT_IMAGE_VERSION=$(helm search repo upwind/upwind-cluster-agent -l -o json | jq -r '.[0].app_version')
UPWIND_AGENT_IMAGE_VERSION=$(helm search repo upwind/upwind-agent -l -o json | jq -r '.[0].app_version')

# Sync the multiarch images
cat > cluster_agent_config.yaml <<EOL
version: 1
sync:
- source: registry.upwind.io/images/cluster-agent:${UPWIND_CLUSTER_AGENT_IMAGE_VERSION}
  target: ${TARGET_REGISTRY}/upwind-cluster-agent:${UPWIND_CLUSTER_AGENT_IMAGE_VERSION}
  type: image
EOL
regsync once -c cluster_agent_config.yaml

cat > agent_config.yaml <<EOL
version: 1
sync:
- source: registry.upwind.io/images/agent:${UPWIND_AGENT_IMAGE_VERSION}
  target: ${TARGET_REGISTRY}/upwind-agent:${UPWIND_AGENT_IMAGE_VERSION}
  type: image
EOL
regsync once -c agent_config.yaml
Step 2. Deploy Upwind
- Cloud
- BYOC
Install the Upwind Cluster Manager
- Kubernetes Secret
- Inline Values
helm install upwind-cluster-agent upwind/upwind-cluster-agent \
 --namespace upwind \
 --create-namespace \
 --set credentials.create=false \
 --set credentials.secretName=upwind-secret \
 --set registry=$TARGET_REGISTRY \
 --set image.repository=upwind-cluster-agent
helm install upwind-cluster-agent upwind/upwind-cluster-agent \
 --namespace upwind \
 --create-namespace \
 --set credentials.create=true \
 --set credentials.clientId=$UPWIND_CLIENT_ID \
 --set credentials.clientSecret=$UPWIND_CLIENT_SECRET \
 --set registry=$TARGET_REGISTRY \
 --set image.repository=upwind-cluster-agent
Install the Upwind Sensor
- Kubernetes Secret
- Inline Values
helm install upwind-agent upwind/upwind-agent \
 --namespace upwind \
 --set credentials.create=false \
 --set credentials.secretName=upwind-secret \
 --set registry=$TARGET_REGISTRY \
 --set image.repository=upwind-agent
helm install upwind-agent upwind/upwind-agent \
 --namespace upwind \
 --set credentials.create=true \
 --set credentials.clientId=$UPWIND_CLIENT_ID \
 --set credentials.clientSecret=$UPWIND_CLIENT_SECRET \
 --set registry=$TARGET_REGISTRY \
 --set image.repository=upwind-agent
Install the Upwind Cluster Manager
- Kubernetes Secret
- Inline Values
helm install upwind-cluster-agent upwind/upwind-cluster-agent \
 --namespace upwind \
 --create-namespace \
 --set credentials.create=false \
 --set credentials.secretName=upwind-secret \
 --set registry=$TARGET_REGISTRY \
 --set image.repository=upwind-cluster-agent \
 --set byoc.accountID=YOUR-BYOC-ACCOUNT-NAME \
 --set byoc.zone=YOUR-BYOC-ZONE
helm install upwind-cluster-agent upwind/upwind-cluster-agent \
 --namespace upwind \
 --create-namespace \
 --set credentials.create=true \
 --set credentials.clientId=$UPWIND_CLIENT_ID \
 --set credentials.clientSecret=$UPWIND_CLIENT_SECRET \
 --set registry=$TARGET_REGISTRY \
 --set image.repository=upwind-cluster-agent \
 --set byoc.accountID=YOUR-BYOC-ACCOUNT-NAME \
 --set byoc.zone=YOUR-BYOC-ZONE
Install the Upwind Sensor
- Kubernetes Secret
- Inline Values
helm install upwind-agent upwind/upwind-agent \
 --namespace upwind \
 --set credentials.create=false \
 --set credentials.secretName=upwind-secret \
 --set registry=$TARGET_REGISTRY \
 --set image.repository=upwind-agent \
 --set byoc.accountID=YOUR-BYOC-ACCOUNT-NAME \
 --set byoc.zone=YOUR-BYOC-ZONE
helm install upwind-agent upwind/upwind-agent \
 --namespace upwind \
 --set credentials.create=true \
 --set credentials.clientId=$UPWIND_CLIENT_ID \
 --set credentials.clientSecret=$UPWIND_CLIENT_SECRET \
 --set registry=$TARGET_REGISTRY \
 --set image.repository=upwind-agent \
 --set byoc.accountID=YOUR-BYOC-ACCOUNT-NAME \
 --set byoc.zone=YOUR-BYOC-ZONE
Step 3. Test Connectivity
It is recommended to validate that none of the resources deployed by Upwind are in a Pending/Failed or any other error state, which will prevent Upwind from operating as expected.
Run the following command to validate that all the resources are in a Running state:
kubectl get agent,clusteragent --namespace upwind
Prerequisites
- Helm installed.
- Review Upwind charts.
Step 1. Add Upwind Helm Repository
To add the Helm repository:
helm repo add upwind https://charts.upwind.io/ && helm repo update
Step 2. Deploy Upwind Chart
With the Upwind Helm repository added, you can now deploy Upwind to your cluster. If you are reusing a credential be sure to add it into the UPWIND_CLIENT_ID & UPWIND_CLIENT_SECRET fields.
To install the helm chart, you should execute the install command as follows:
- Kubernetes Secret
- Inline Values
The umbrella chart reads credentials at the upwind-operator subchart scope, so the --set paths are prefixed accordingly:
helm install upwind upwind/upwind \
  --namespace upwind \
  --set upwind-operator.credentials.create=false \
  --set upwind-operator.credentials.name=upwind-secret \
  --set upwind-operator.extraArgs[0]="--dynamic-values-enabled=false" \
  --create-namespace
helm install upwind upwind/upwind \
  --namespace upwind \
  --set upwind-operator.credentials.clientId="${UPWIND_CLIENT_ID}" \
  --set upwind-operator.credentials.clientSecret="${UPWIND_CLIENT_SECRET}" \
  --set upwind-operator.extraArgs[0]="--dynamic-values-enabled=false" \
  --create-namespace
Step 3. Test Connectivity
It is recommended to validate that none of the resources deployed by Upwind are in a Pending/Failed or any other error state, which will prevent Upwind from operating as expected.
Run the following command to validate that all the resources are in a Running state:
kubectl get agent,clusteragent --namespace upwind
Amazon Elastic Kubernetes Services (Amazon EKS) is a managed container service to run and scale Kubernetes applications in the AWS cloud. In collaboration with Amazon EKS, Upwind provides a Runtime Security for Kubernetes add-on that enables customers to effortlessly deploy and configure the Upwind Operator, which in turn simplifies the installation of the Upwind Sensor.
Prerequisites
- Subscribe to Upwind Runtime-Powered Cloud Security Platform on AWS Marketplace.
- Install the following tools: kubectl , AWS CLI , and optionally eksctl .
- An existing Amazon EKS cluster . To deploy one, see Getting started with Amazon EKS .
Step 1. Create a Kubernetes Secret
The EKS Add-on consumes the credentials from a Kubernetes Secret. Unlike the other install methods, the Add-on requires the Secret to be named exactly upwind-operator-client-credentials — the Provide Client Credentials section above uses the generic name upwind-secret, so you'll need a different kubectl create secret command here.
-
Authenticate with your Kubernetes cluster using
kubectl. -
Create a namespace for the add-on:
kubectl create namespace upwind -
Export the credentials and create the Secret. The leading space before each
exportkeeps the credentials out of your shell history:# Upwind Client Credentials
export UPWIND_CLIENT_ID="<redacted>"
export UPWIND_CLIENT_SECRET="<redacted>"
kubectl create secret generic upwind-operator-client-credentials -n upwind \
--from-literal=clientId="$UPWIND_CLIENT_ID" \
--from-literal=clientSecret="$UPWIND_CLIENT_SECRET"
Step 2. Deploy the EKS Add-on
You can deploy the add-on using the Amazon EKS console , the AWS CLI , or eksctl . The add-on checks for an active subscription from AWS Marketplace and then initializes the resources in your Amazon EKS cluster.
- AWS Management Console
- AWS CLI
- eksctl
To deploy the add-on using the AWS Management Console
-
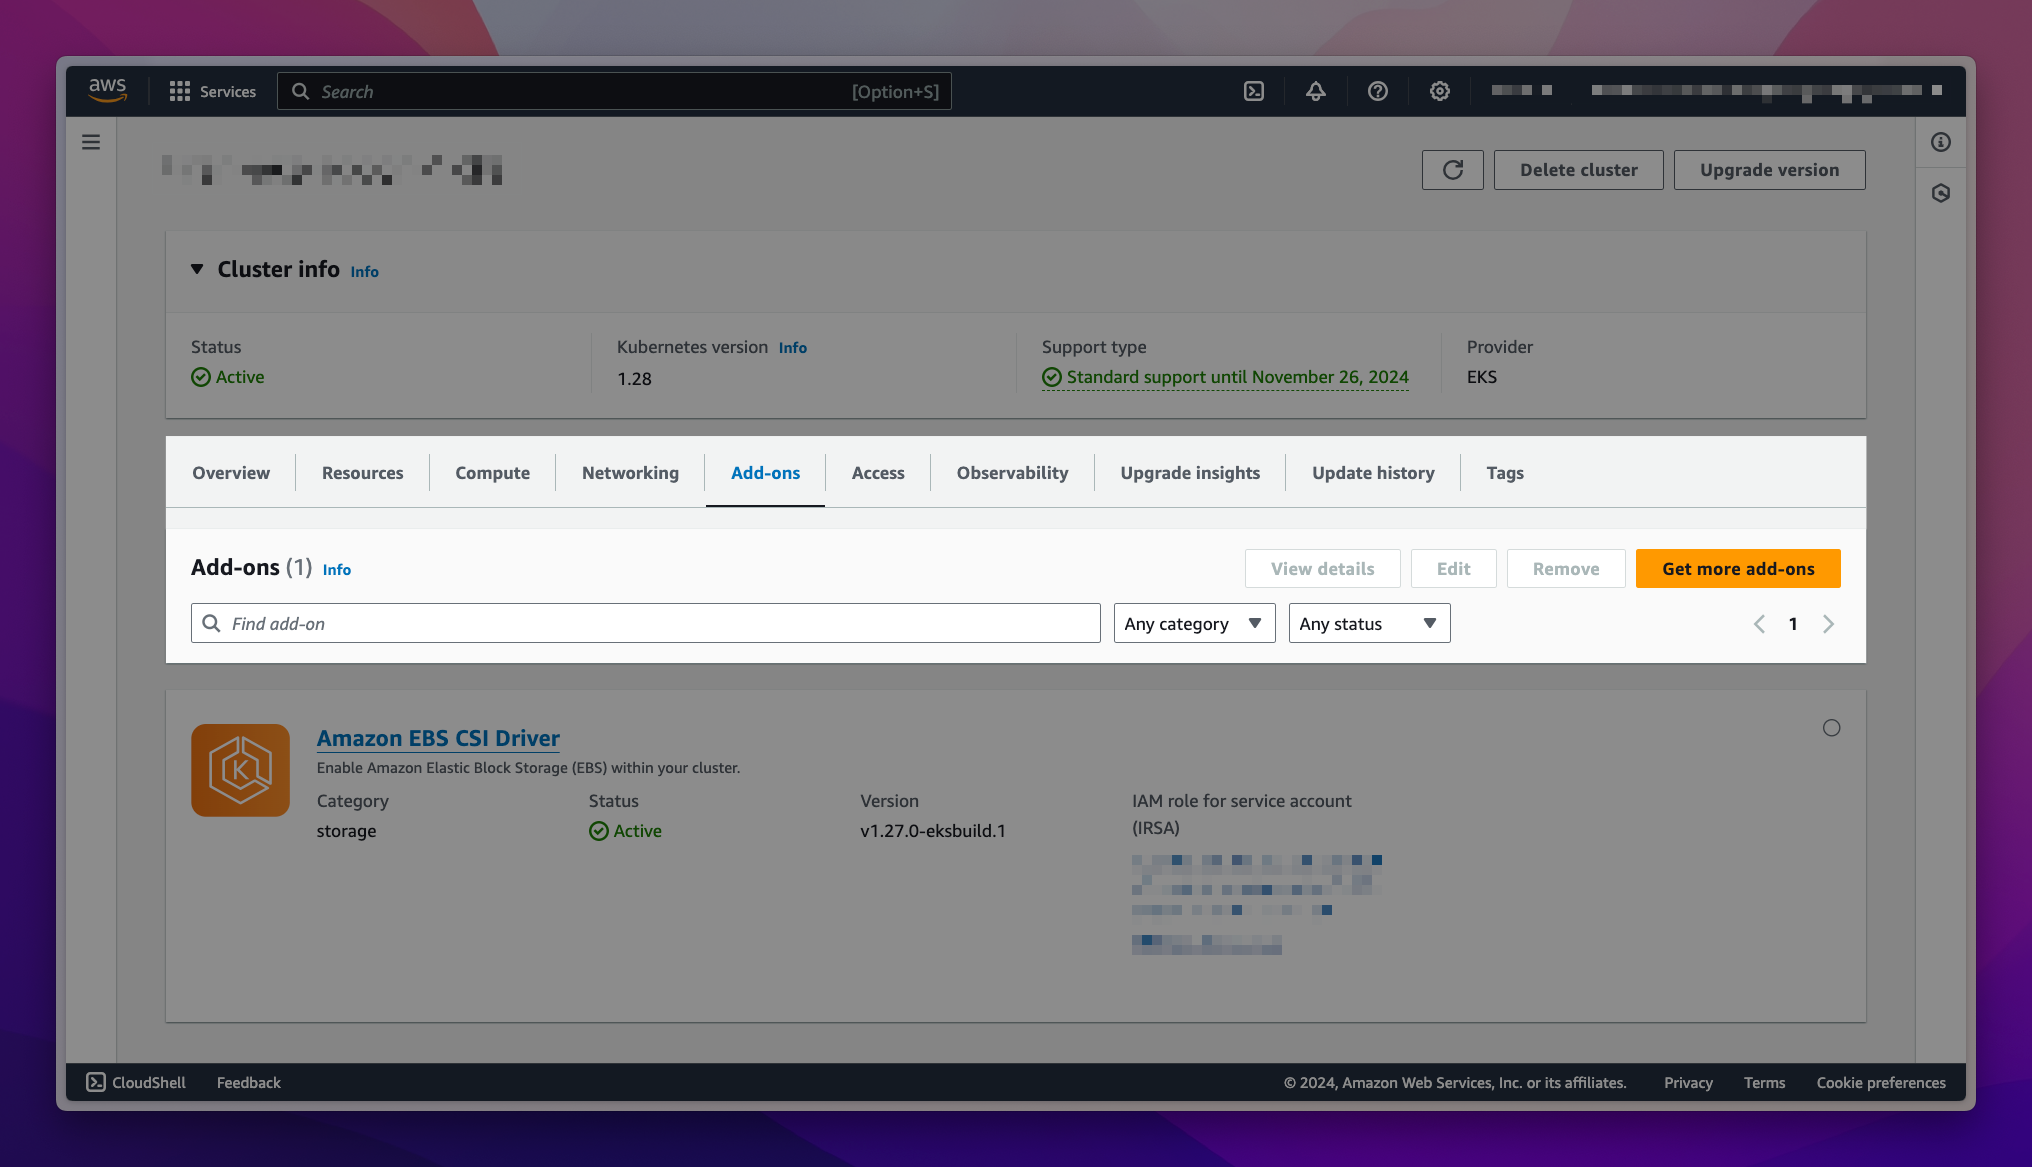
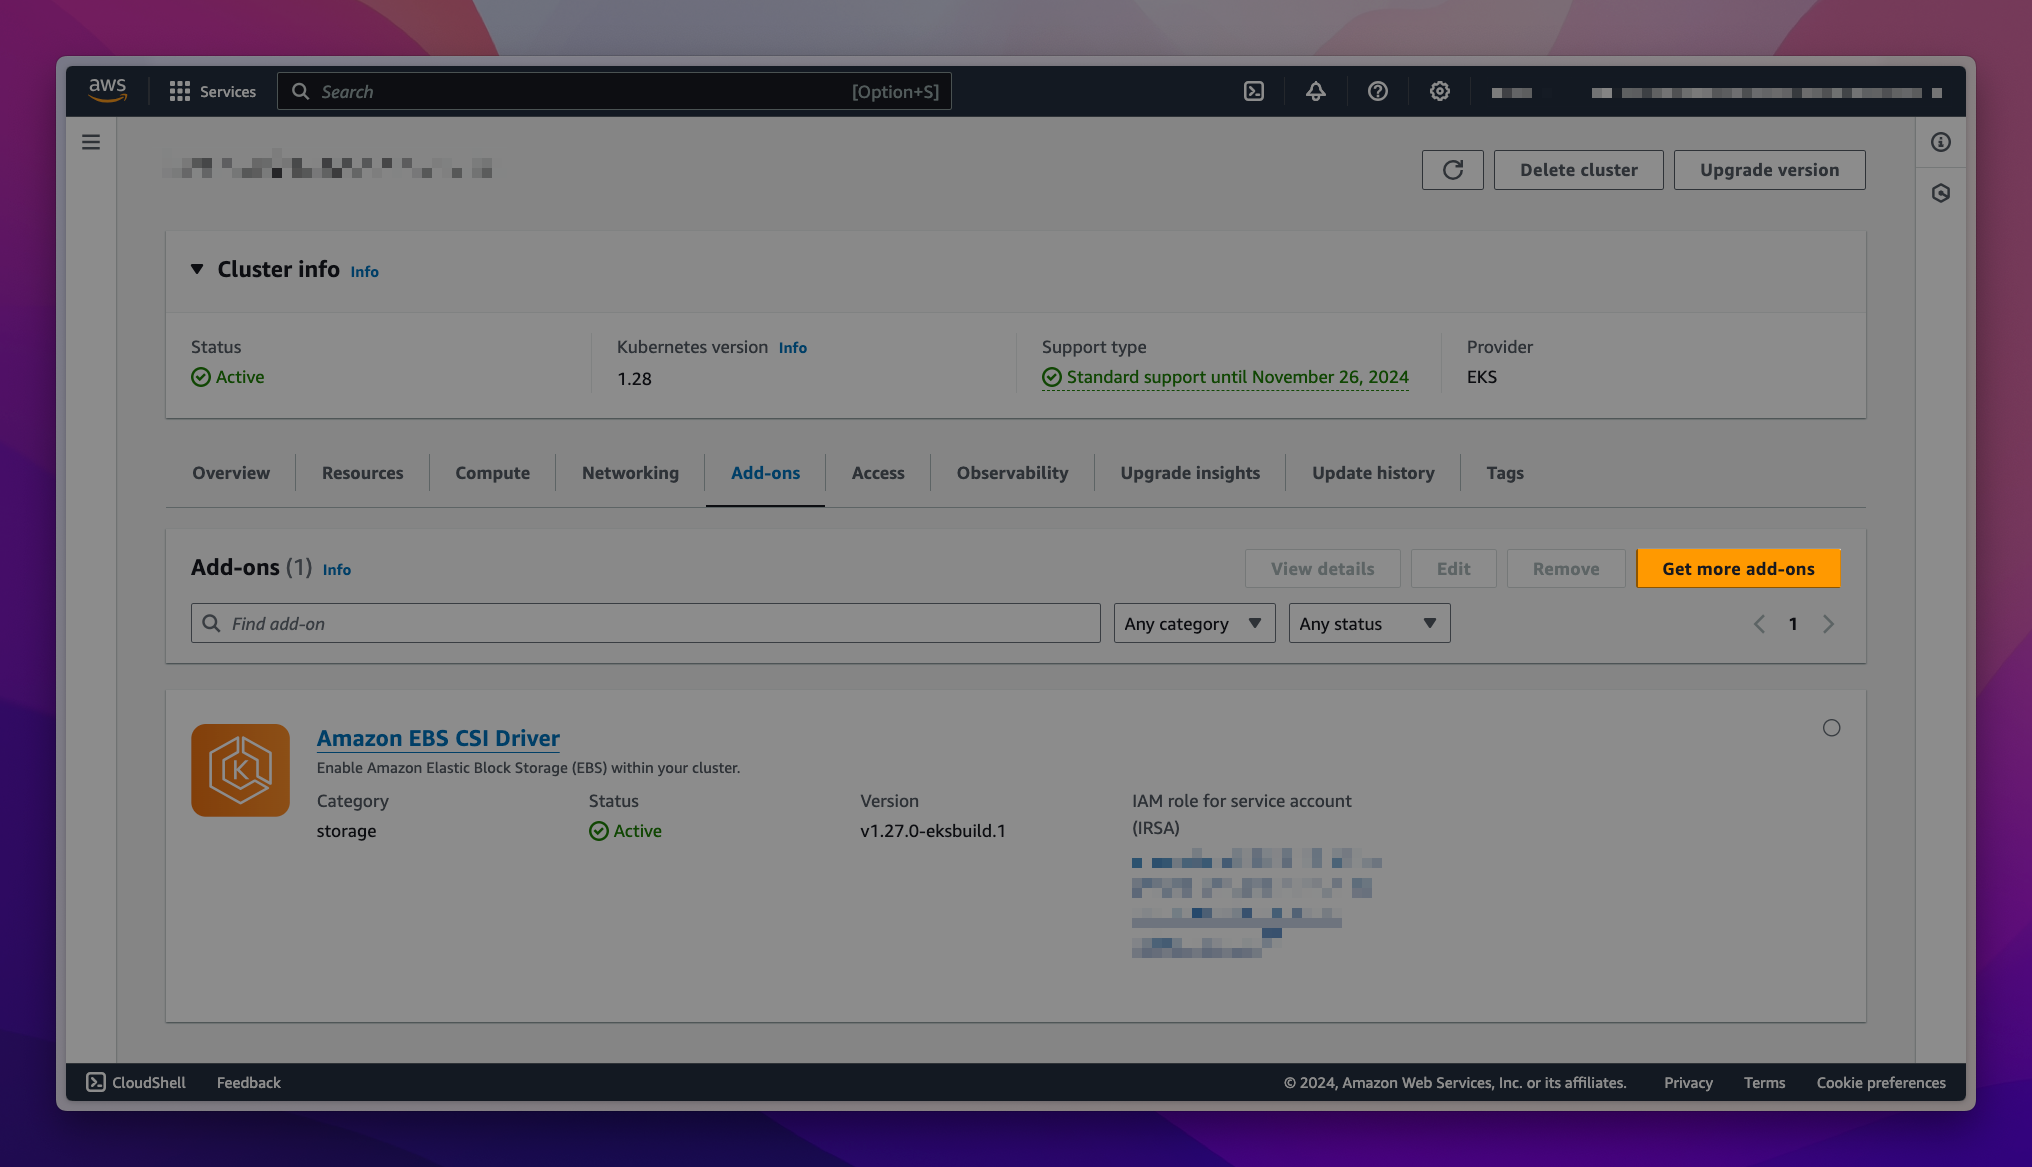
Navigate to the Amazon EKS Console . In the left navigation pane, select Clusters, and then select the name of the cluster that you want to create the add-on for. On the cluster info page, choose the Add-ons tab.
-
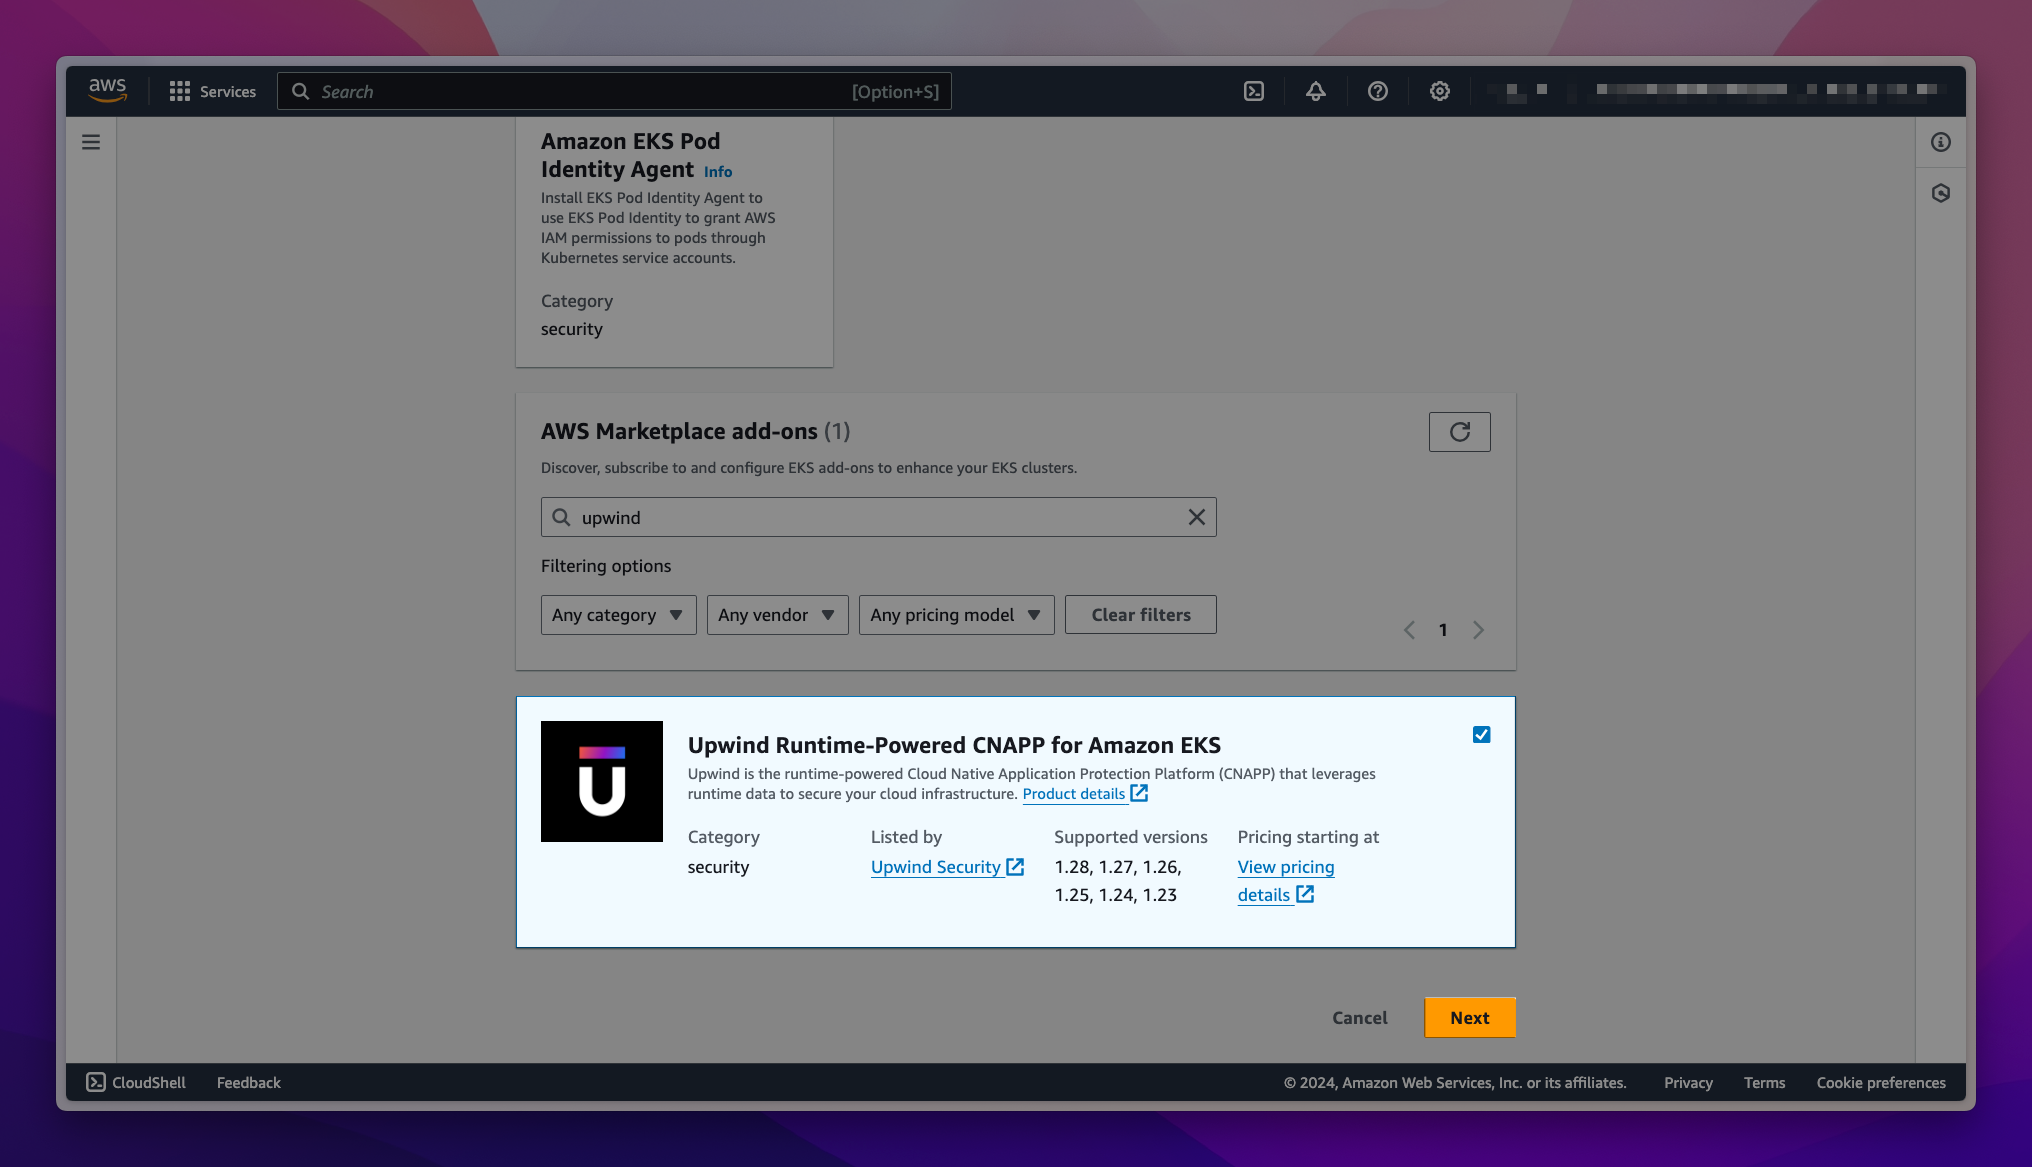
Choose Get more add-ons to explore various add-on software options that can be installed from AWS Marketplace.
-
Scroll down to find the Upwind Runtime-Powered Cloud Security Platform for Amazon EKS and select it. You can also use the search box to locate the add-on. Once you have selected the add-on, choose Next.
-
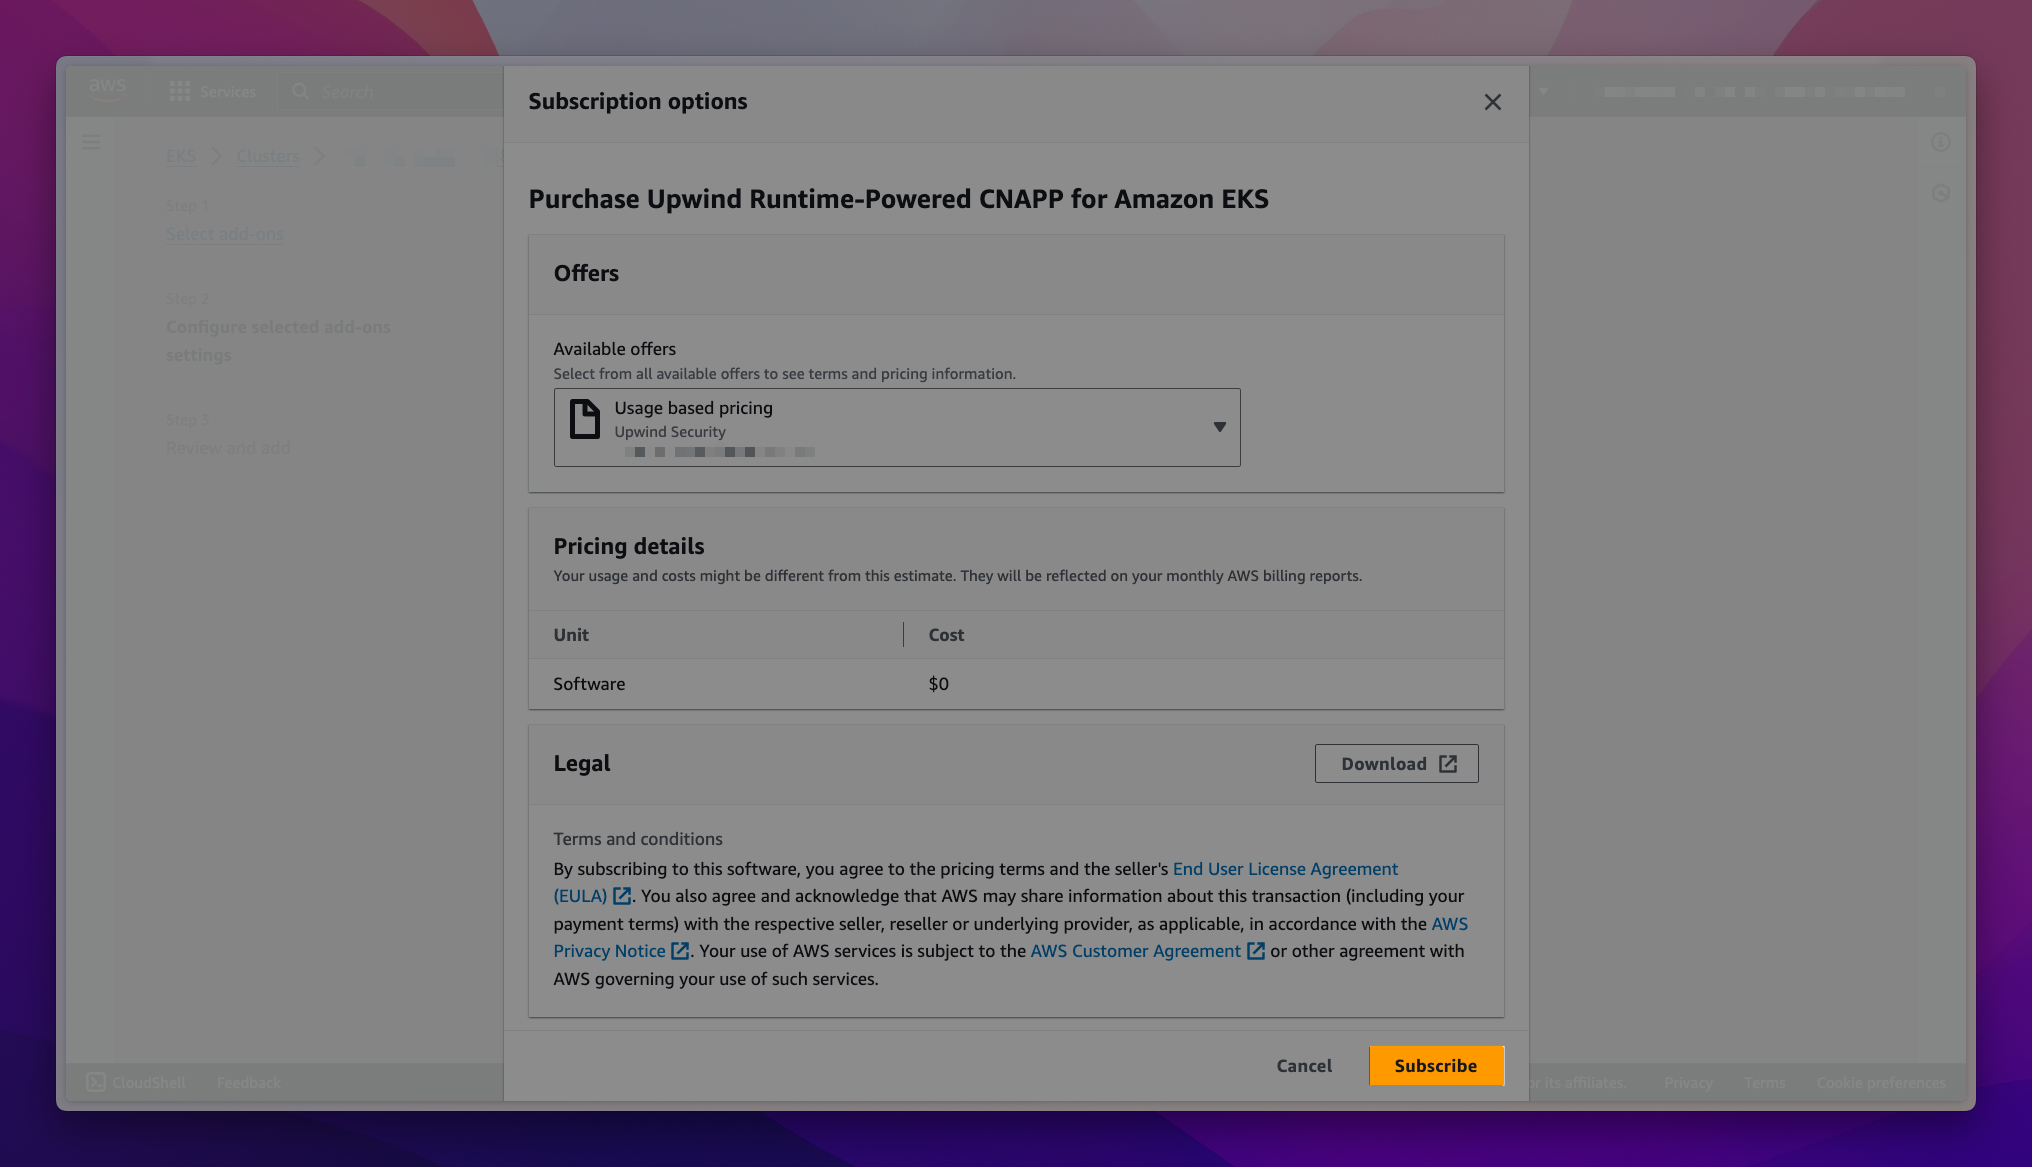
If you do not have subscription to the add-on through the AWS Marketplace, you will see a callout to subscribe to the software on the Configure selected add-ons settings page. Choose View subscription options to open the Subscription options form.
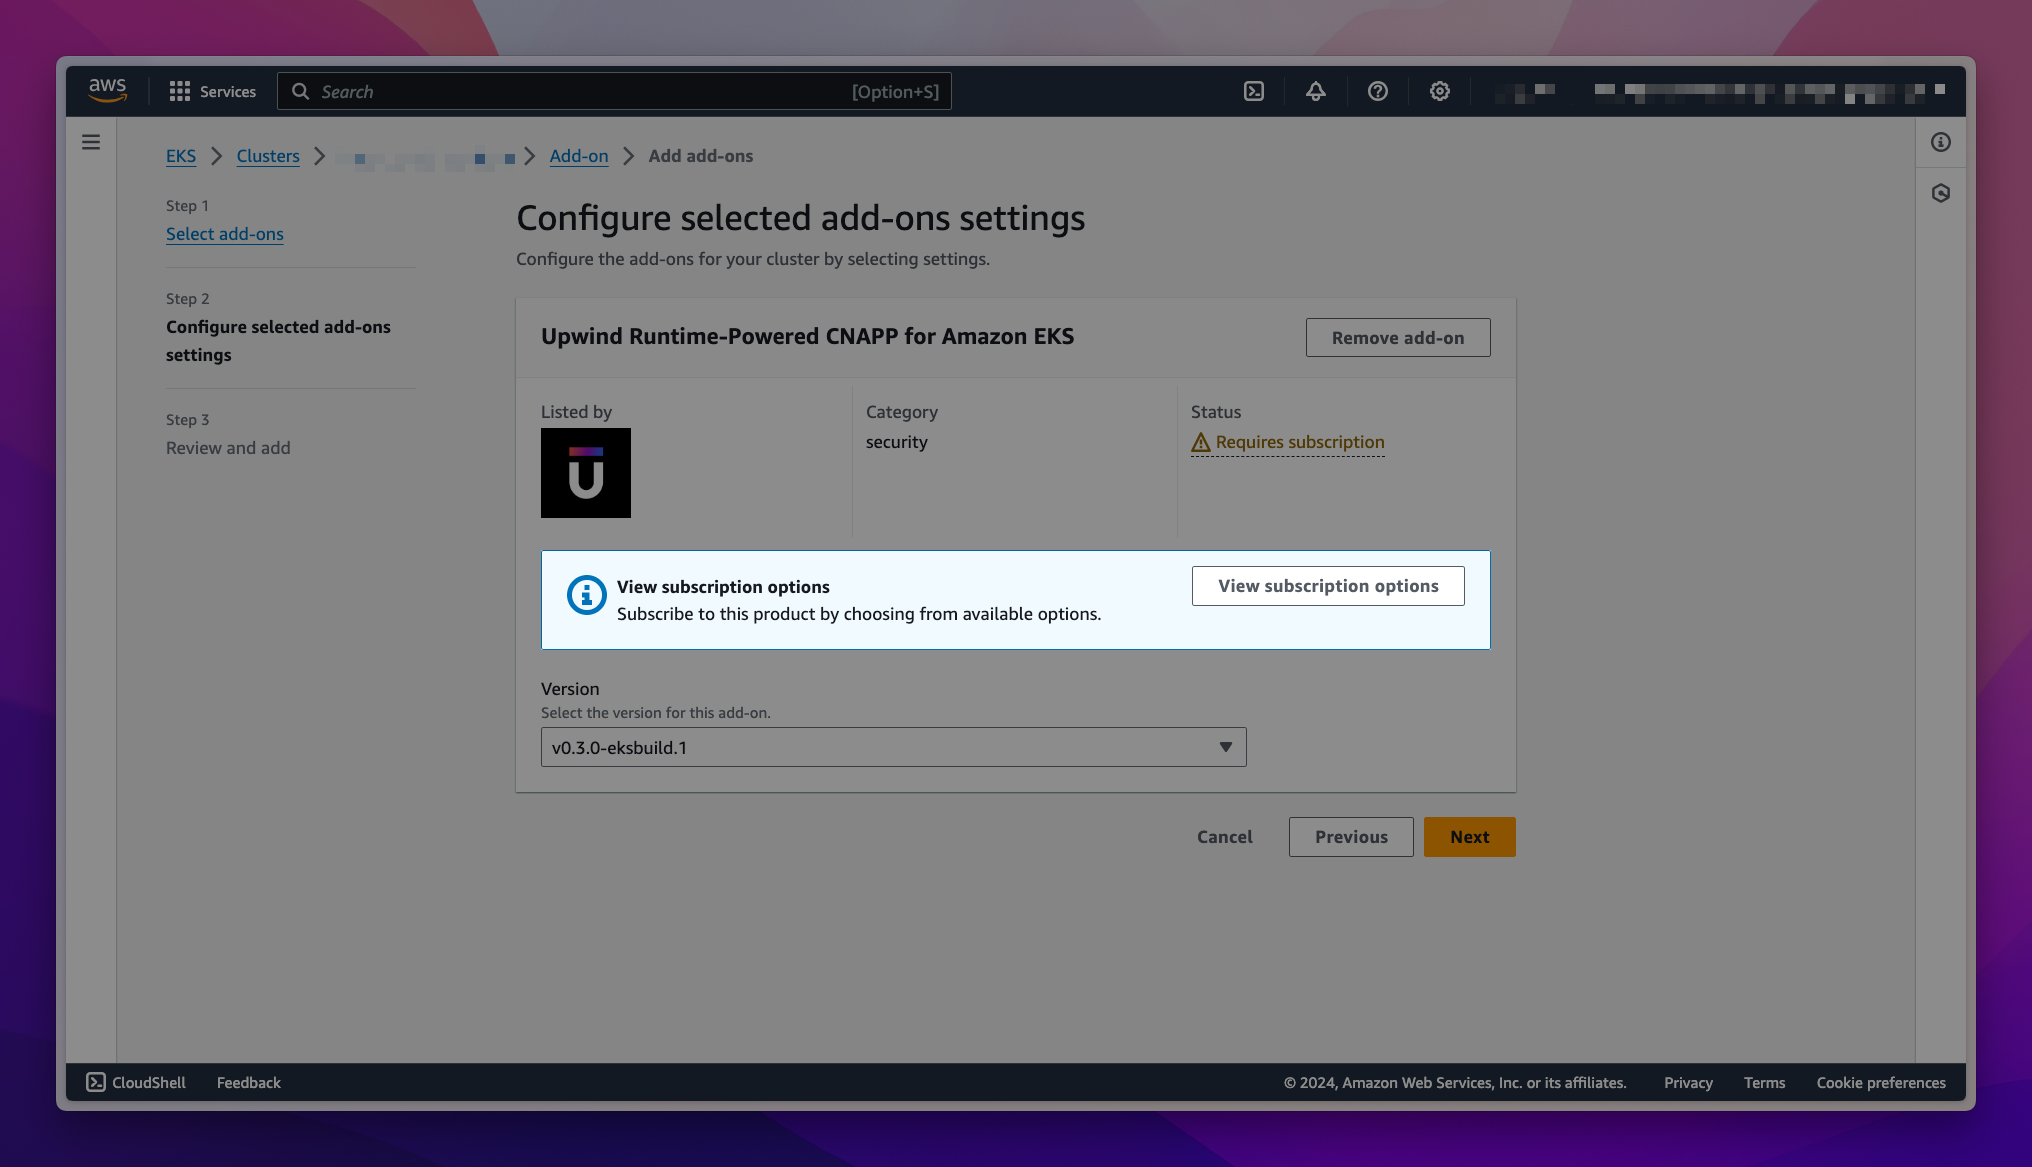
-
Review the information, then choose the Subscribe button to continue.
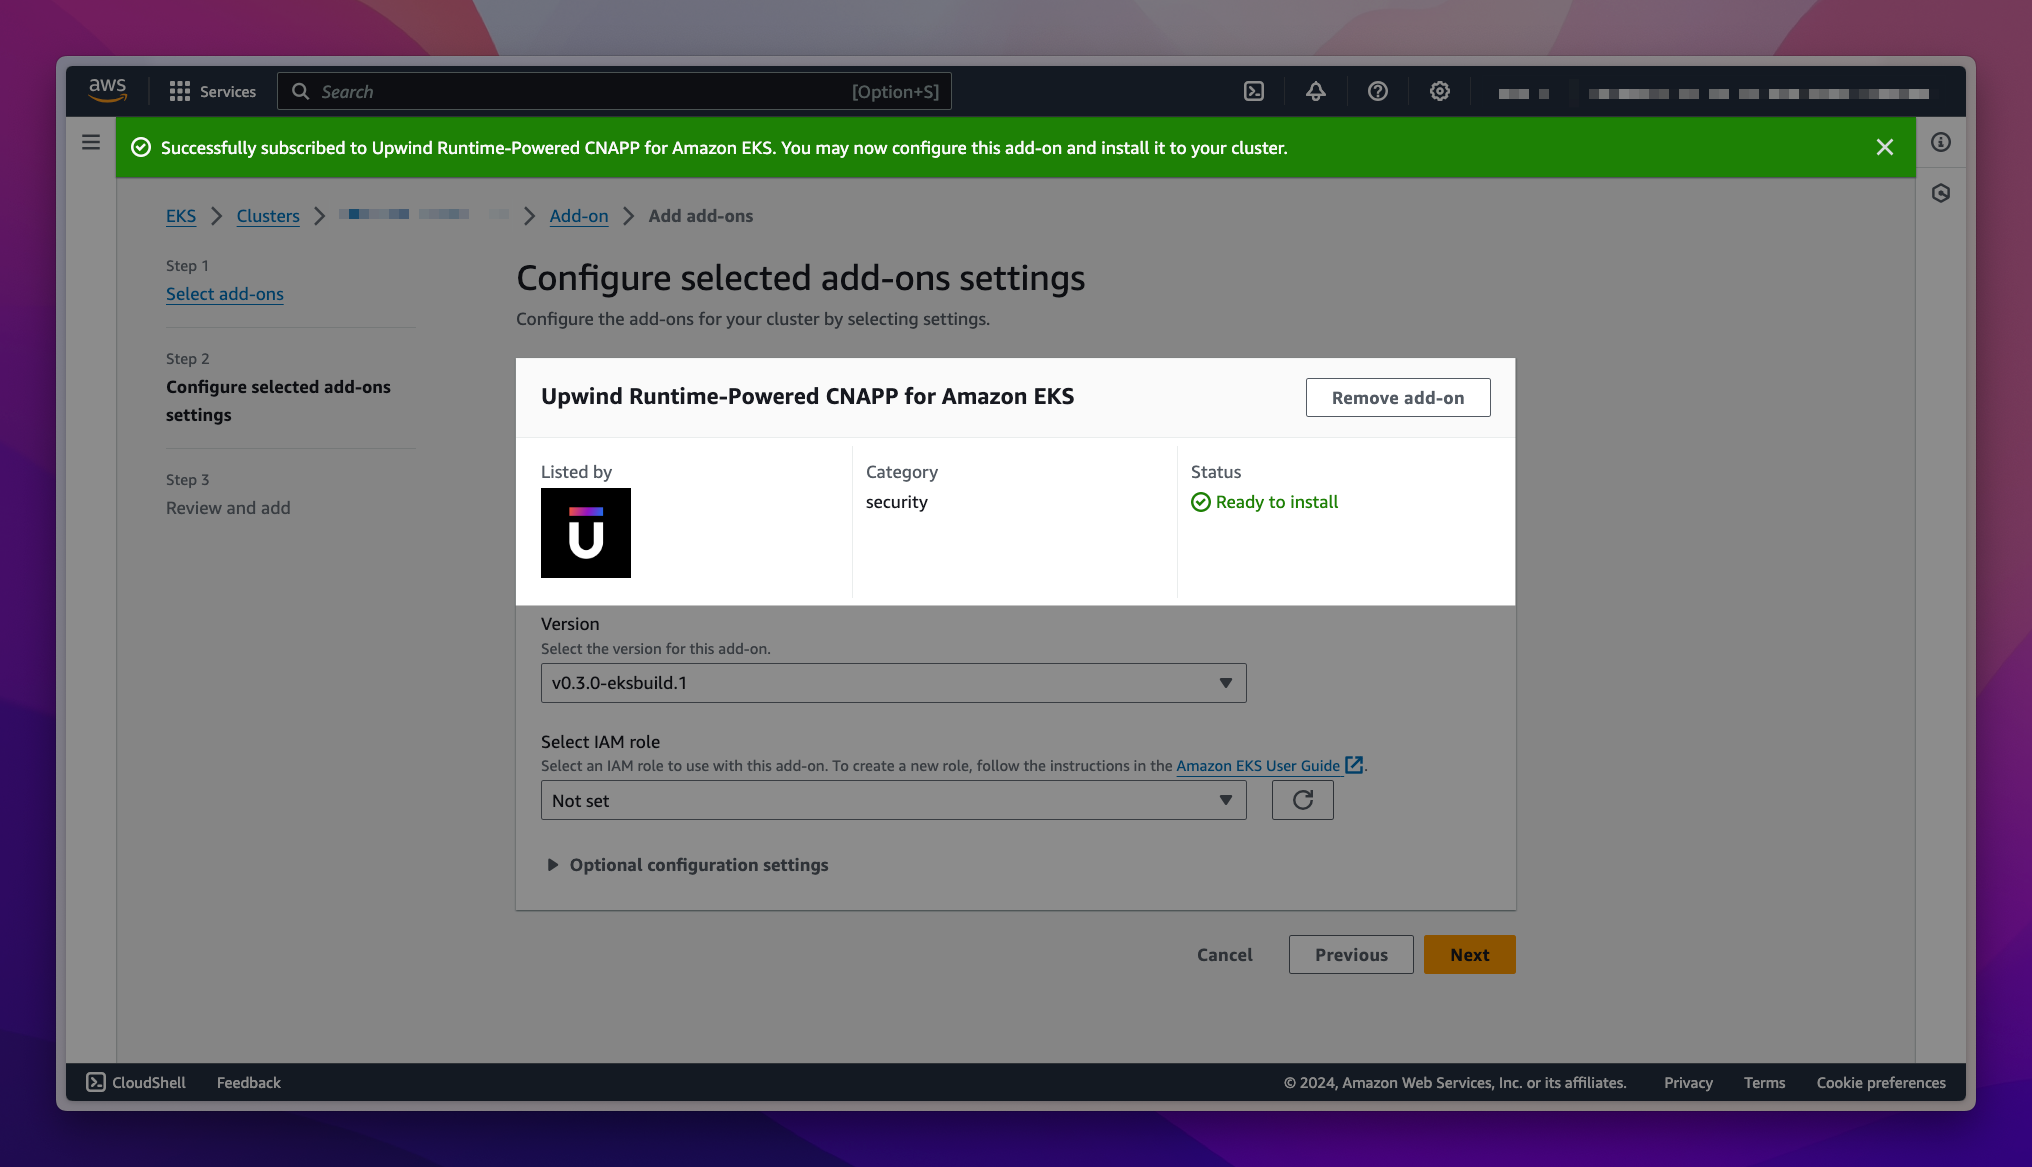
-
Wait for the subscription processing to complete. You will receive a notification when the add-on is ready to be installed. Choose Next when the status changes to Ready to install.
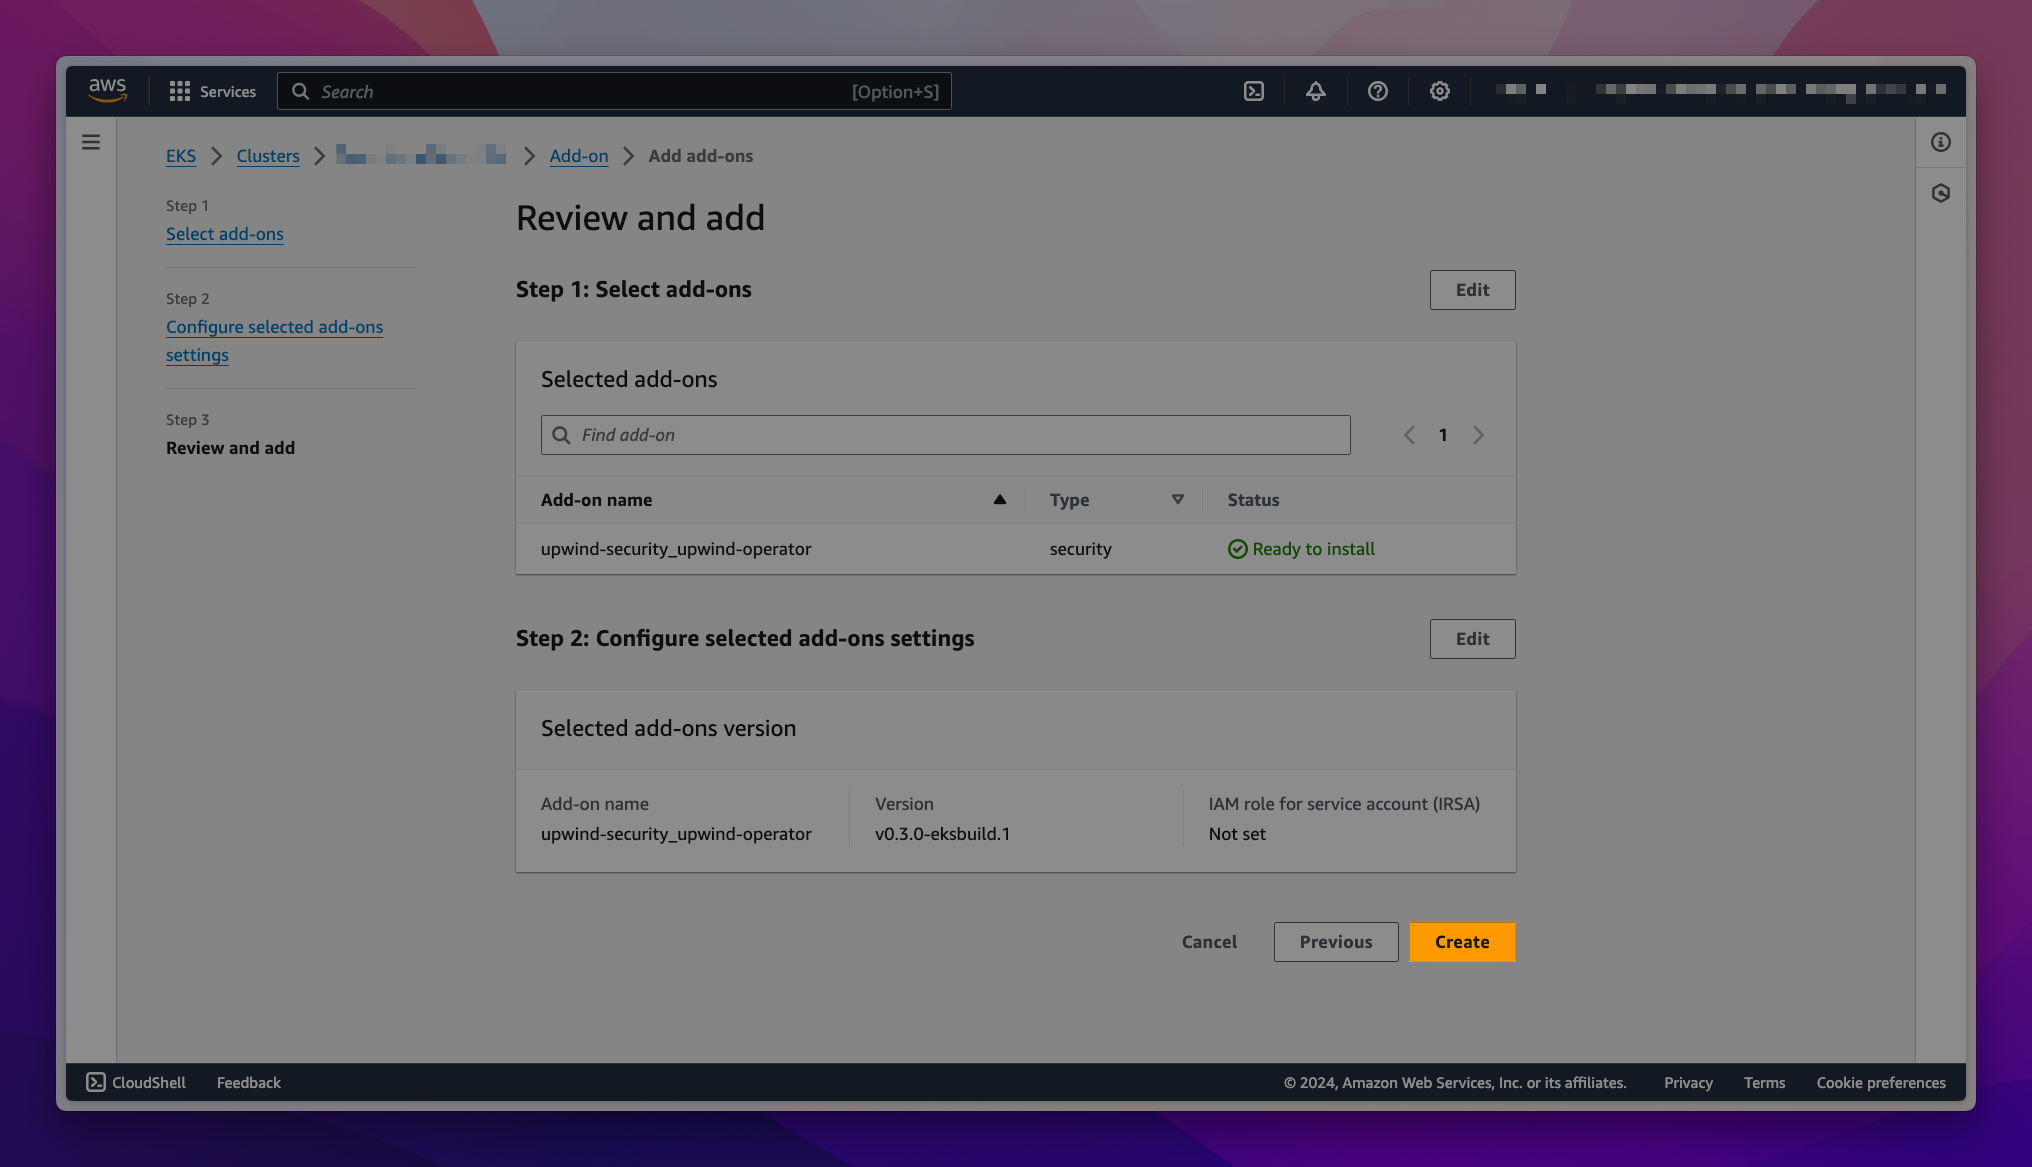
-
On the Review and add page, choose Create. After the add-on installation is complete, you see your installed add-on.
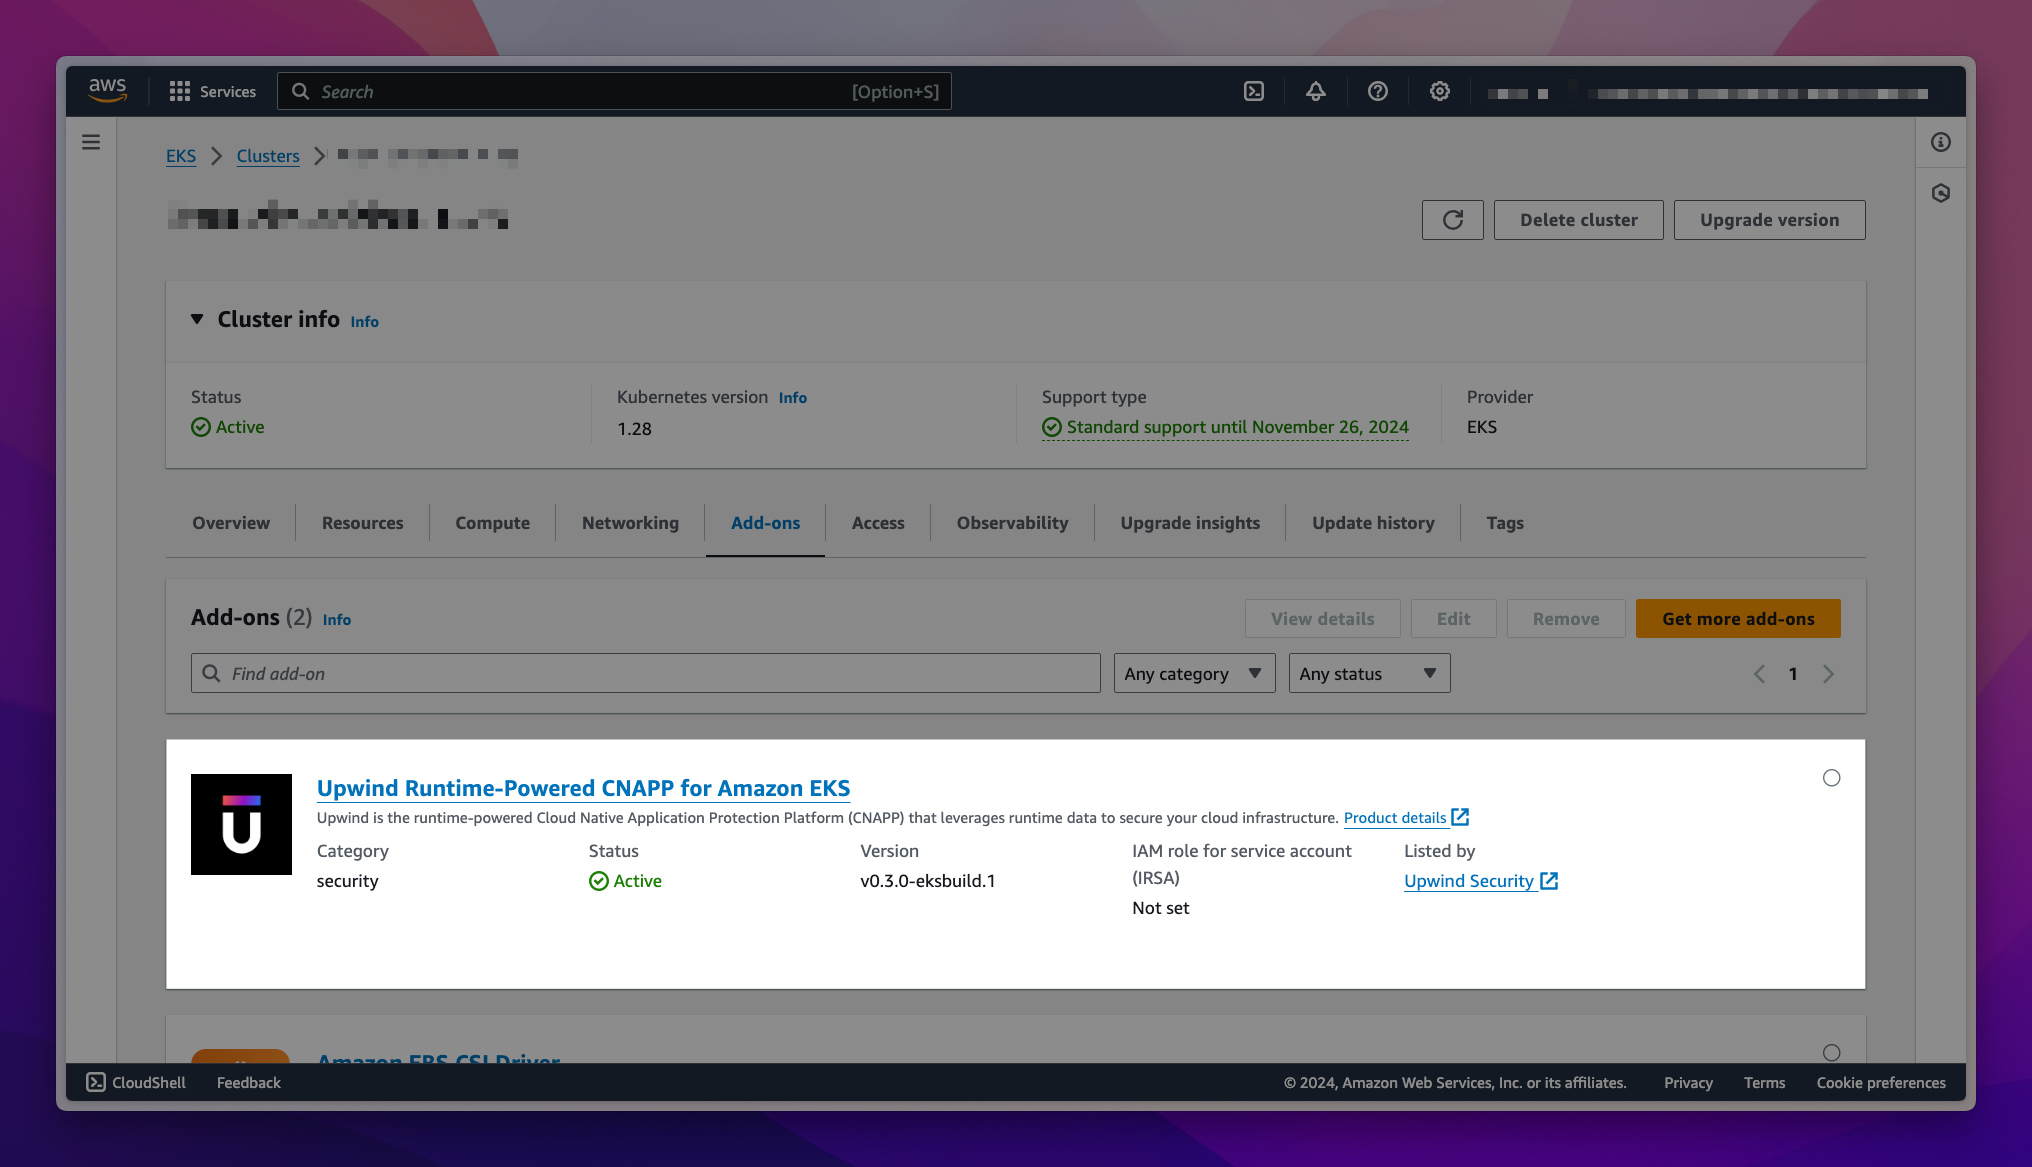
-
The add-on is now deployed.
For more information about deploying directly to Amazon EKS clusters, see the AWS blog post or the official documentation on Managing Amazon EKS add-ons .
To deploy the add-on using the AWS CLI
- Create the add-on by running the following command, replacing
<AWS_EKS_CLUSTER_NAME>with the cluster name:
- Command
- Example output
aws eks create-addon \
  --addon-name upwind-security_upwind-operator \
  --cluster-name <AWS_EKS_CLUSTER_NAME>
{
  "addon": {
    "addonName": "upwind-security_upwind-operator",
    "clusterName": "<AWS_EKS_CLUSTER_NAME>",
    "status": "CREATING",
    "addonVersion": "v0.3.0-eksbuild.1",
    "health": {
      "issues": []
    },
    "addonArn": "arn:aws:eks:<AWS_REGION>:111122223333:addon/<AWS_EKS_CLUSTER_NAME>/upwind-security_upwind-operator/...",
    "createdAt": "2024-01-01T00:00:00.000000+02:00",
    "modifiedAt": "2024-01-01T00:00:00.000000+02:00",
    "tags": {}
  }
}
- Check the status of the deployment by running the following command, replacing
<AWS_EKS_CLUSTER_NAME>with the cluster name:
- Command
- Example output
aws eks describe-addon \
  --addon-name upwind-security_upwind-operator \
  --cluster-name <AWS_EKS_CLUSTER_NAME>
{
  "addon": {
    "addonName": "upwind-security_upwind-operator",
    "clusterName": "<AWS_EKS_CLUSTER_NAME>",
    "status": "ACTIVE",
    "addonVersion": "v0.3.0-eksbuild.1",
    "health": {
      "issues": []
    },
    "addonArn": "arn:aws:eks:<AWS_REGION>:111122223333:addon/<AWS_EKS_CLUSTER_NAME>/upwind-security_upwind-operator/...",
    "createdAt": "2024-01-01T00:00:00.000000+02:00",
    "modifiedAt": "2024-01-01T00:00:00.000000+02:00",
    "tags": {}
  }
}
The deployment is complete when the status is ACTIVE.
To deploy the add-on using eksctl
- Create the add-on by running the following command, replacing
<AWS_EKS_CLUSTER_NAME>with the cluster name:
- Command
- Example output
eksctl create addon \
  --name upwind-security_upwind-operator \
  --cluster <AWS_EKS_CLUSTER_NAME>
2024-01-01 00:00:00 [ℹ]  Kubernetes version "1.nn" in use by cluster "<AWS_EKS_CLUSTER_NAME>"
2024-01-01 00:00:00 [ℹ]  no recommended policies found, proceeding without any IAM
2024-01-01 00:00:00 [ℹ]  creating addon
2024-01-01 00:01:00 [ℹ]  addon "upwind-security_upwind-operator" active
- Check the status of the deployment by running the following command, replacing
<AWS_EKS_CLUSTER_NAME>with the cluster name:
- Command
- Example output
eksctl get addon \
--name upwind-security_upwind-operator \
--cluster <AWS_EKS_CLUSTER_NAME>
2024-01-01 00:01:00 [ℹ]  Kubernetes version "1.nn" in use by cluster "<AWS_EKS_CLUSTER_NAME>"
NAME				VERSION			STATUS	ISSUES	IAMROLE	UPDATE AVAILABLE	CONFIGURATION VALUES
upwind-security_upwind-operator	v0.3.0-eksbuild.1	ACTIVE	0
The deployment is complete when the status is ACTIVE.
Google Kubernetes Engine (GKE) Autopilot is a mode of operation in GKE that reduces the operational cost of managing clusters while optimizing your applications for production. This guide will help you install Upwind on a GKE Autopilot cluster.
Prerequisites
- Ensure that you have an active Google Cloud account .
- Ensure that you have an existing GKE Autopilot cluster with version
1.32.1-gke.1376000or later to use the new allowlisting system. To deploy one, see the Create an Autopilot Cluster user guide. - Ensure that you have installed the following tools: kubectl , Google Cloud CLI (gcloud) , and Helm .
Step 1. Configure Cluster Access
Before proceeding with the installation, you need to configure your local environment to communicate with your GKE Autopilot cluster. The following command will:
- Fetch cluster credentials from Google Cloud
- Configure your local kubeconfig file (
~/.kube/config) - Allow kubectl to authenticate and communicate with your GKE cluster
gcloud container clusters get-credentials <CLUSTER_NAME> \
  --region <REGION> \
  --project <PROJECT_ID>
After running this command, kubectl will be configured to use your GKE Autopilot cluster as the current context.
You can verify your connection by running:
kubectl cluster-info
This should display your cluster's control plane and CoreDNS service endpoints.
Step 2. Add Upwind Helm Repository
helm repo add upwind https://charts.upwind.io/ && helm repo update
Step 3. Deploy Upwind Operator
Install Upwind using Helm with specific configurations for GKE Autopilot:
- Kubernetes Secret
- Inline Values
helm install upwind-operator upwind/upwind-operator \
    --namespace upwind \
    --set credentials.create=false \
    --set credentials.name=upwind-secret \
    --set agent.values.providers.gke.autopilot.enabled=true \
    --set agent.values.docker.enabled=false \
    --create-namespace
helm install upwind-operator upwind/upwind-operator \
    --namespace upwind \
    --set credentials.clientId="${UPWIND_CLIENT_ID}" \
    --set credentials.clientSecret="${UPWIND_CLIENT_SECRET}" \
    --set agent.values.providers.gke.autopilot.enabled=true \
    --set agent.values.docker.enabled=false \
    --create-namespace
GKE Autopilot enforces stricter security and operational constraints compared to Standard GKE. The configuration above includes the required settings to meet these requirements. For more information, see GKE Autopilot security measures .
Step 4. Test Connectivity
Validate that all resources are running correctly:
kubectl get agent,clusteragent --namespace upwind
All resources should be in a Running state. If you encounter any issues, check the Troubleshooting guide.
Clean Up
Once the install is complete and you have verified the Sensor is running, clean up any temporary credential artifacts on your local machine. The Secret stored in the cluster is what the Sensor uses at runtime — the local artifacts are no longer needed.
-
If you exported environment variables, unset them so they do not linger in the shell:
unset UPWIND_CLIENT_ID UPWIND_CLIENT_SECRET -
If you created a manifest file (e.g.
upwind-secret.yaml), delete it — or move it into a secrets manager such as Sealed Secrets or External Secrets Operator if you need GitOps-friendly long-term storage:rm -i upwind-secret.yaml
Troubleshooting
If you encounter any issues during the installation process, please refer to the Troubleshooting guide, where you can find a list of possible issues and solutions.