Instructions
Overview
This article outlines the steps to integrate your Google Cloud environment with Upwind. You can choose from three onboarding approaches:
- Organization: Onboard your entire Google Cloud organization (requires organization admin permissions)
- Multiple Folders: Onboard specific folders within your organization (requires organization admin permissions)
- Multiple Projects: Onboard individual projects directly (requires project admin permissions, no organization admin needed)
Integration steps
Choose your onboarding approach:
- Organization
- Multiple Folders
- Project(s)
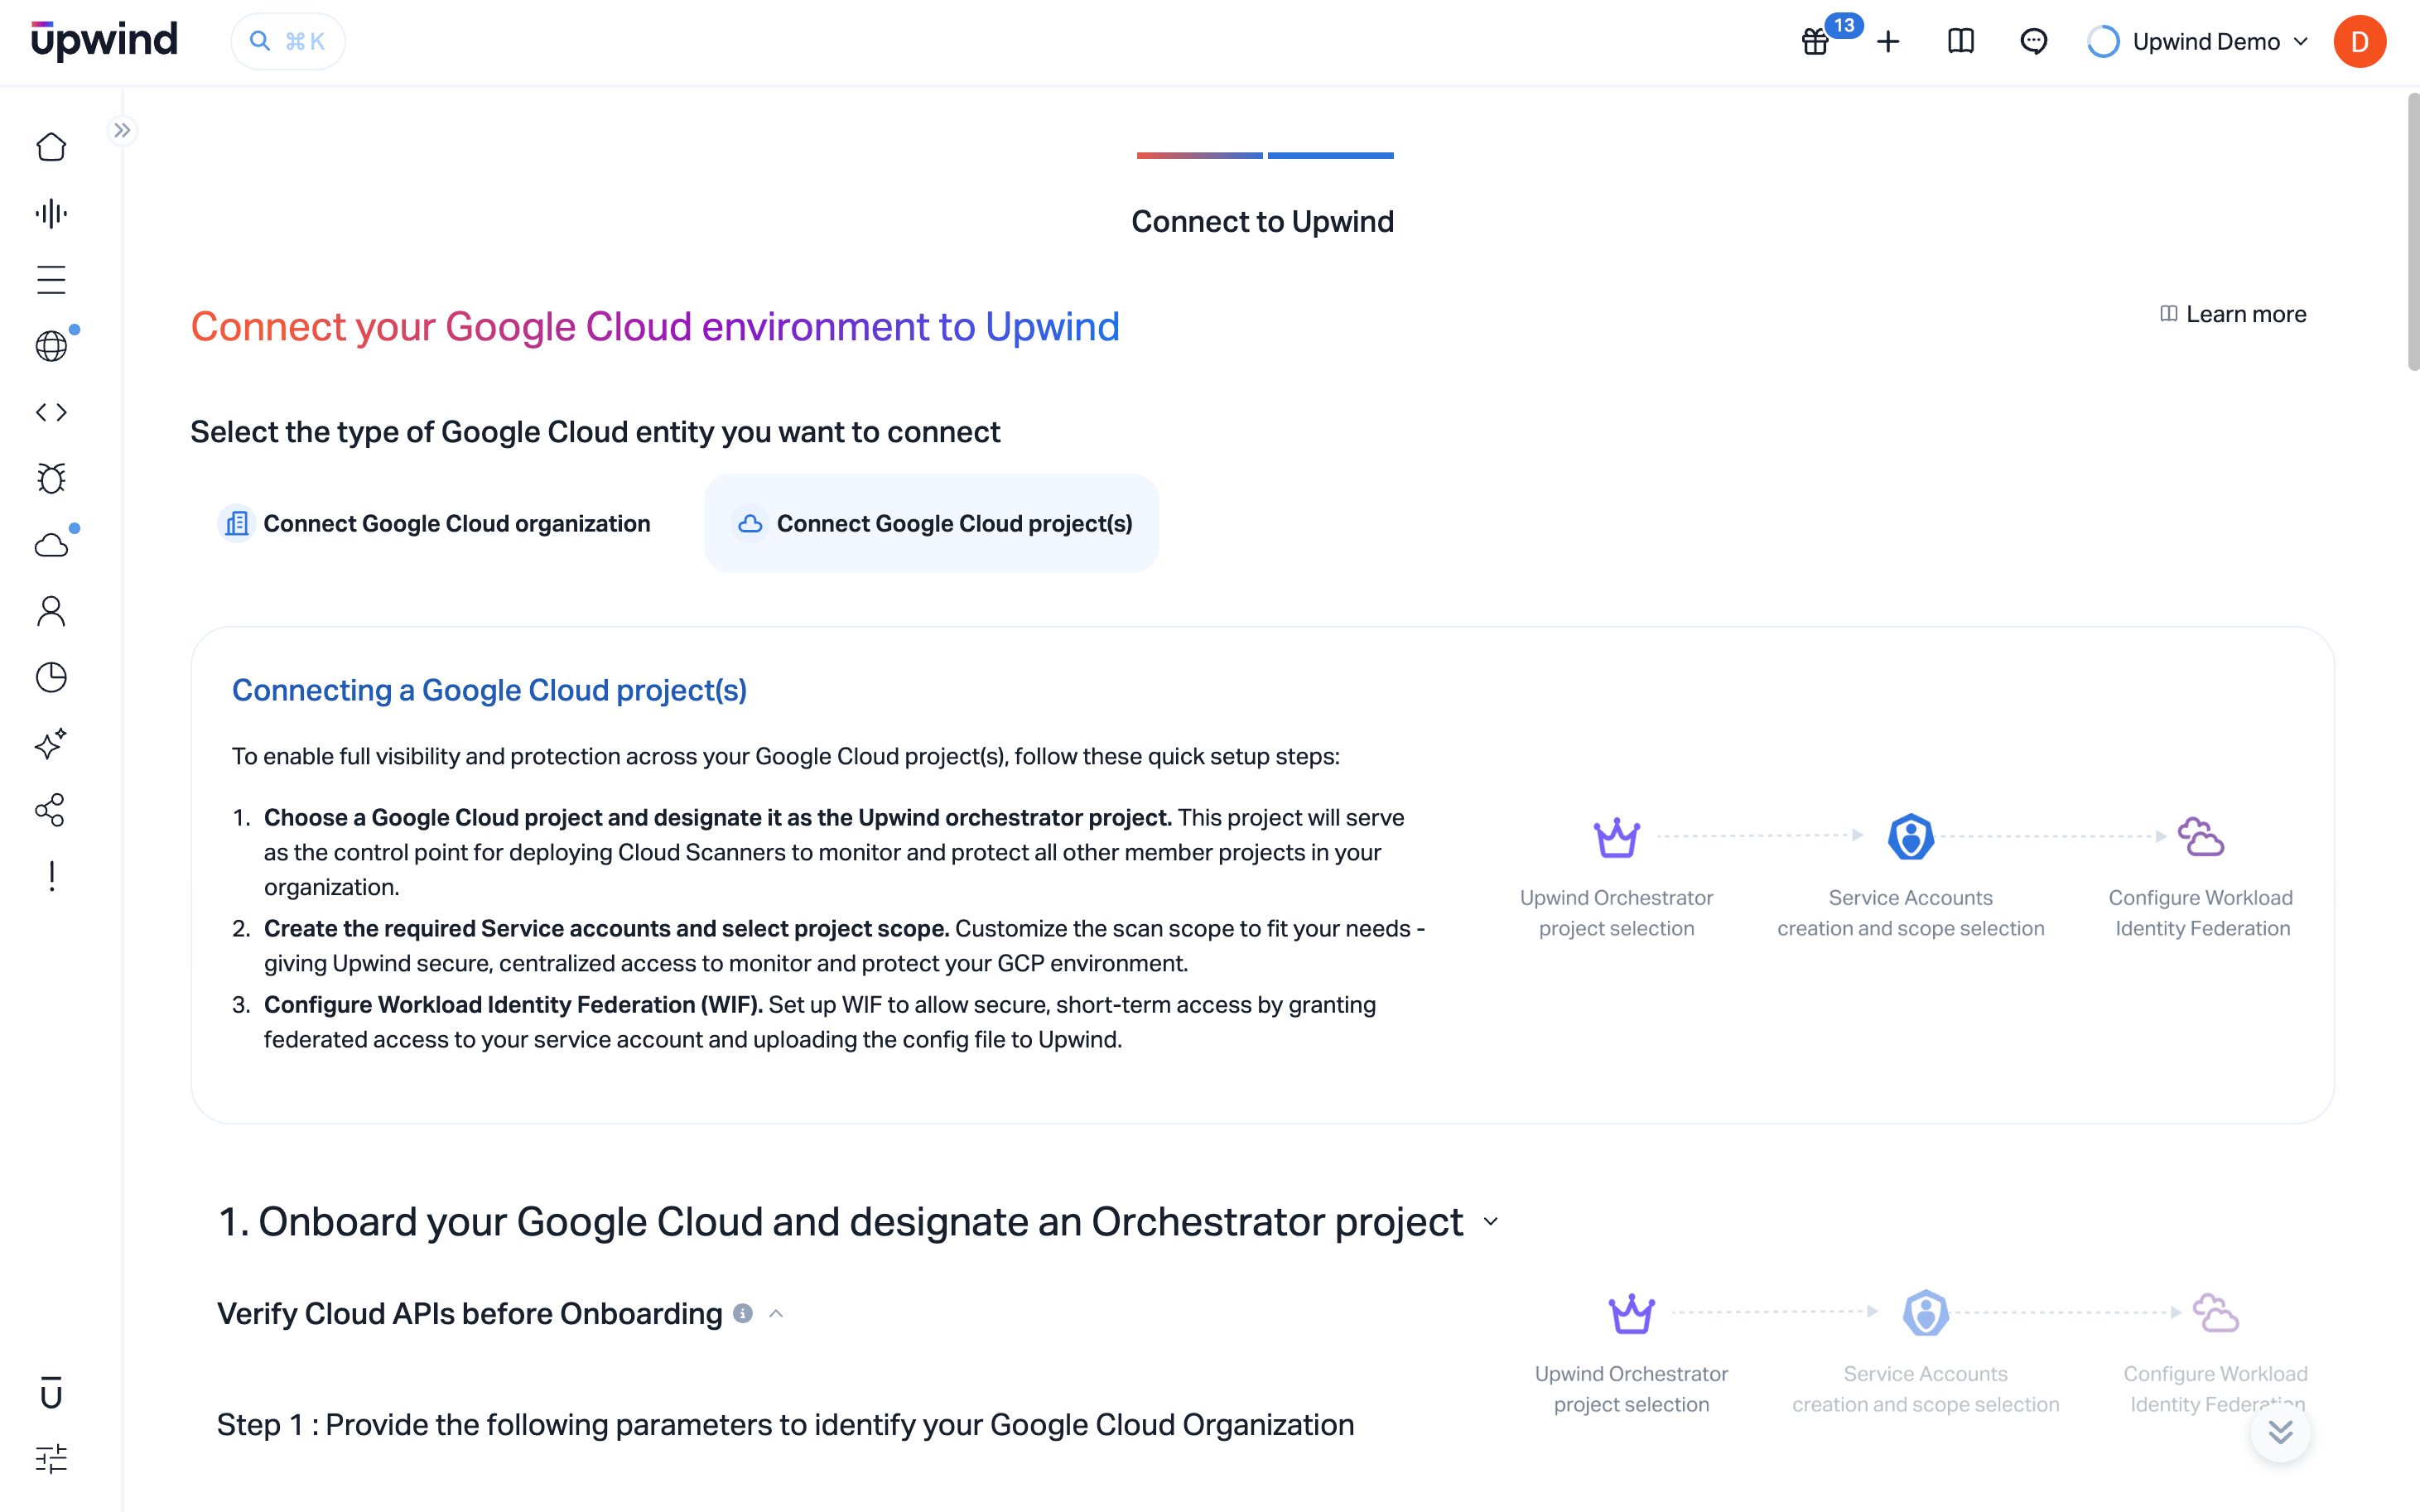
Onboarding a Google Cloud Organization follows these stages:
- Step 1: Selecting the Google Cloud Organization and an Orchestrator project.
- Step 2: Deploying the Terraform module to create the necessary resources.
- Step 3: Generating a Workload Identity Federation (WIF) configuration to allow Upwind to access your Google Cloud Organization and its projects.
- Step 4: Defining which projects you want Upwind to scan.
- (Optional) Step 5: Repeat process for further organizations.
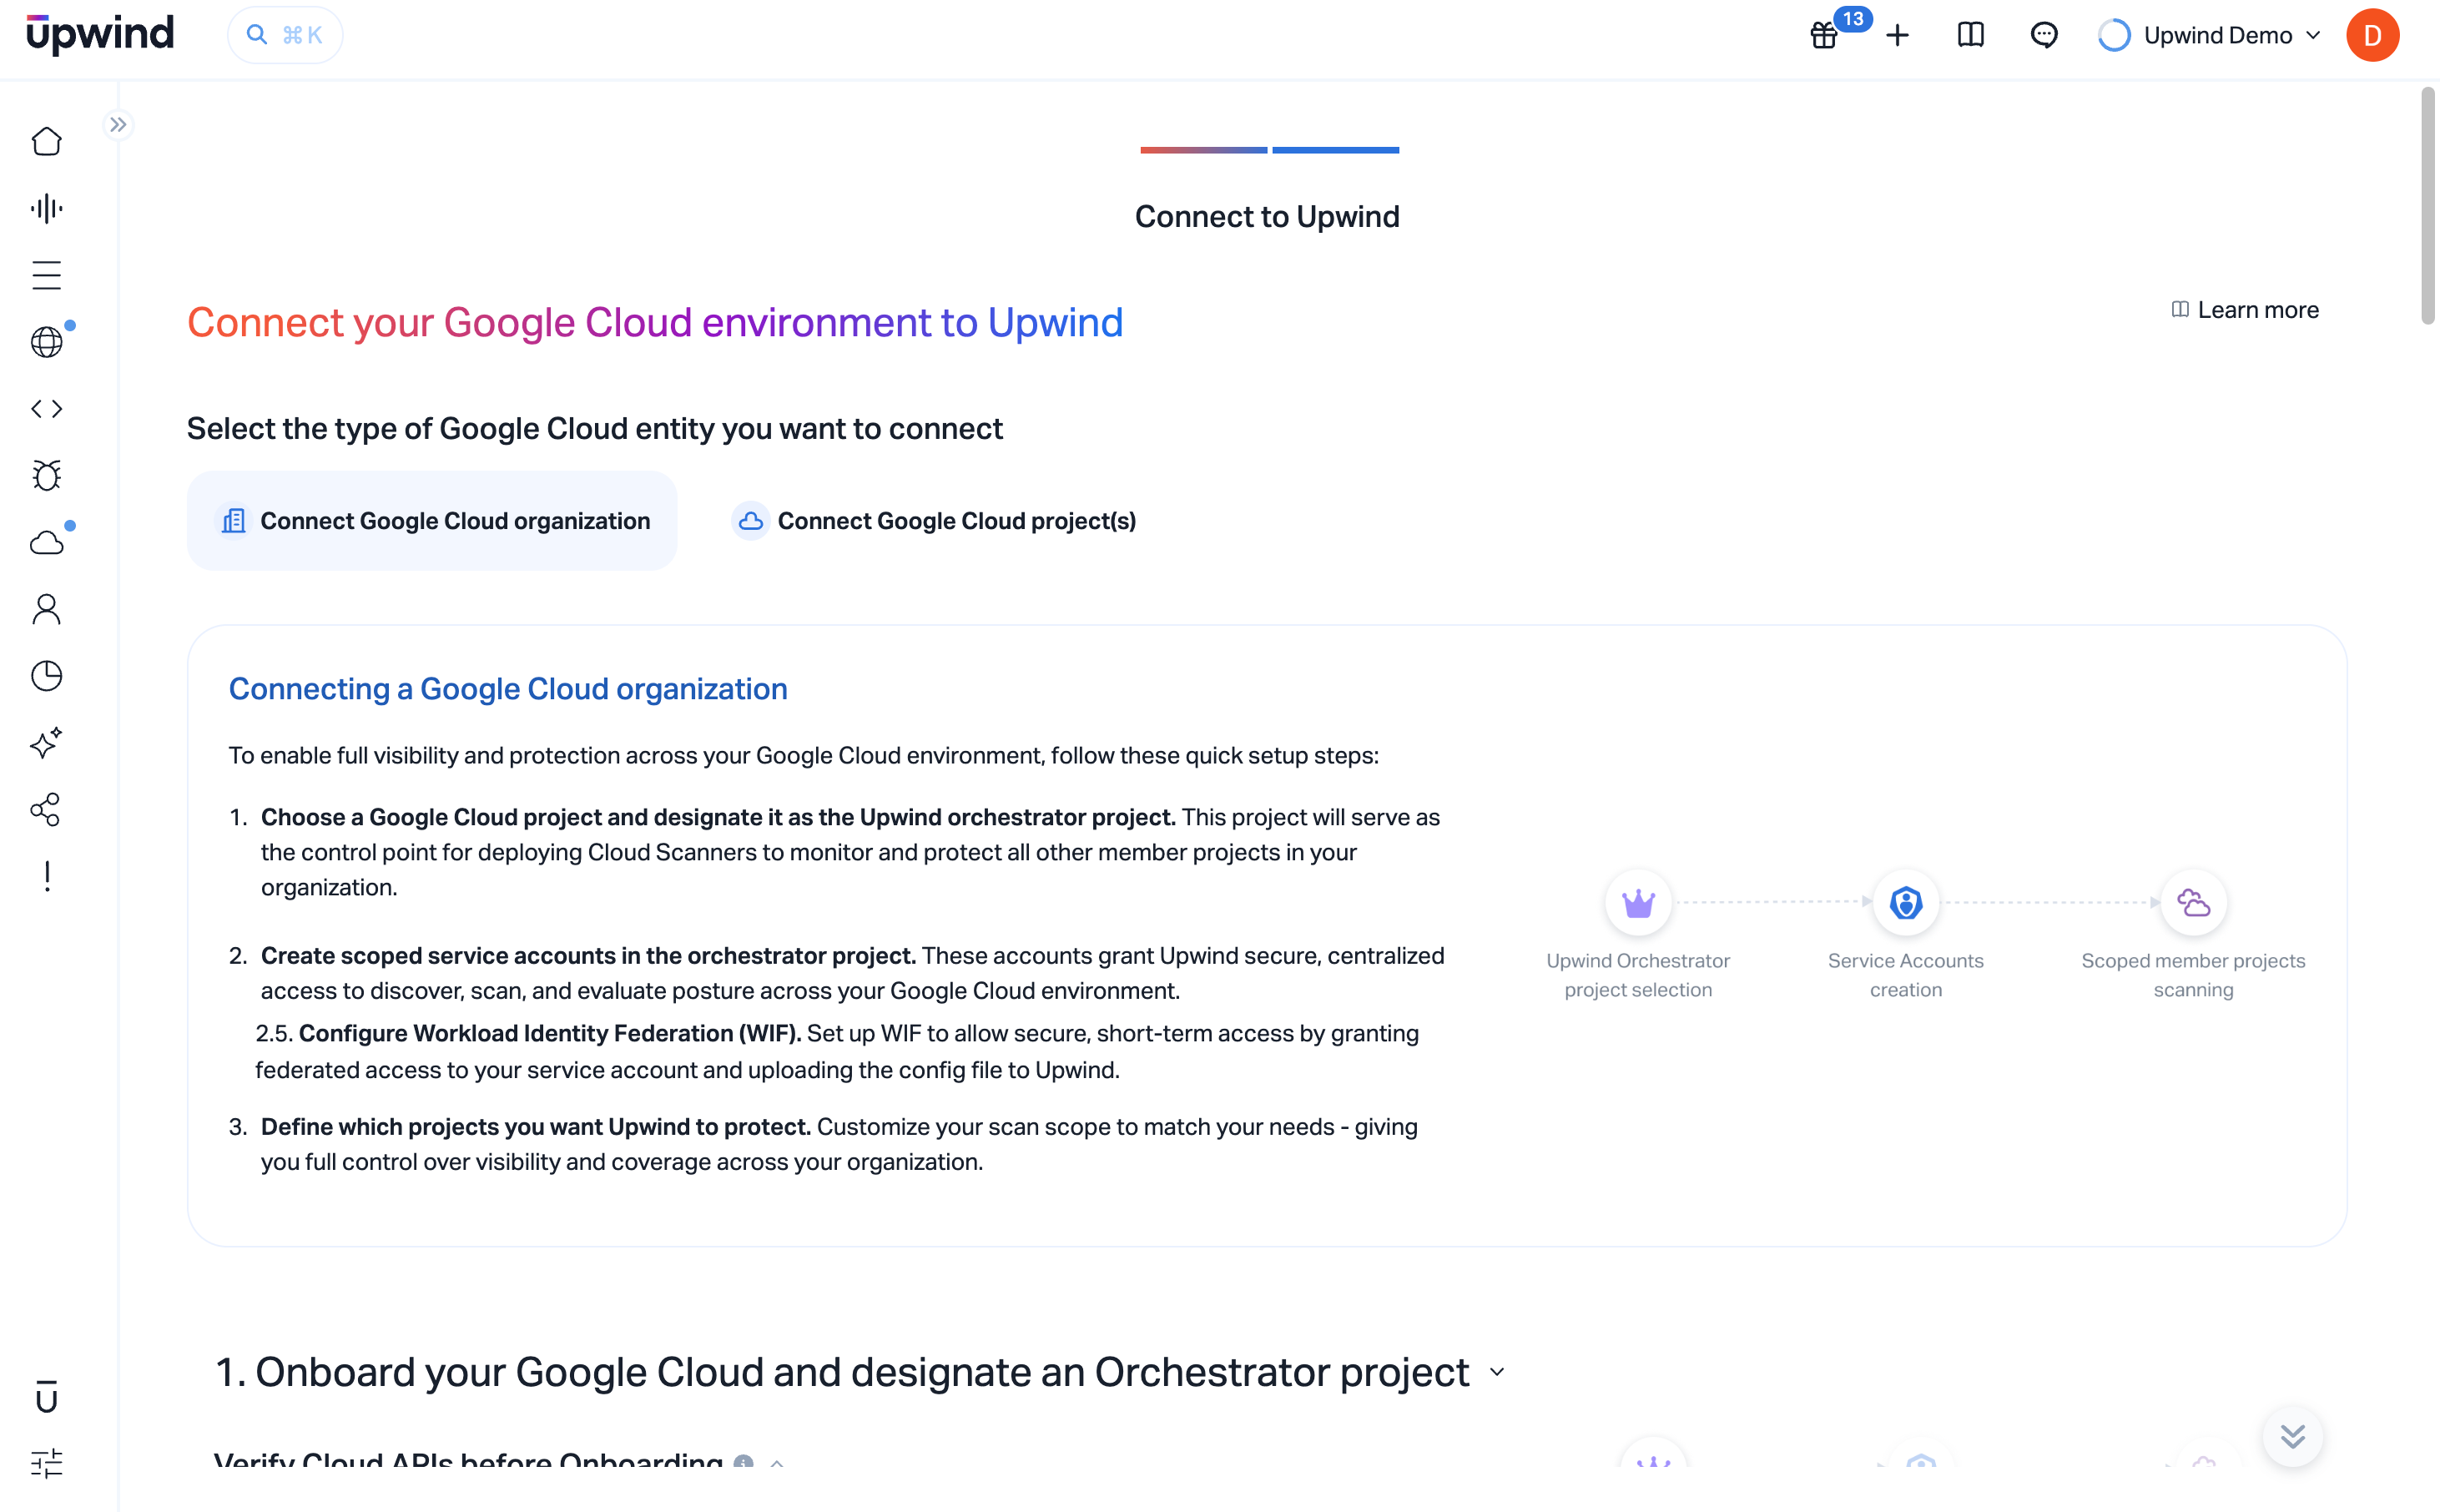
- Log in to the Upwind Management Console .
- Select the + (plus) symbol at the top of the screen and select Connect cloud account.
- Choose Google Cloud Platform, and from there Connect Google Cloud Organization.
The Terraform module does not attempt to manage or directly interact with multiple projects within the Google Cloud Organization. Instead, it follows a simplified approach where the same module can be applied to each project individually to create the necessary resources.
It is assumed that the module will be used within other Infrastructure-as-Code (IaC) tools capable of handling deployments at scale across multiple projects, and can be more easily integrated into your team's workflows.
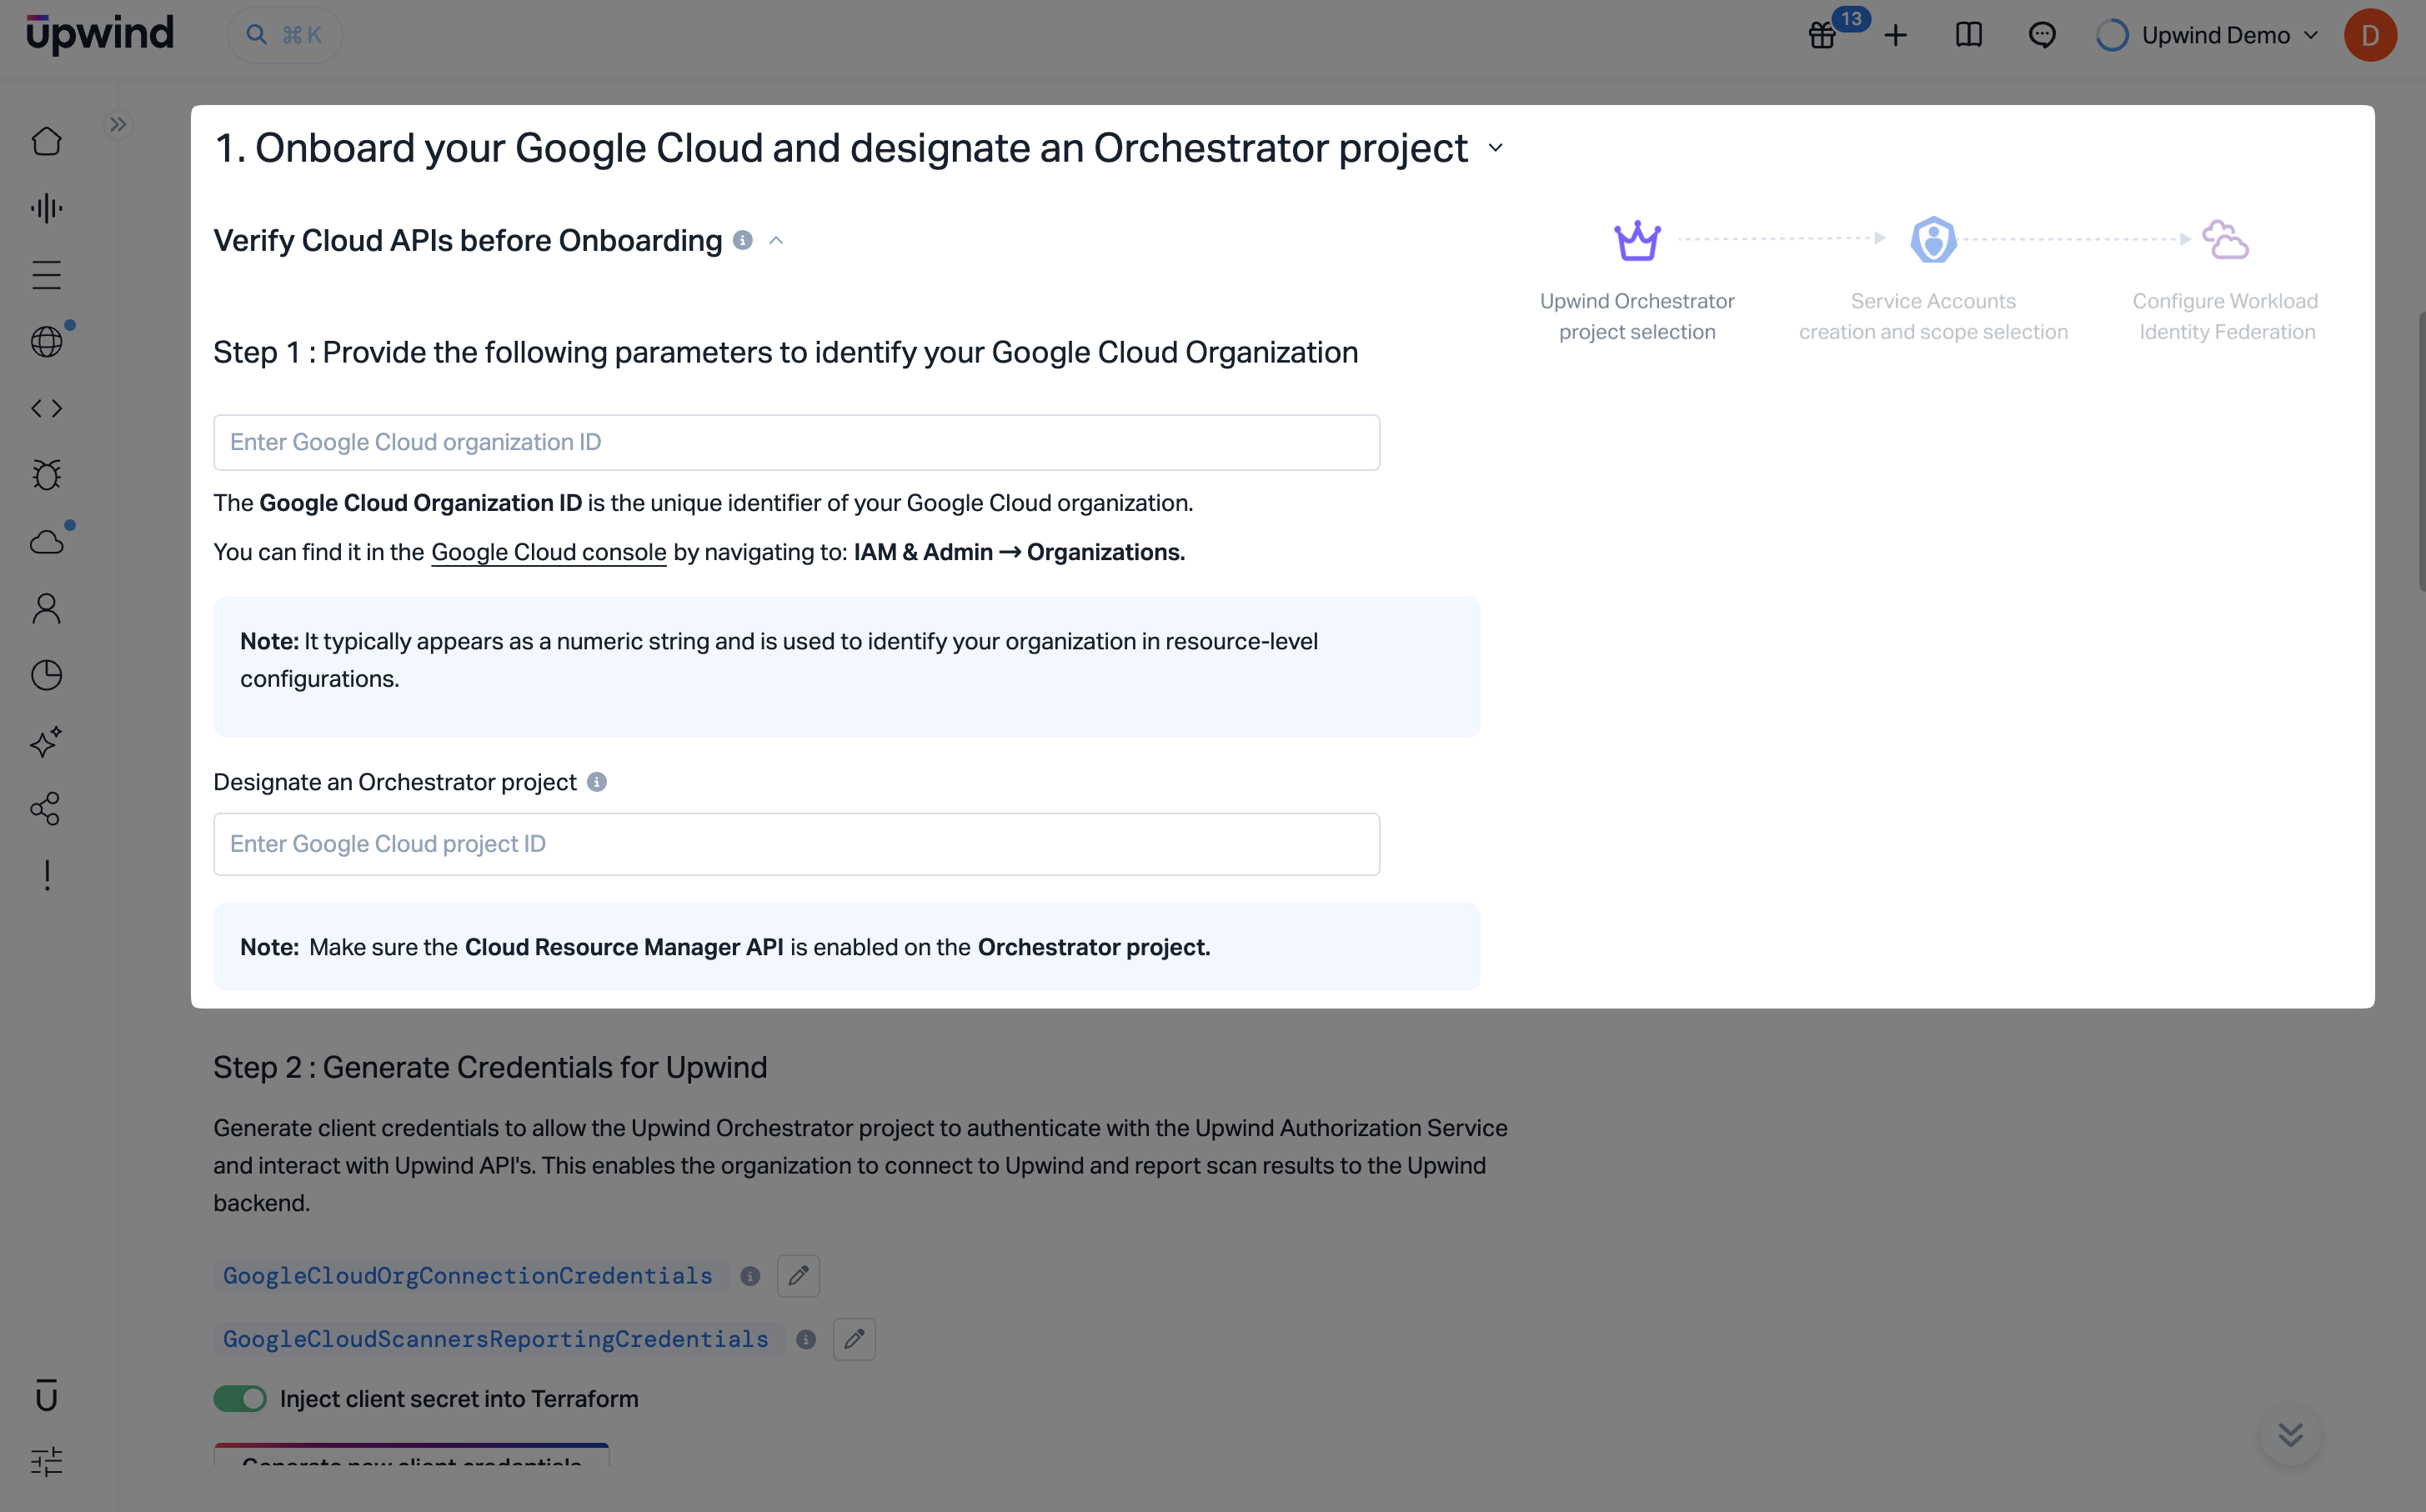
Step 1: Onboard your Google Cloud Organization and designate an Orchestrator Project
In this step, you will provide key identifiers from your Google Cloud environment and register them in the Upwind Management Console.
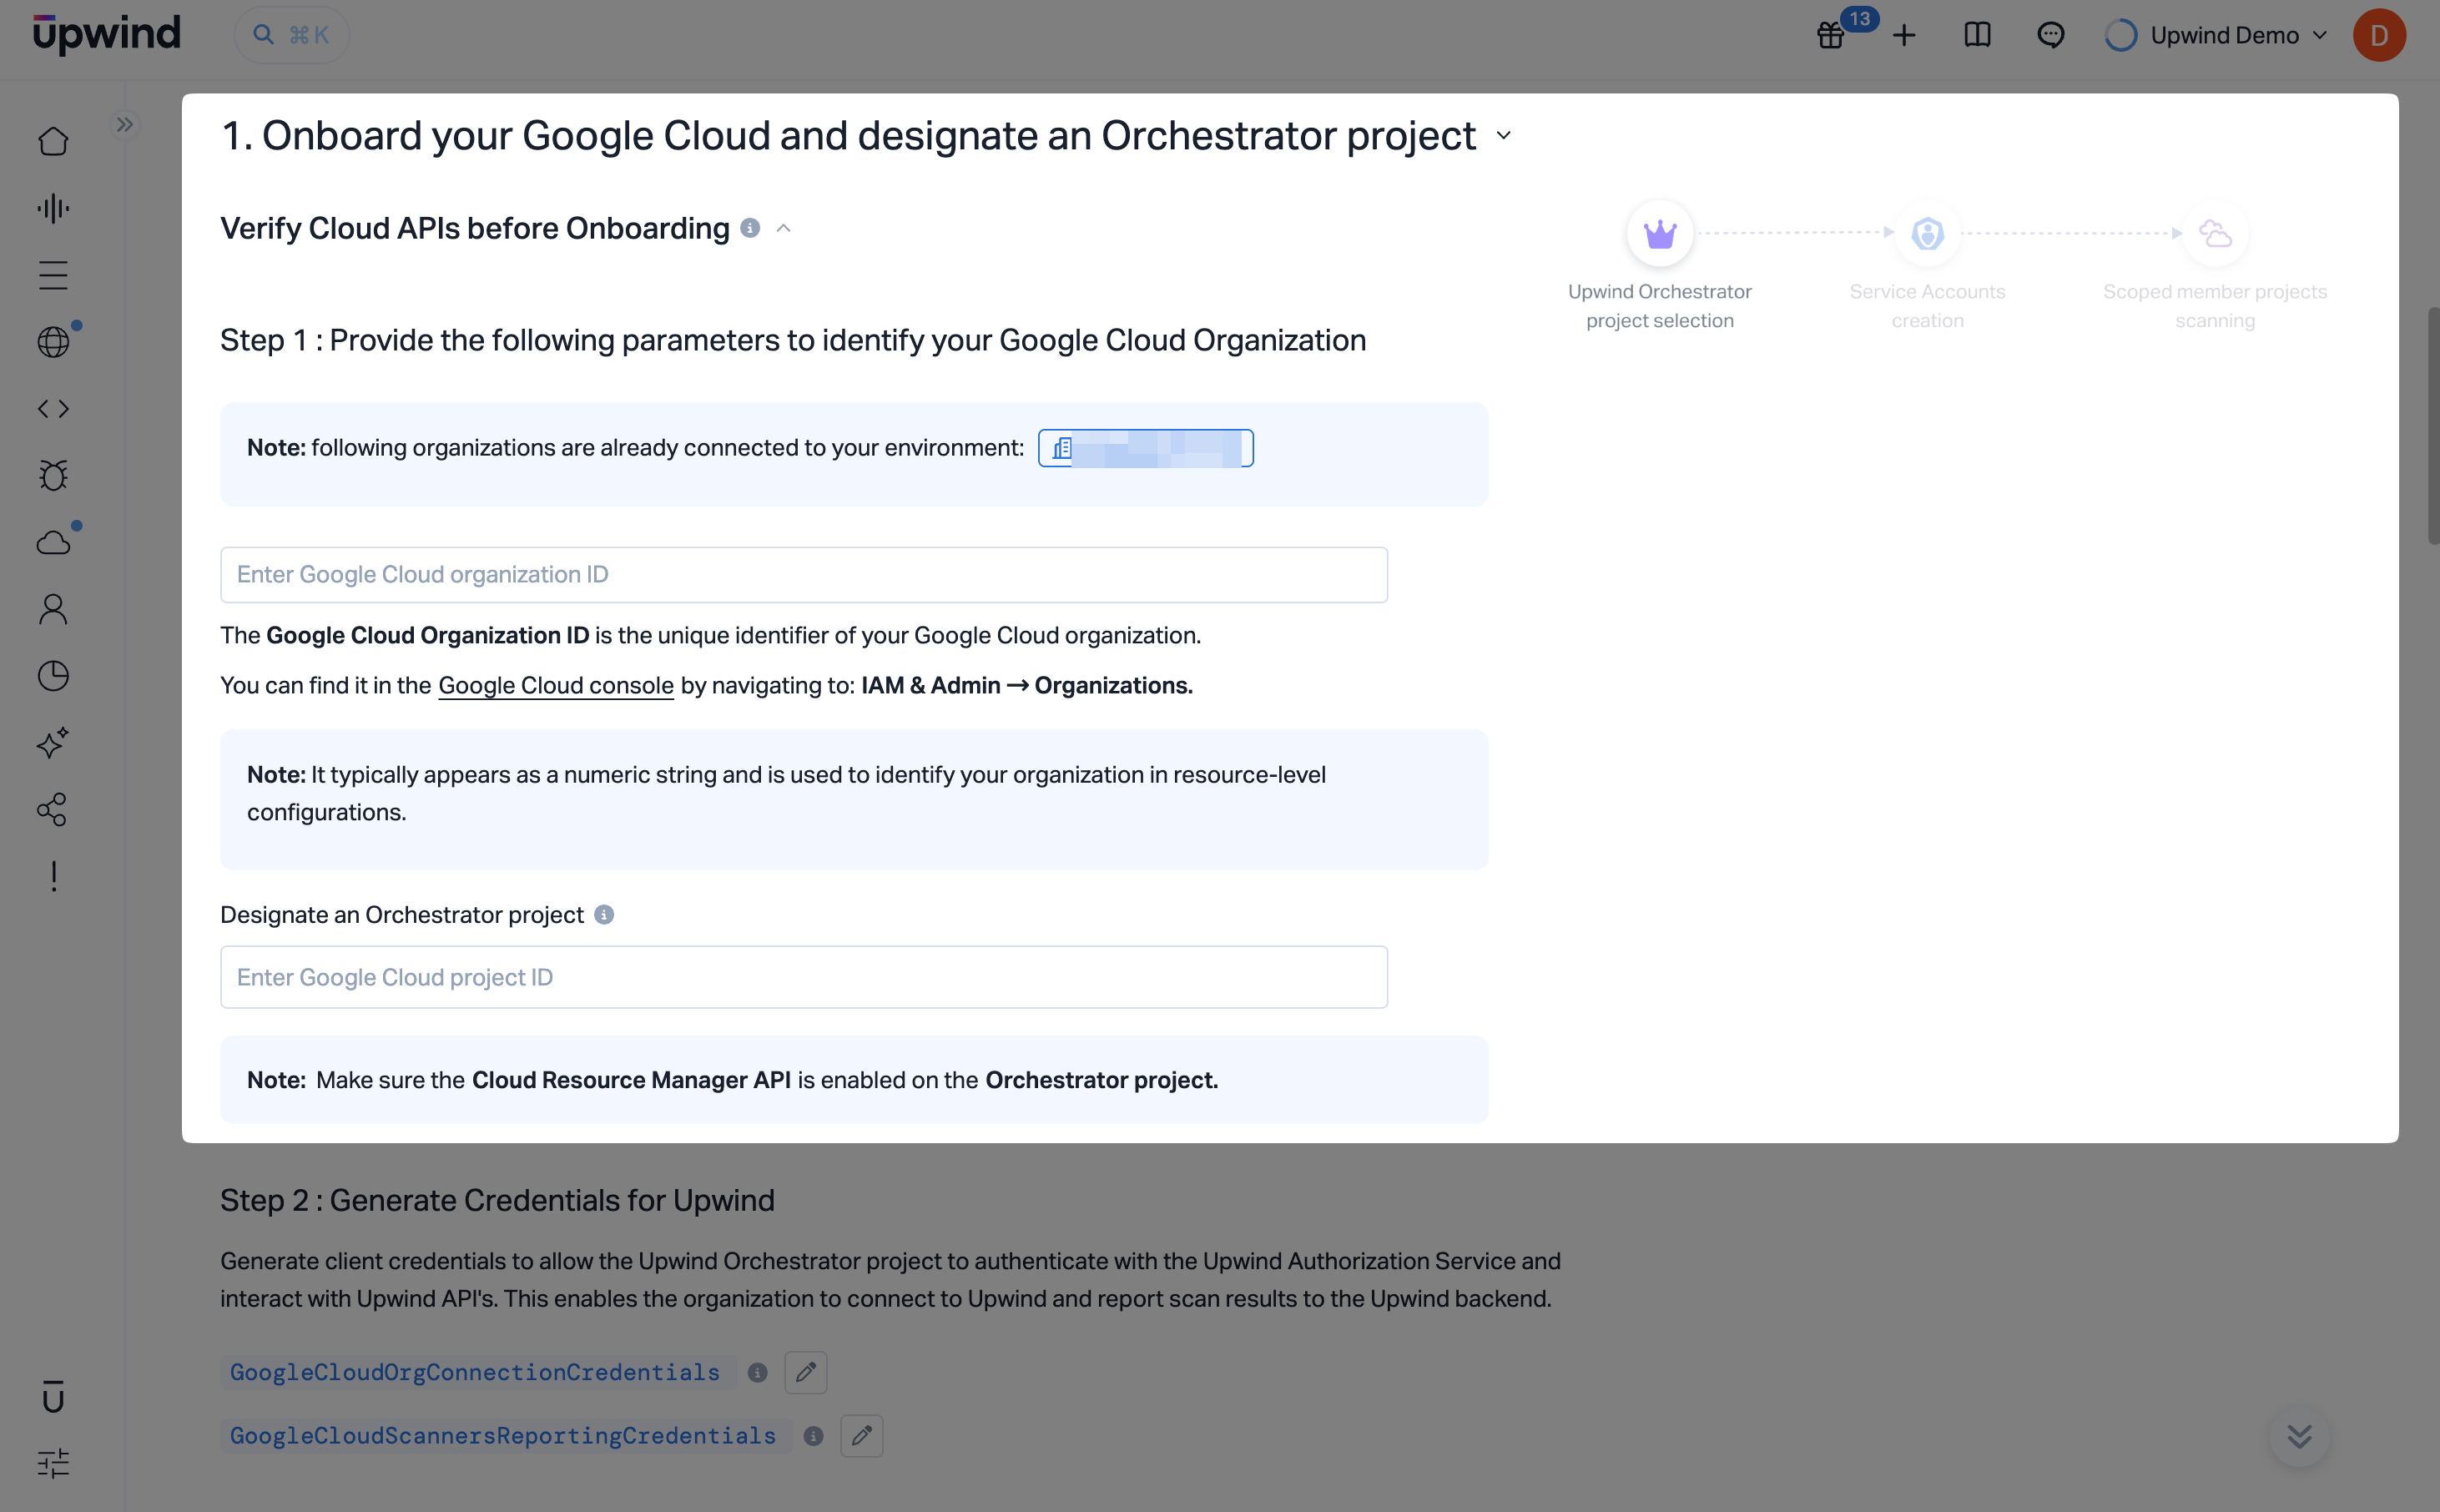
Step 1.1: Provide the parameters to identify your Google Cloud Organization
- Sign in to the Google Cloud Console using an account with organization-level access.
- Navigate to IAM & Admin → Settings.
- Copy your Organization ID - this is the unique identifier for your Google Cloud organization.
- Paste the Organization ID into the field labeled "Enter Google Cloud Organization ID".
Designate an Orchestrator Project
-
Enter the Project ID you want to designate as the Orchestrator Project. This project will be responsible for deploying and managing Cloud Scanner resources on behalf of your organization. The orchestrator project should have sufficient permissions to interact with organization-level resources and initiate scans across projects.
noteThe Orchestrator Project must belong to the same Google Cloud Organization and be granted the necessary permissions (via service account) to access and scan other projects. This does not have to be the organization's billing or parent project.
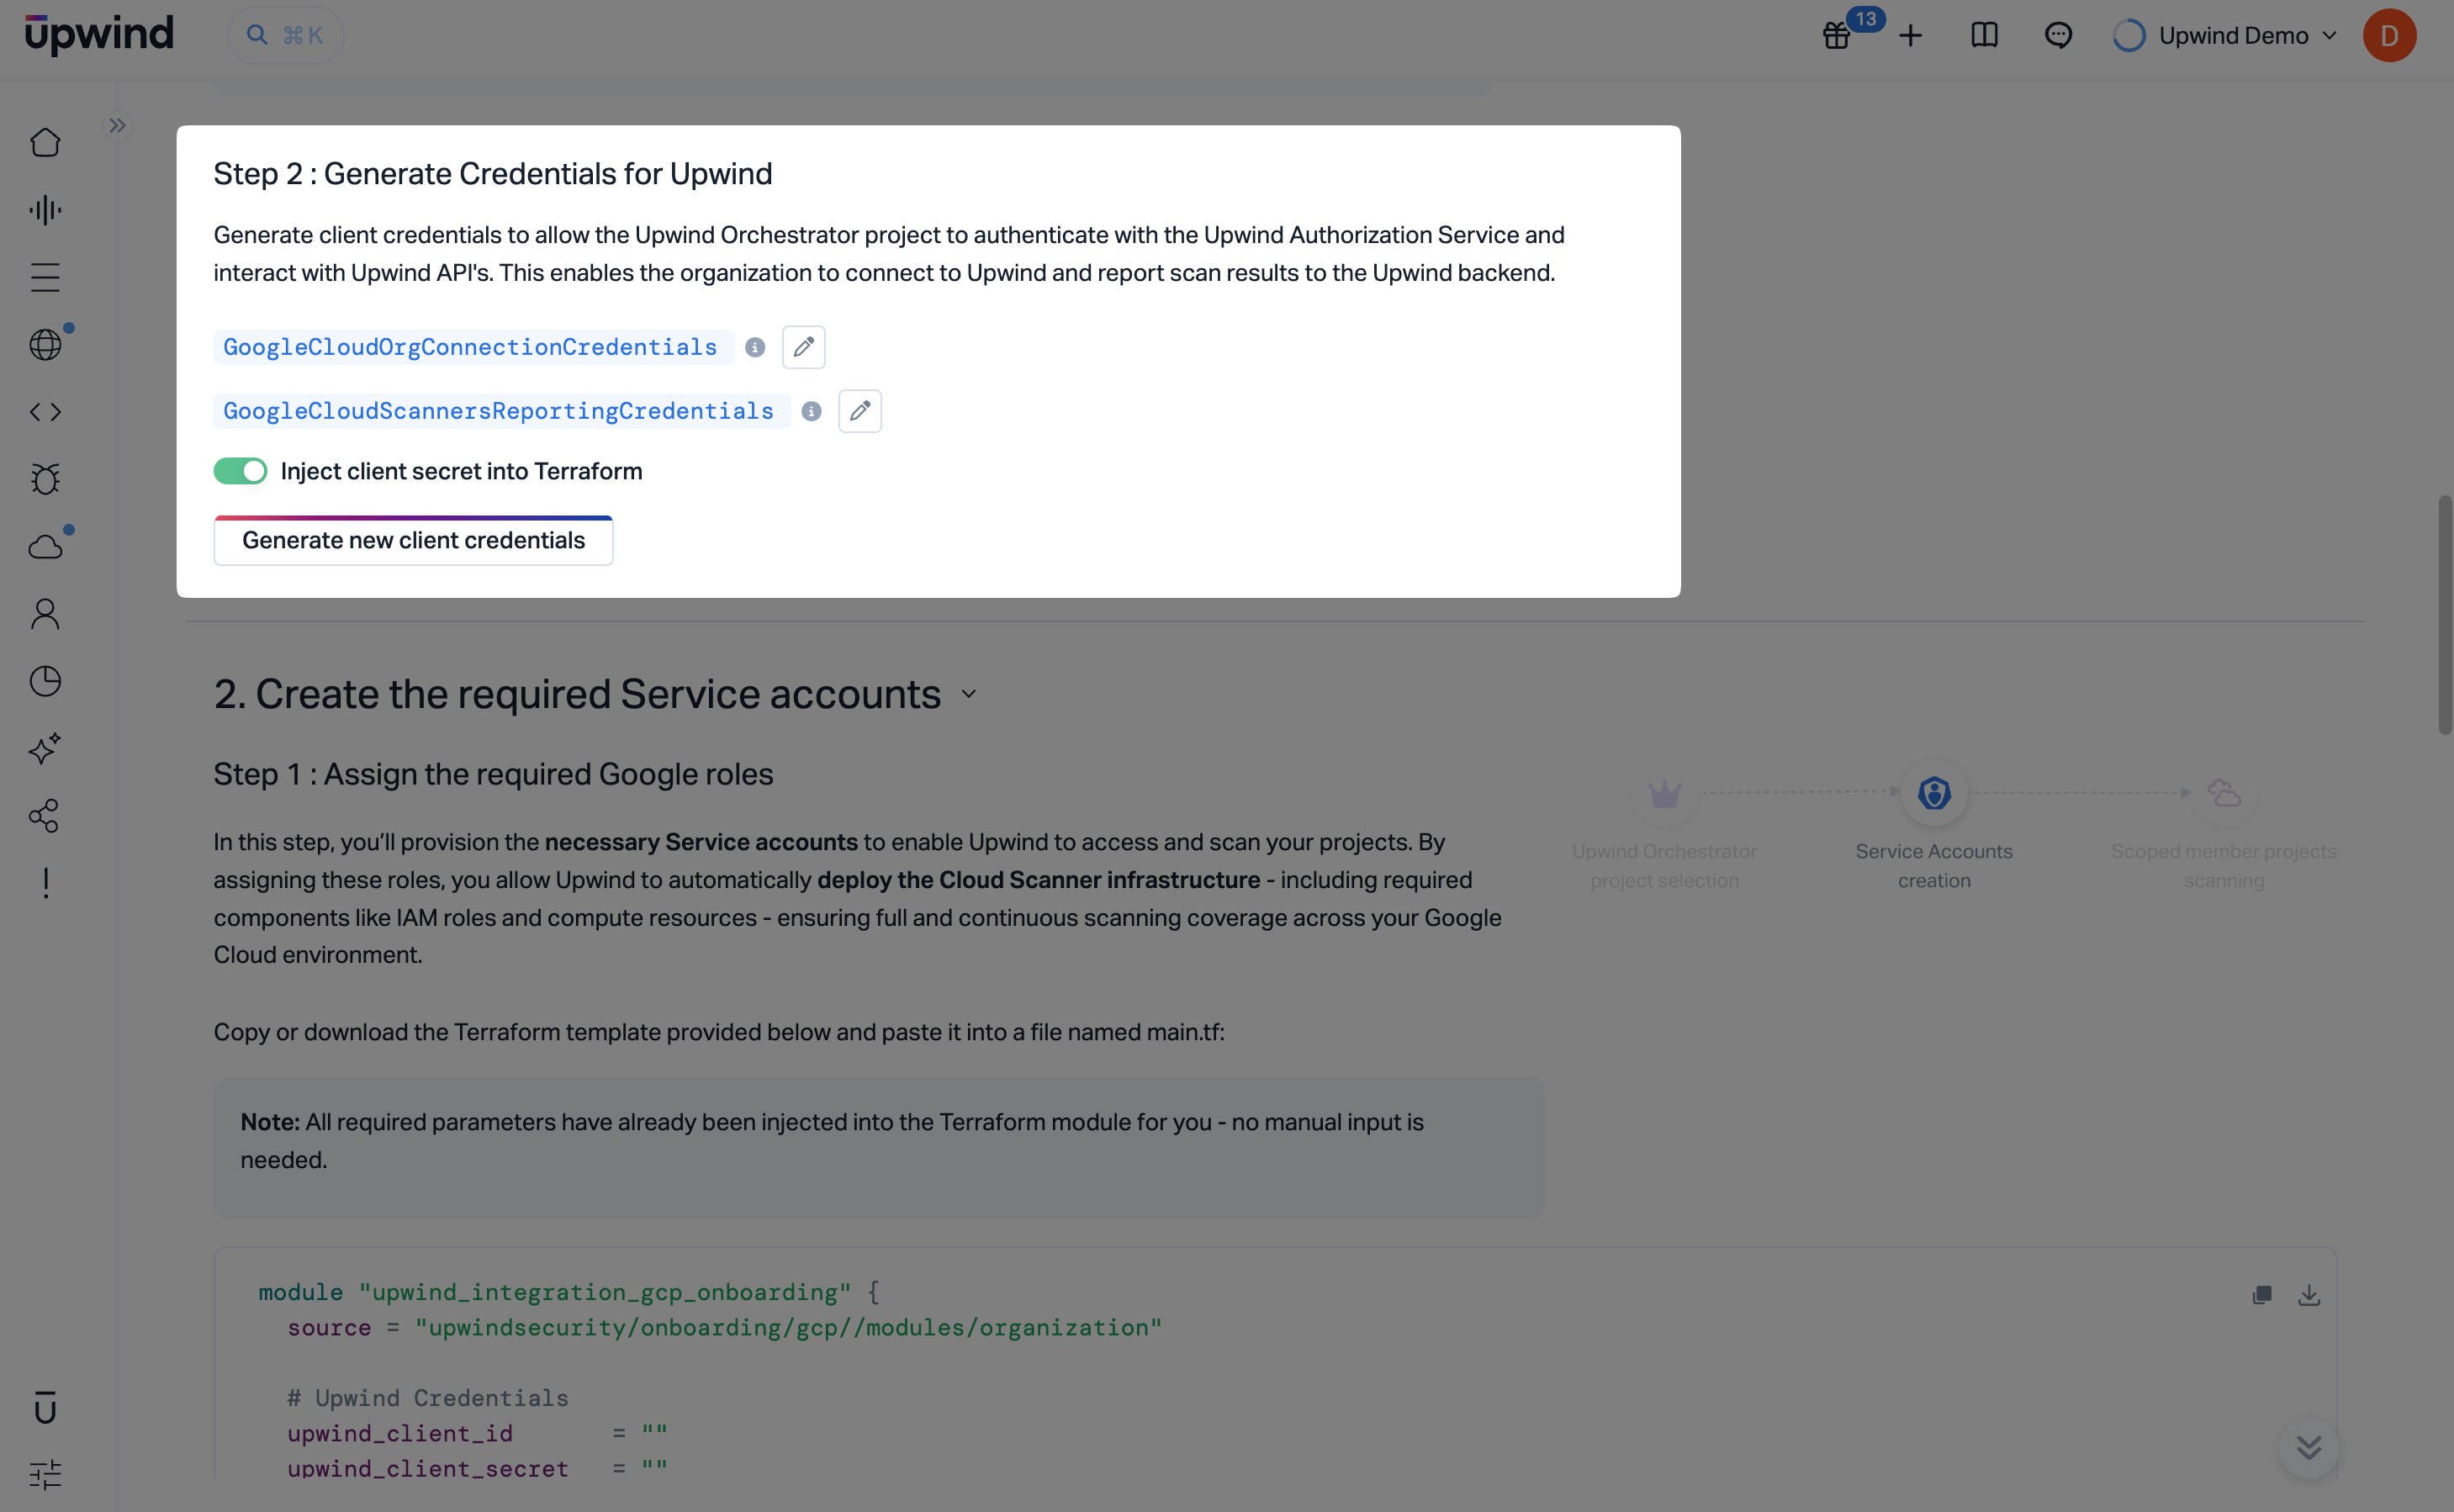
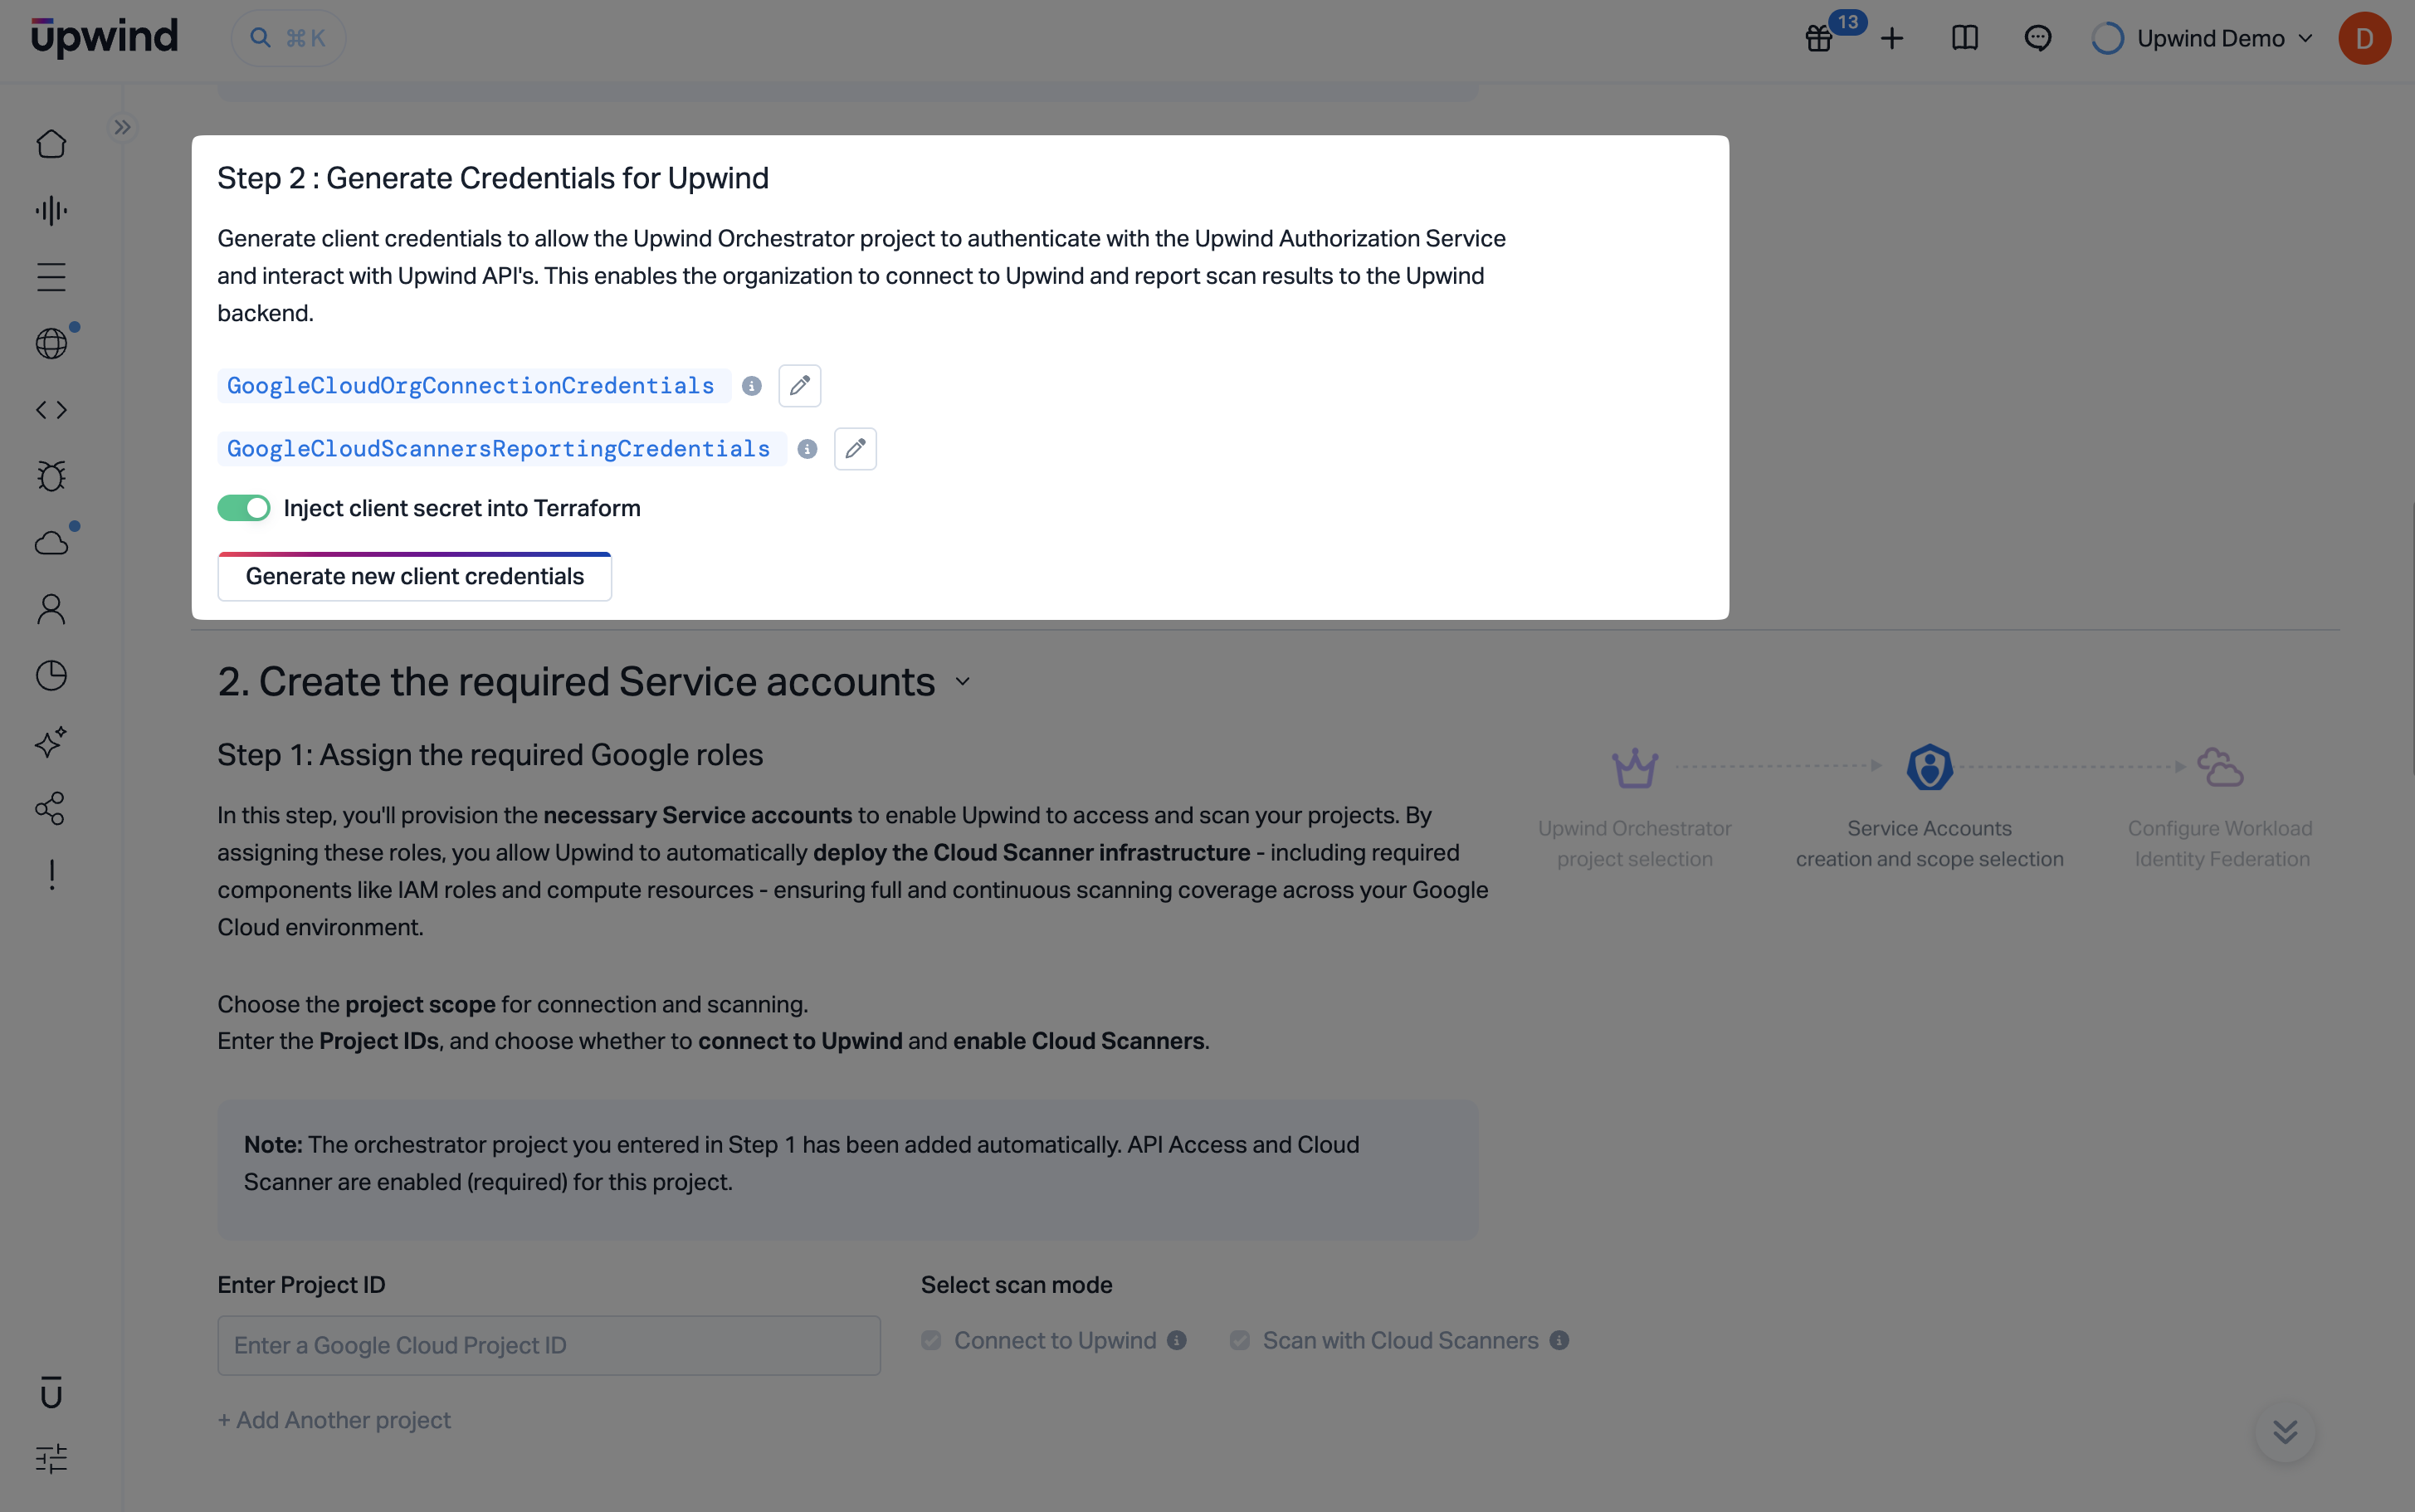
Step 1.2: Generate Credentials for Upwind
In this step, you will generate the client credentials that allow the Upwind Orchestrator Project to authenticate with the Upwind Authorization Service and interact with Upwind APIs. These credentials are required to connect your Google Cloud organization to Upwind and enable secure reporting and scanning.
You will generate two sets of credentials:
-
GoogleCloudOrgConnectionCredentials- used to authenticate and identify projects within your Google Cloud organization. These credentials are essential for allowing Upwind to discover, connect, and onboard your Google Cloud projects. -
GoogleCloudScannersReportingCredentials- used to securely report scan results from your Google Cloud projects back to Upwind. They enable continuous visibility by allowing Upwind to receive findings, metadata, and status updates from your scanned resources.
Click "Generate new client credentials" to create both sets of credentials. Once generated, they will be used in later steps to complete the onboarding process.
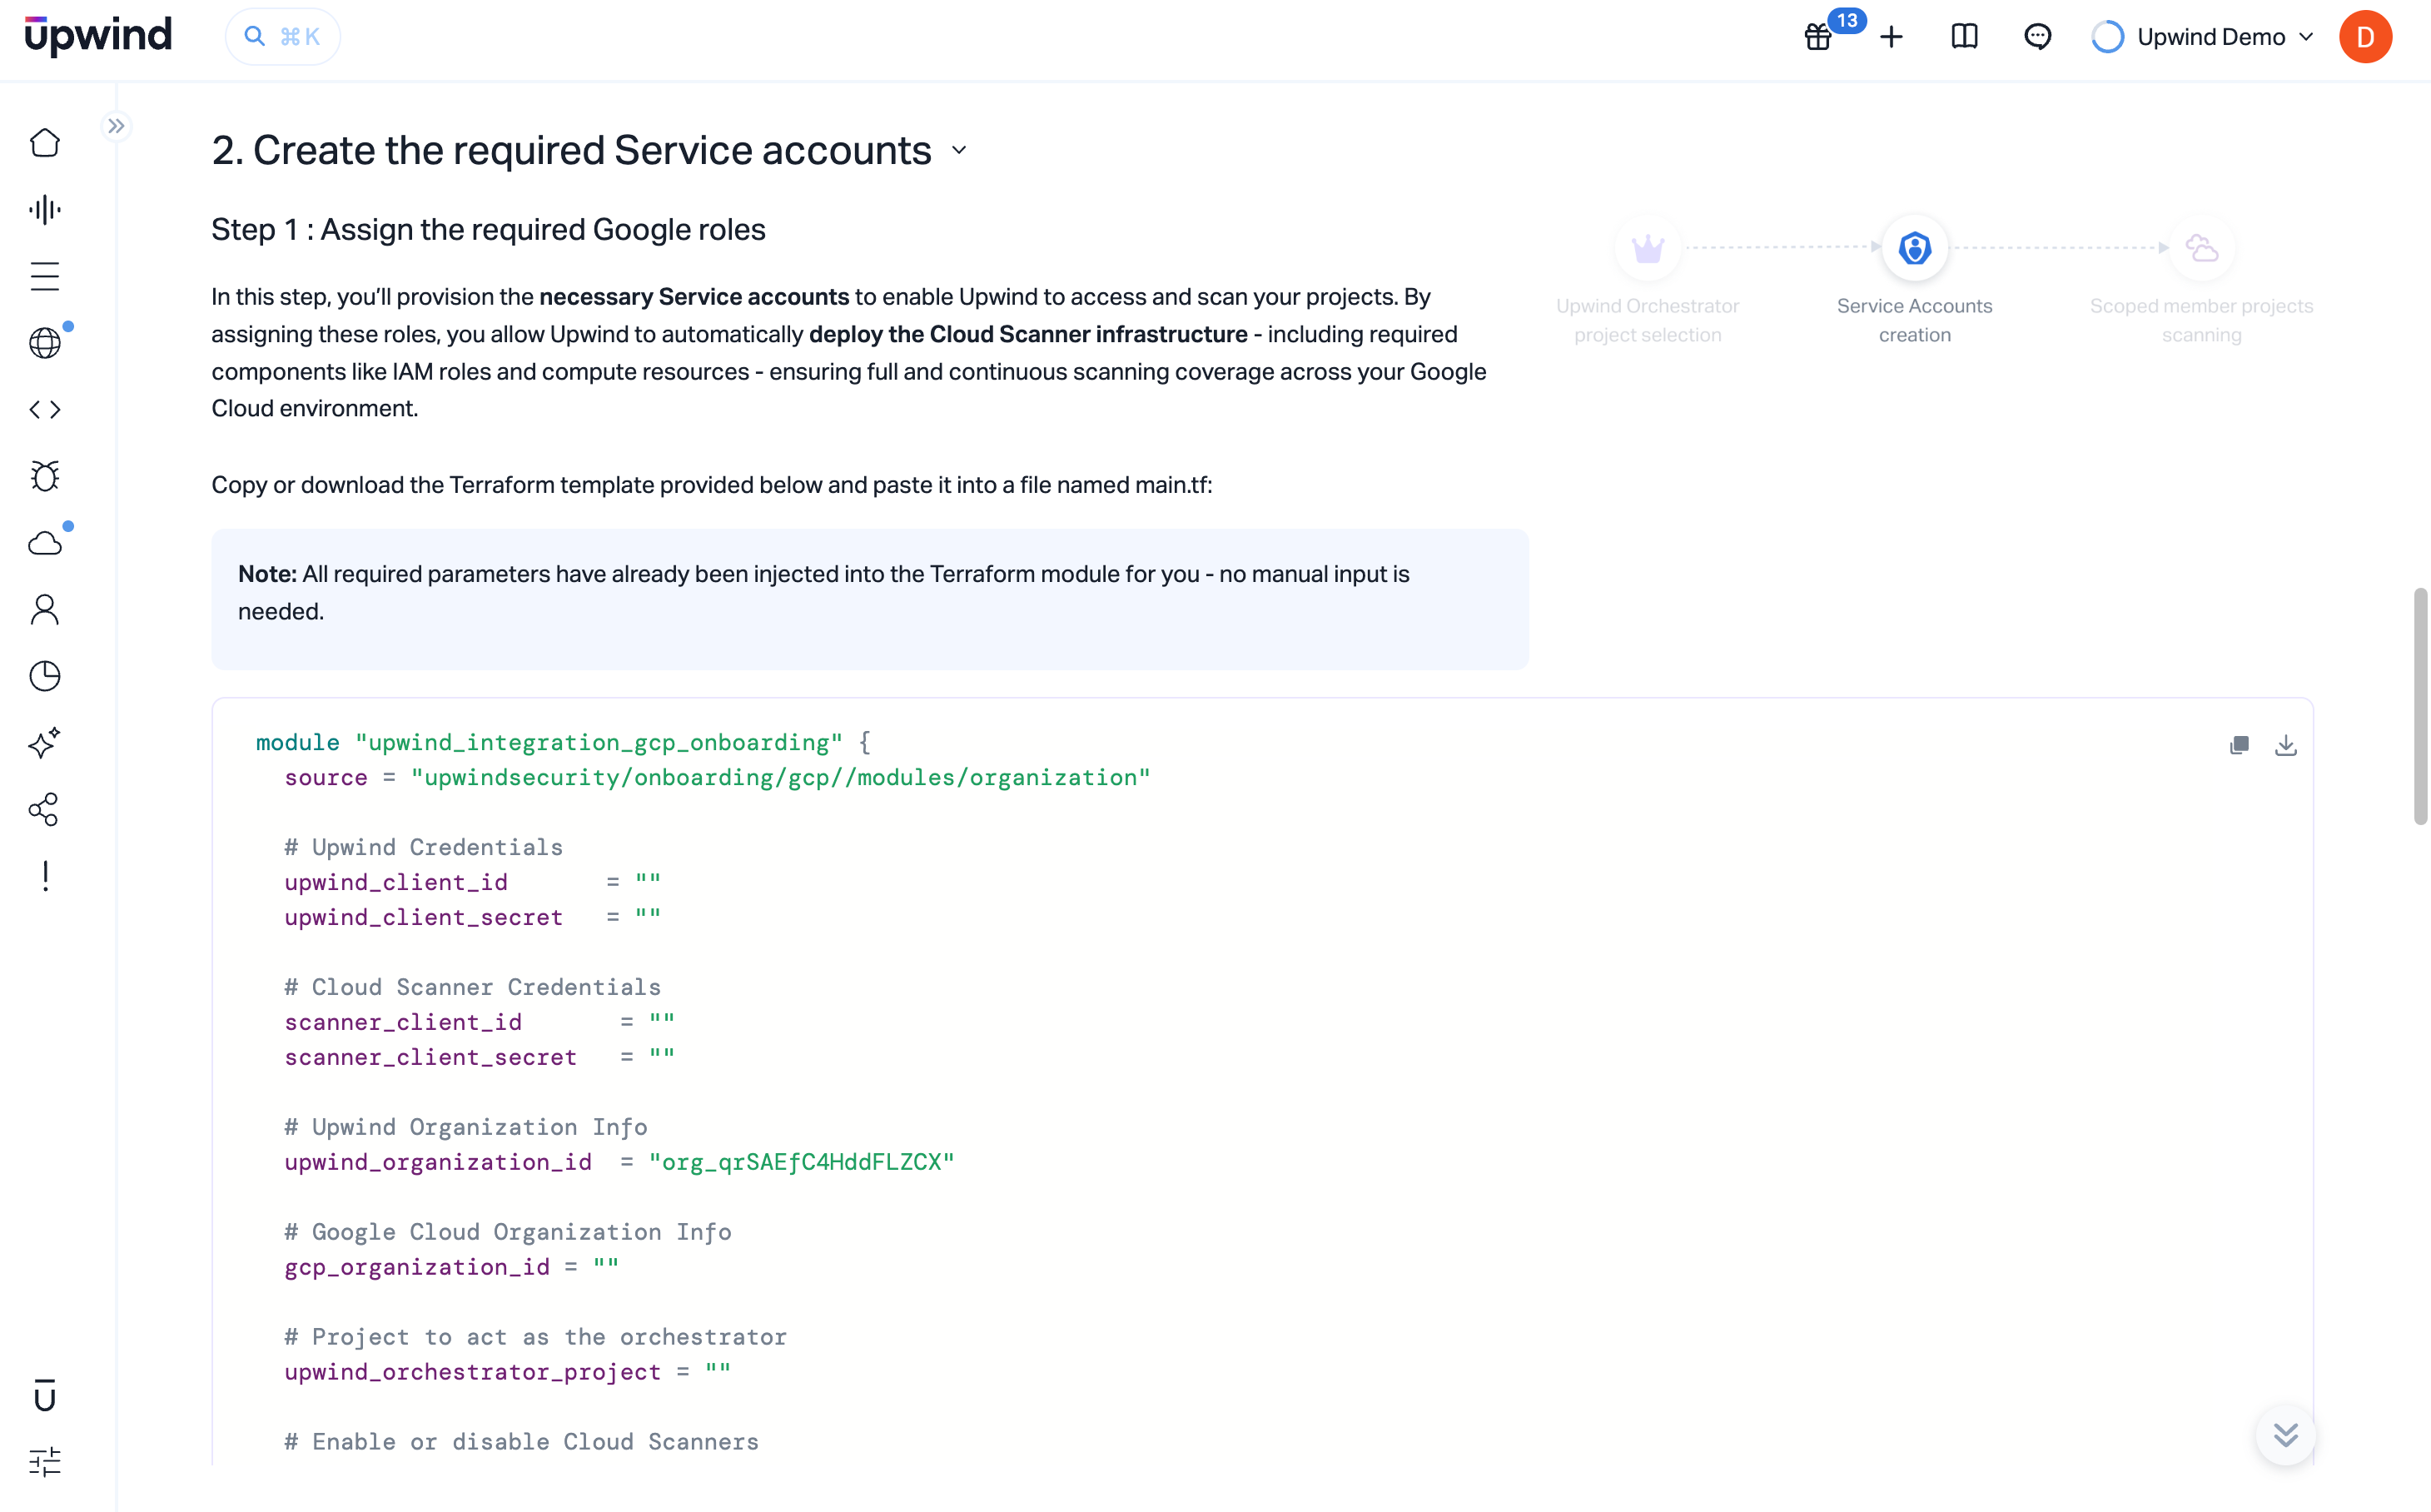
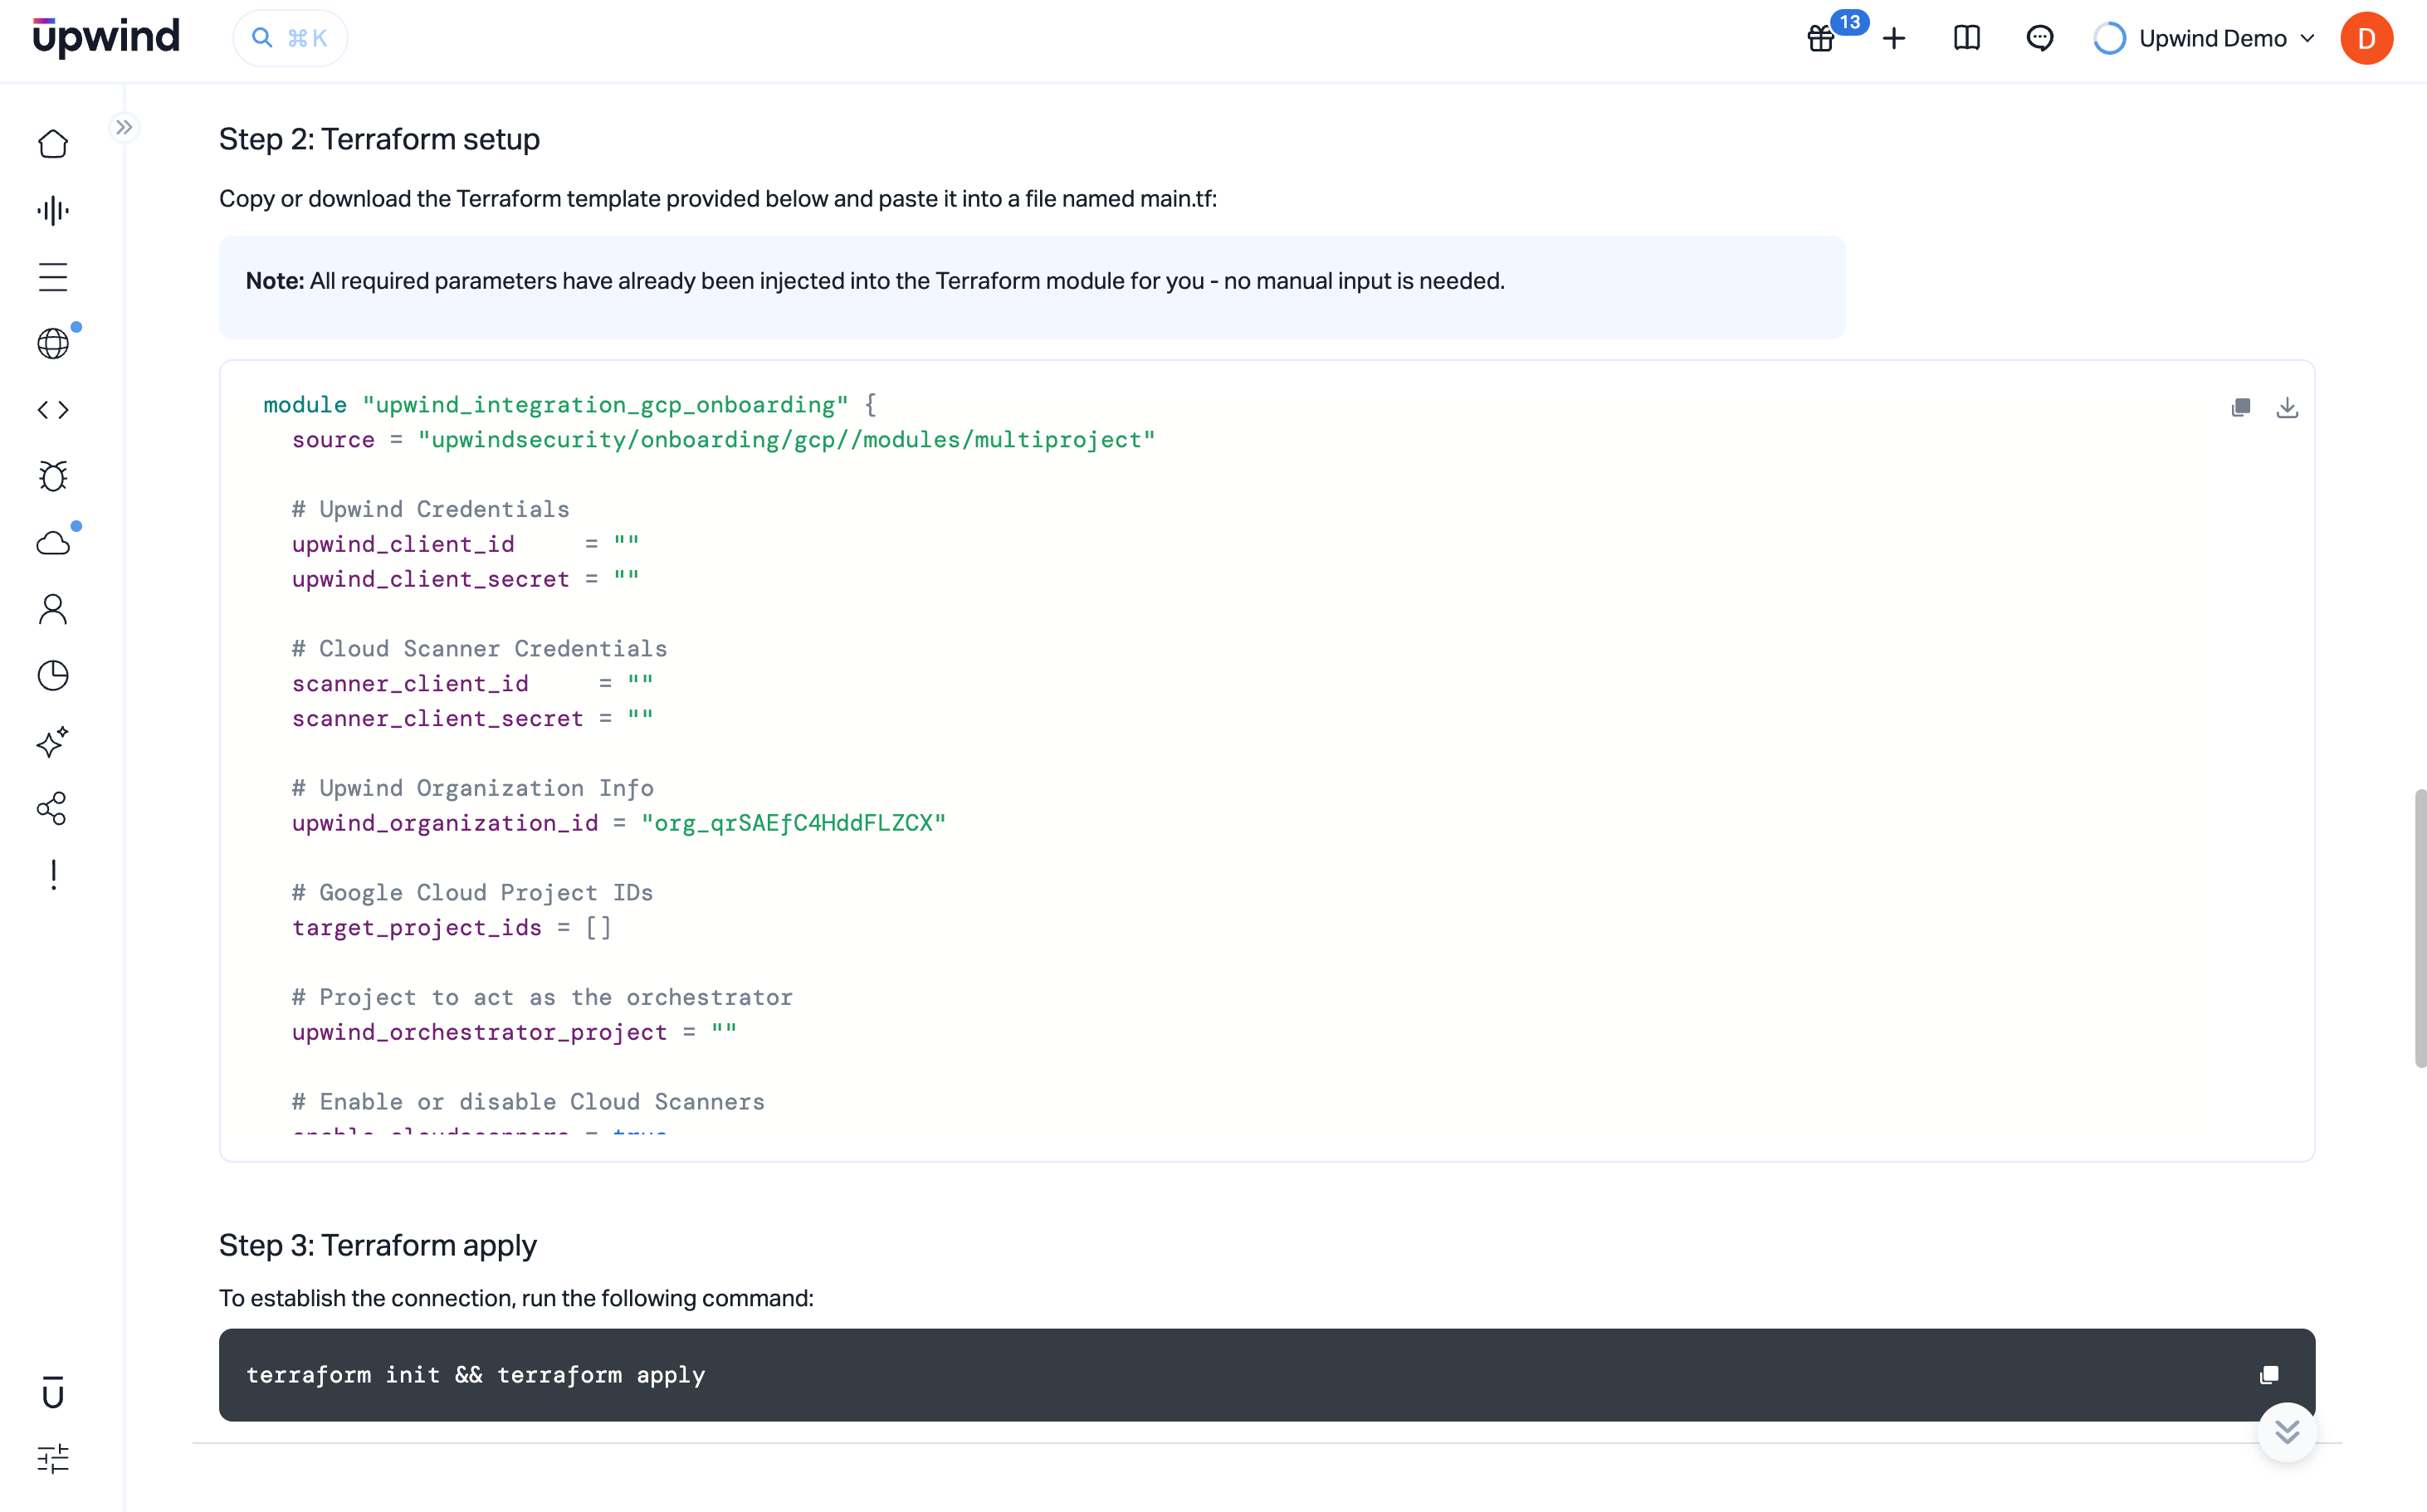
Step 2: Deploy the Terraform module to provision the necessary resources
In this step, you'll provision the necessary resources to enable Upwind to access and scan your Google Cloud projects.
The module will deploy all required resources and configure authentication via Workload Identity Federation. This will grant access to your Google Cloud environment specifically from Upwind's AWS environment.
This will then allow Upwind to automatically deploy the Cloud Scanner infrastructure - including required components like IAM roles and compute resources - ensuring full and continuous scanning coverage across your environment.
All required parameters have already been injected into the Terraform module for you - no manual input is needed.
Step 2.1: Assign the required Google roles
-
Before proceeding, review all the settings and parameters to ensure the configuration settings are tailored to your environment.
-
Create a new directory for your Terraform project and navigate to it in your terminal. Inside the project directory.
-
Create a new file named
main.tfto hold the Terraform configuration. -
Copy the code snippet from the Terraform setup section and paste it into
main.tf.main.tfmodule "upwind_integration_gcp_onboarding" {
source = "upwindsecurity/onboarding/gcp//modules/organization"
# Upwind Credentials
upwind_client_id = "<client-id>"
upwind_client_secret = "<client-secret>"
# Cloud Scanner Credentials
scanner_client_id = "<scanner-client-id>"
scanner_client_secret = "<scanner-client-secret>"
# Upwind Organization Info
upwind_organization_id = "<your-upwind-organization-id>"
# Google Cloud Organization Info
gcp_organization_id = "<your-gcp-organization-id>"
# Project to act as the orchestrator
upwind_orchestrator_project = "<your-orchestrator-project-id>"
# Enable or disable Cloud Scanners
enable_cloudscanners = true
# Enable or disable Bucket scanning. Requires enable_cloudscanners to be true
enable_dspm_scanning = true
workload_identity_trusted_account = "<trusted-account-id>"
resource_suffix = "<suffix (auto-generated)>"
google_service_account_display_name = "Upwind Management Service Account (custom)"
}
output "workload_identity_provider_name" {
description = "Full path name of the workload identity pool provider"
value = module.upwind_integration_gcp_onboarding.workload_identity_provider_name
}
output "service_account_email" {
description = "Email of the Upwind management service account"
value = module.upwind_integration_gcp_onboarding.upwind_management_service_account_email
}
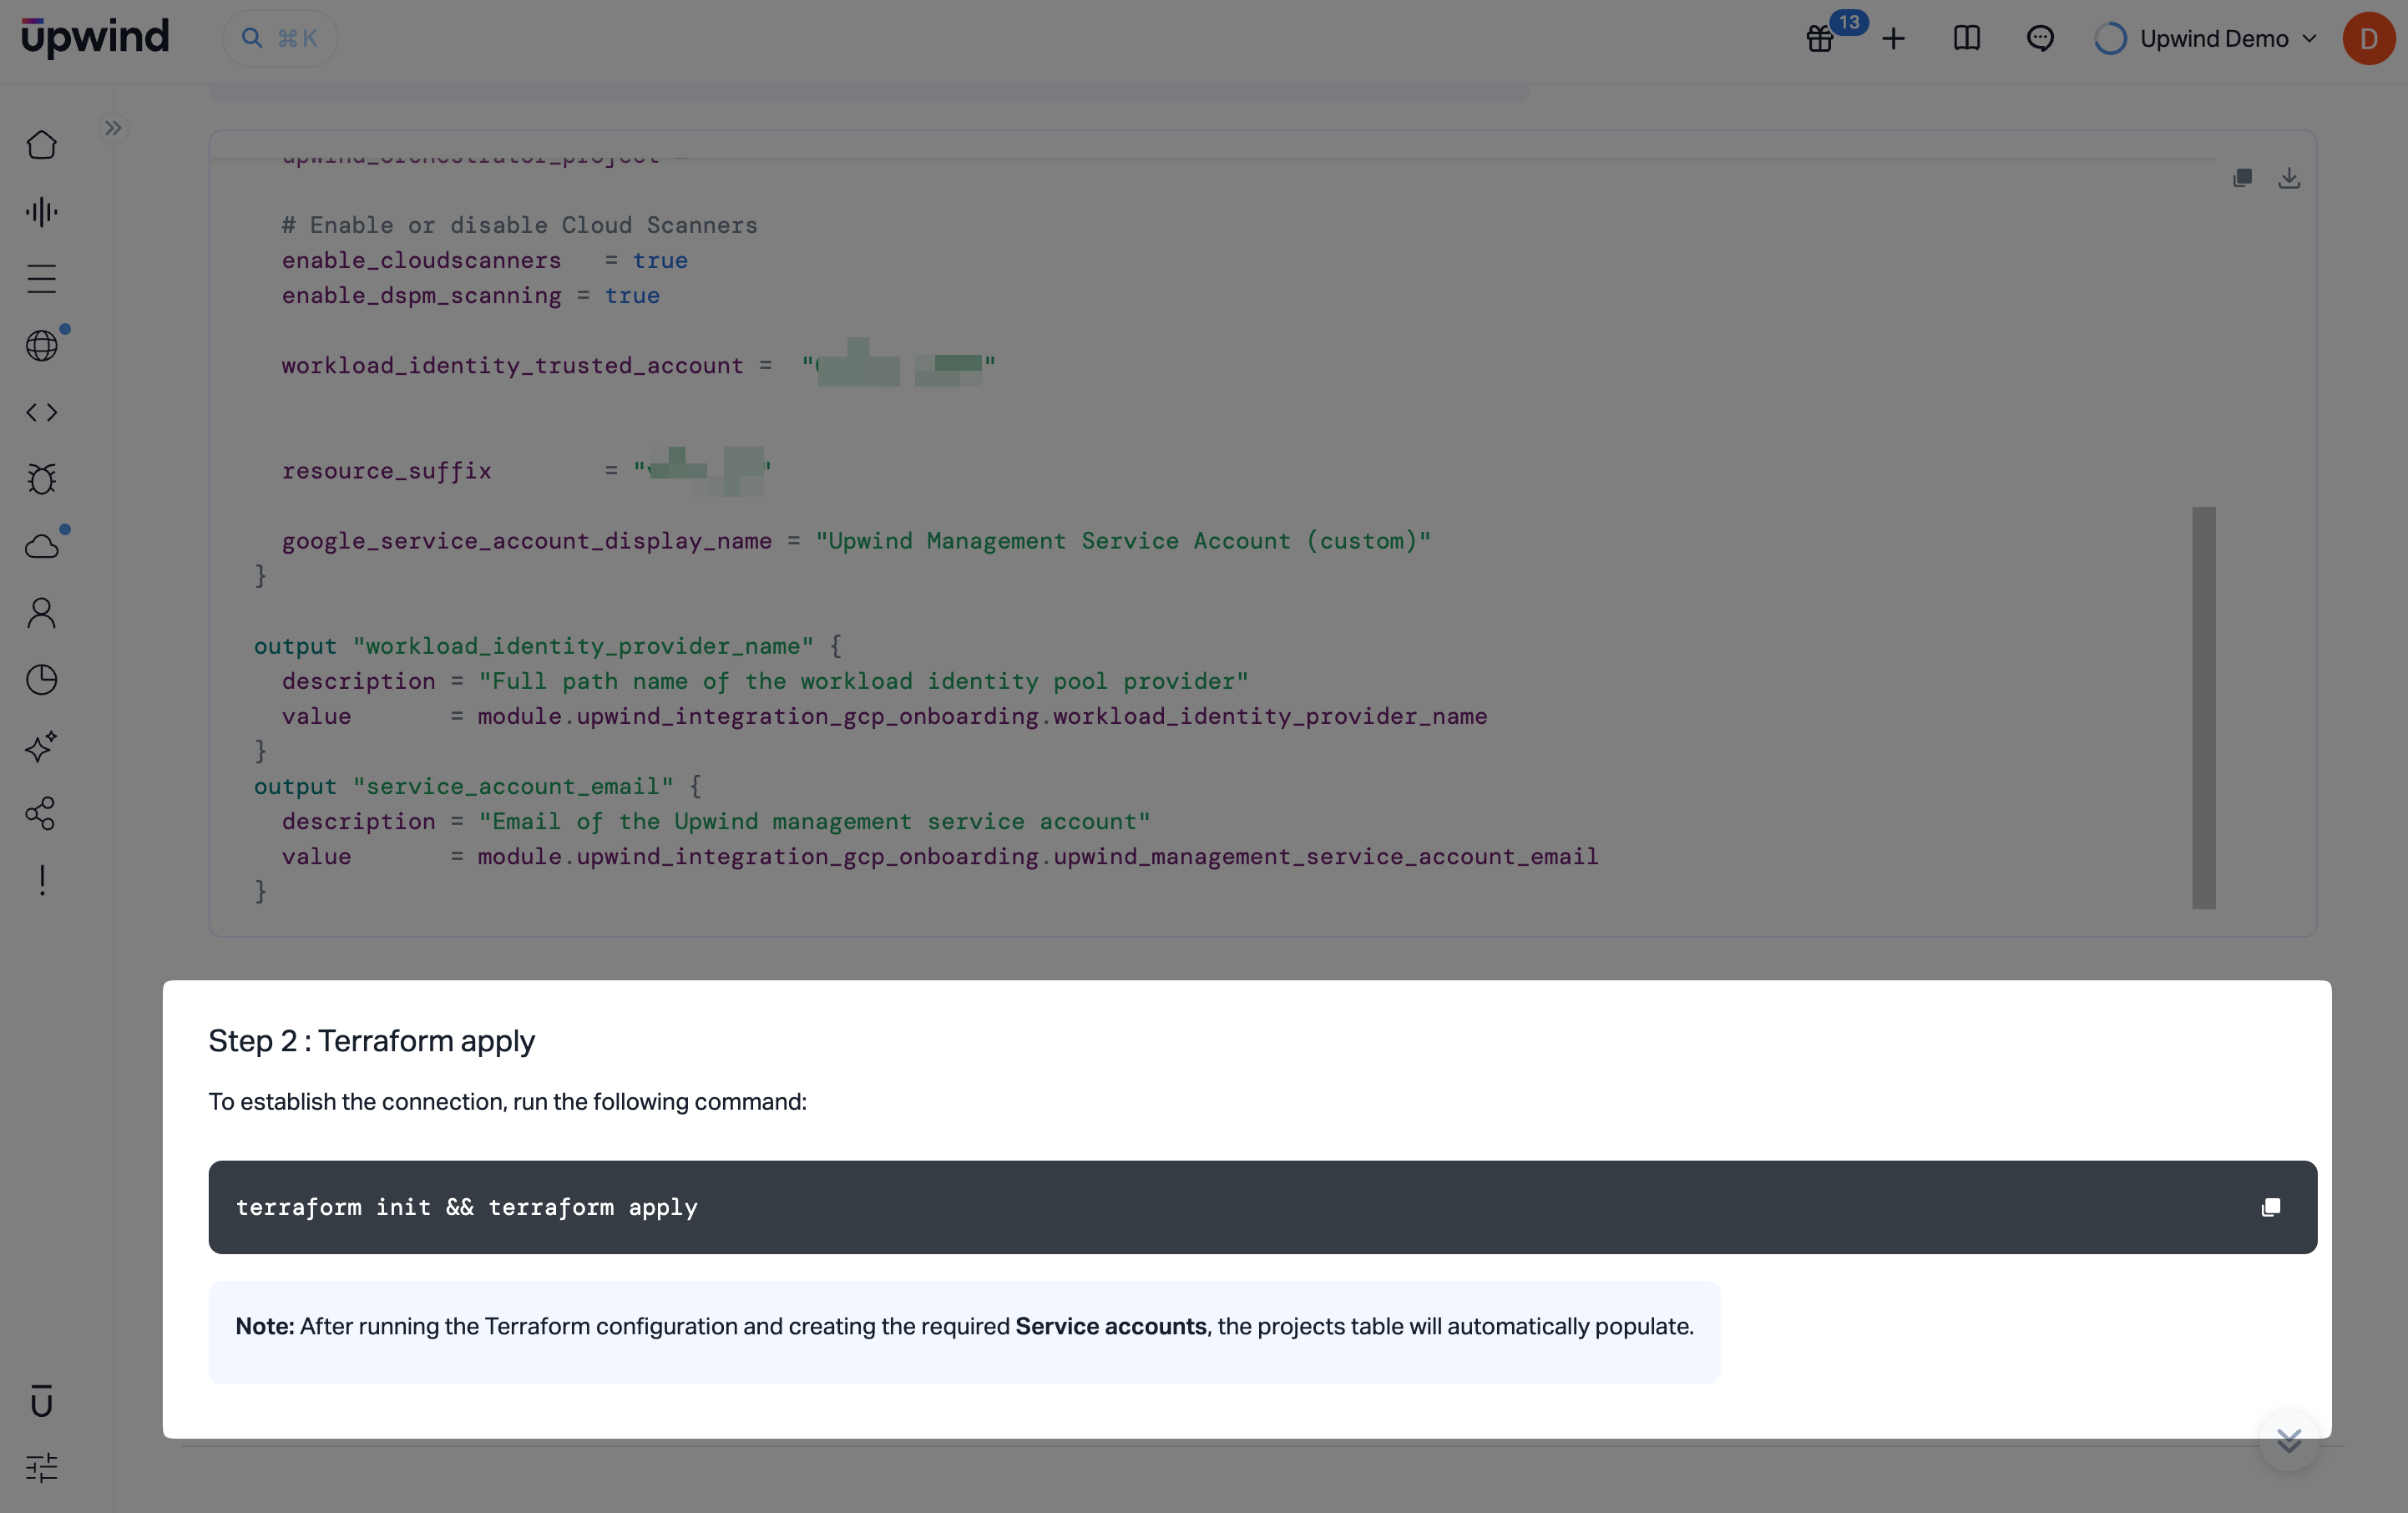
Step 2.2: Terraform apply
The module can be run manually using terraform init && terraform apply, however, it was designed with the expectation that it will be integrated into an Infrastructure-as-Code (IaC) tool such as Terragrunt or a CI/CD pipeline.
This makes it easier to deploy the module consistently across multiple Google Cloud projects within your organization.
Ensure to inject secret values using the appropriate method for your infrastructure-as-code methodology.
Once the terraform apply command has successfully executed, the connection should be established within a few moments. Detected projects will be listed in the next section.
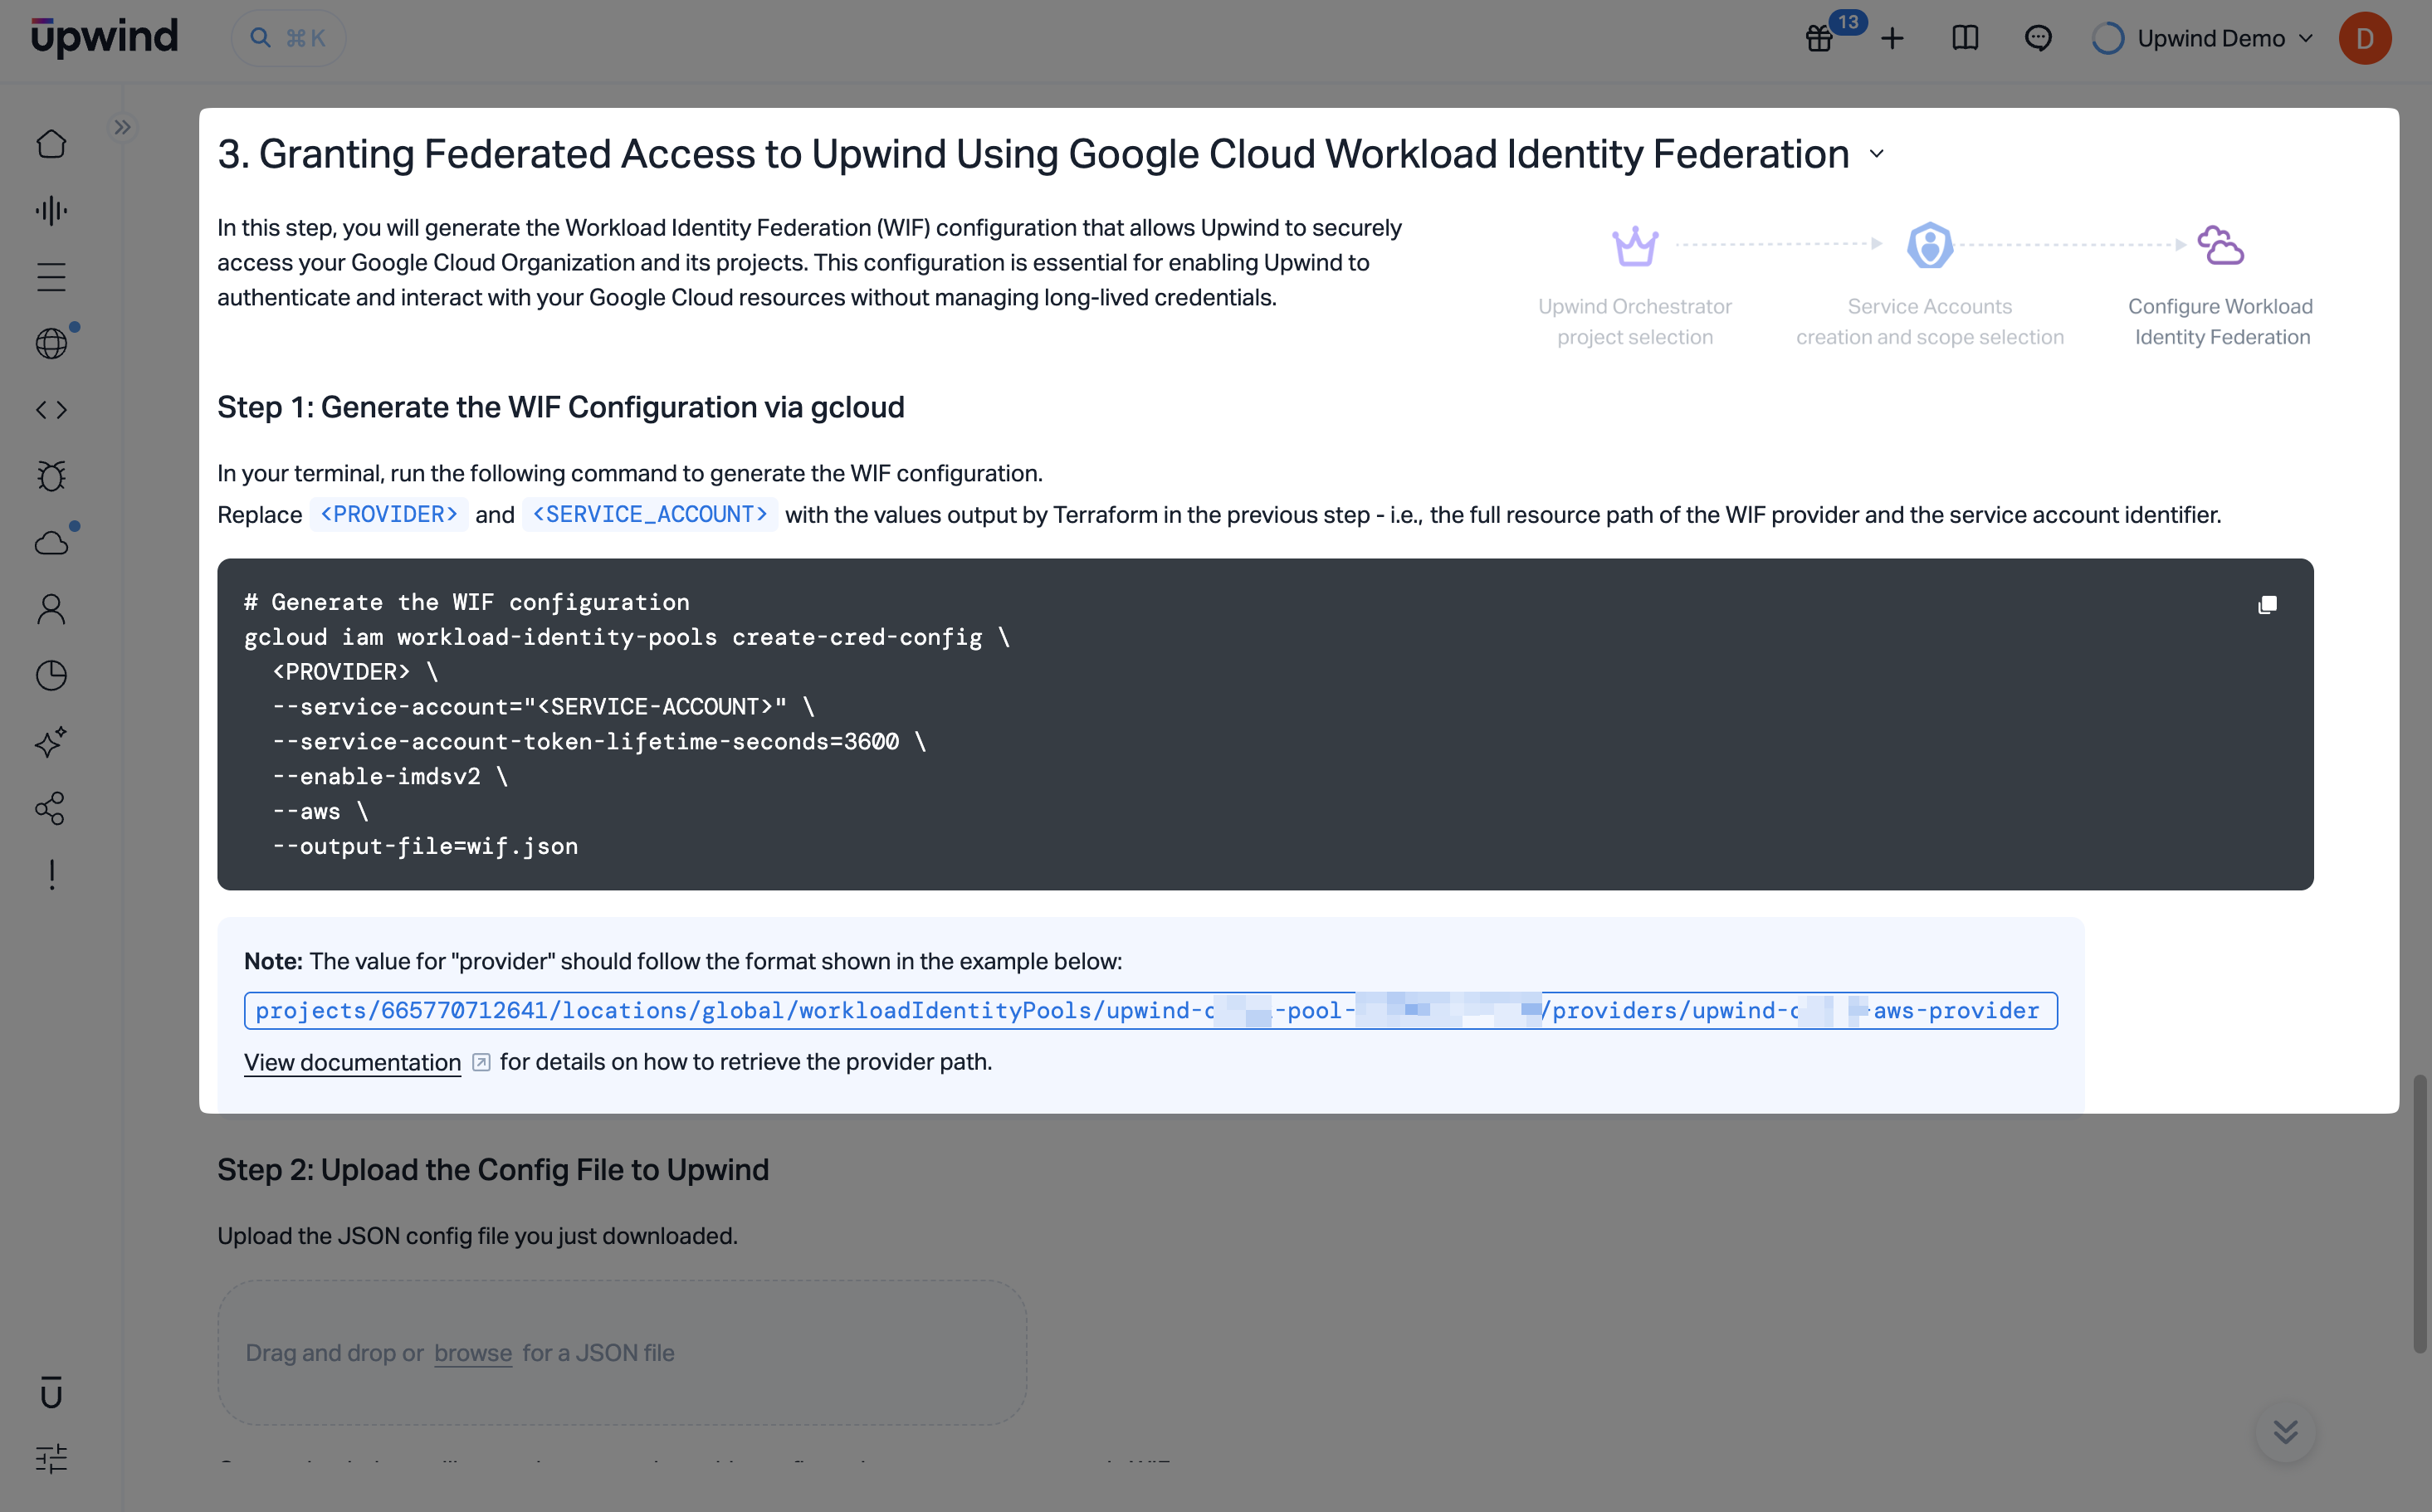
Step 3: Generate Workload Identity Federation (WIF) configuration
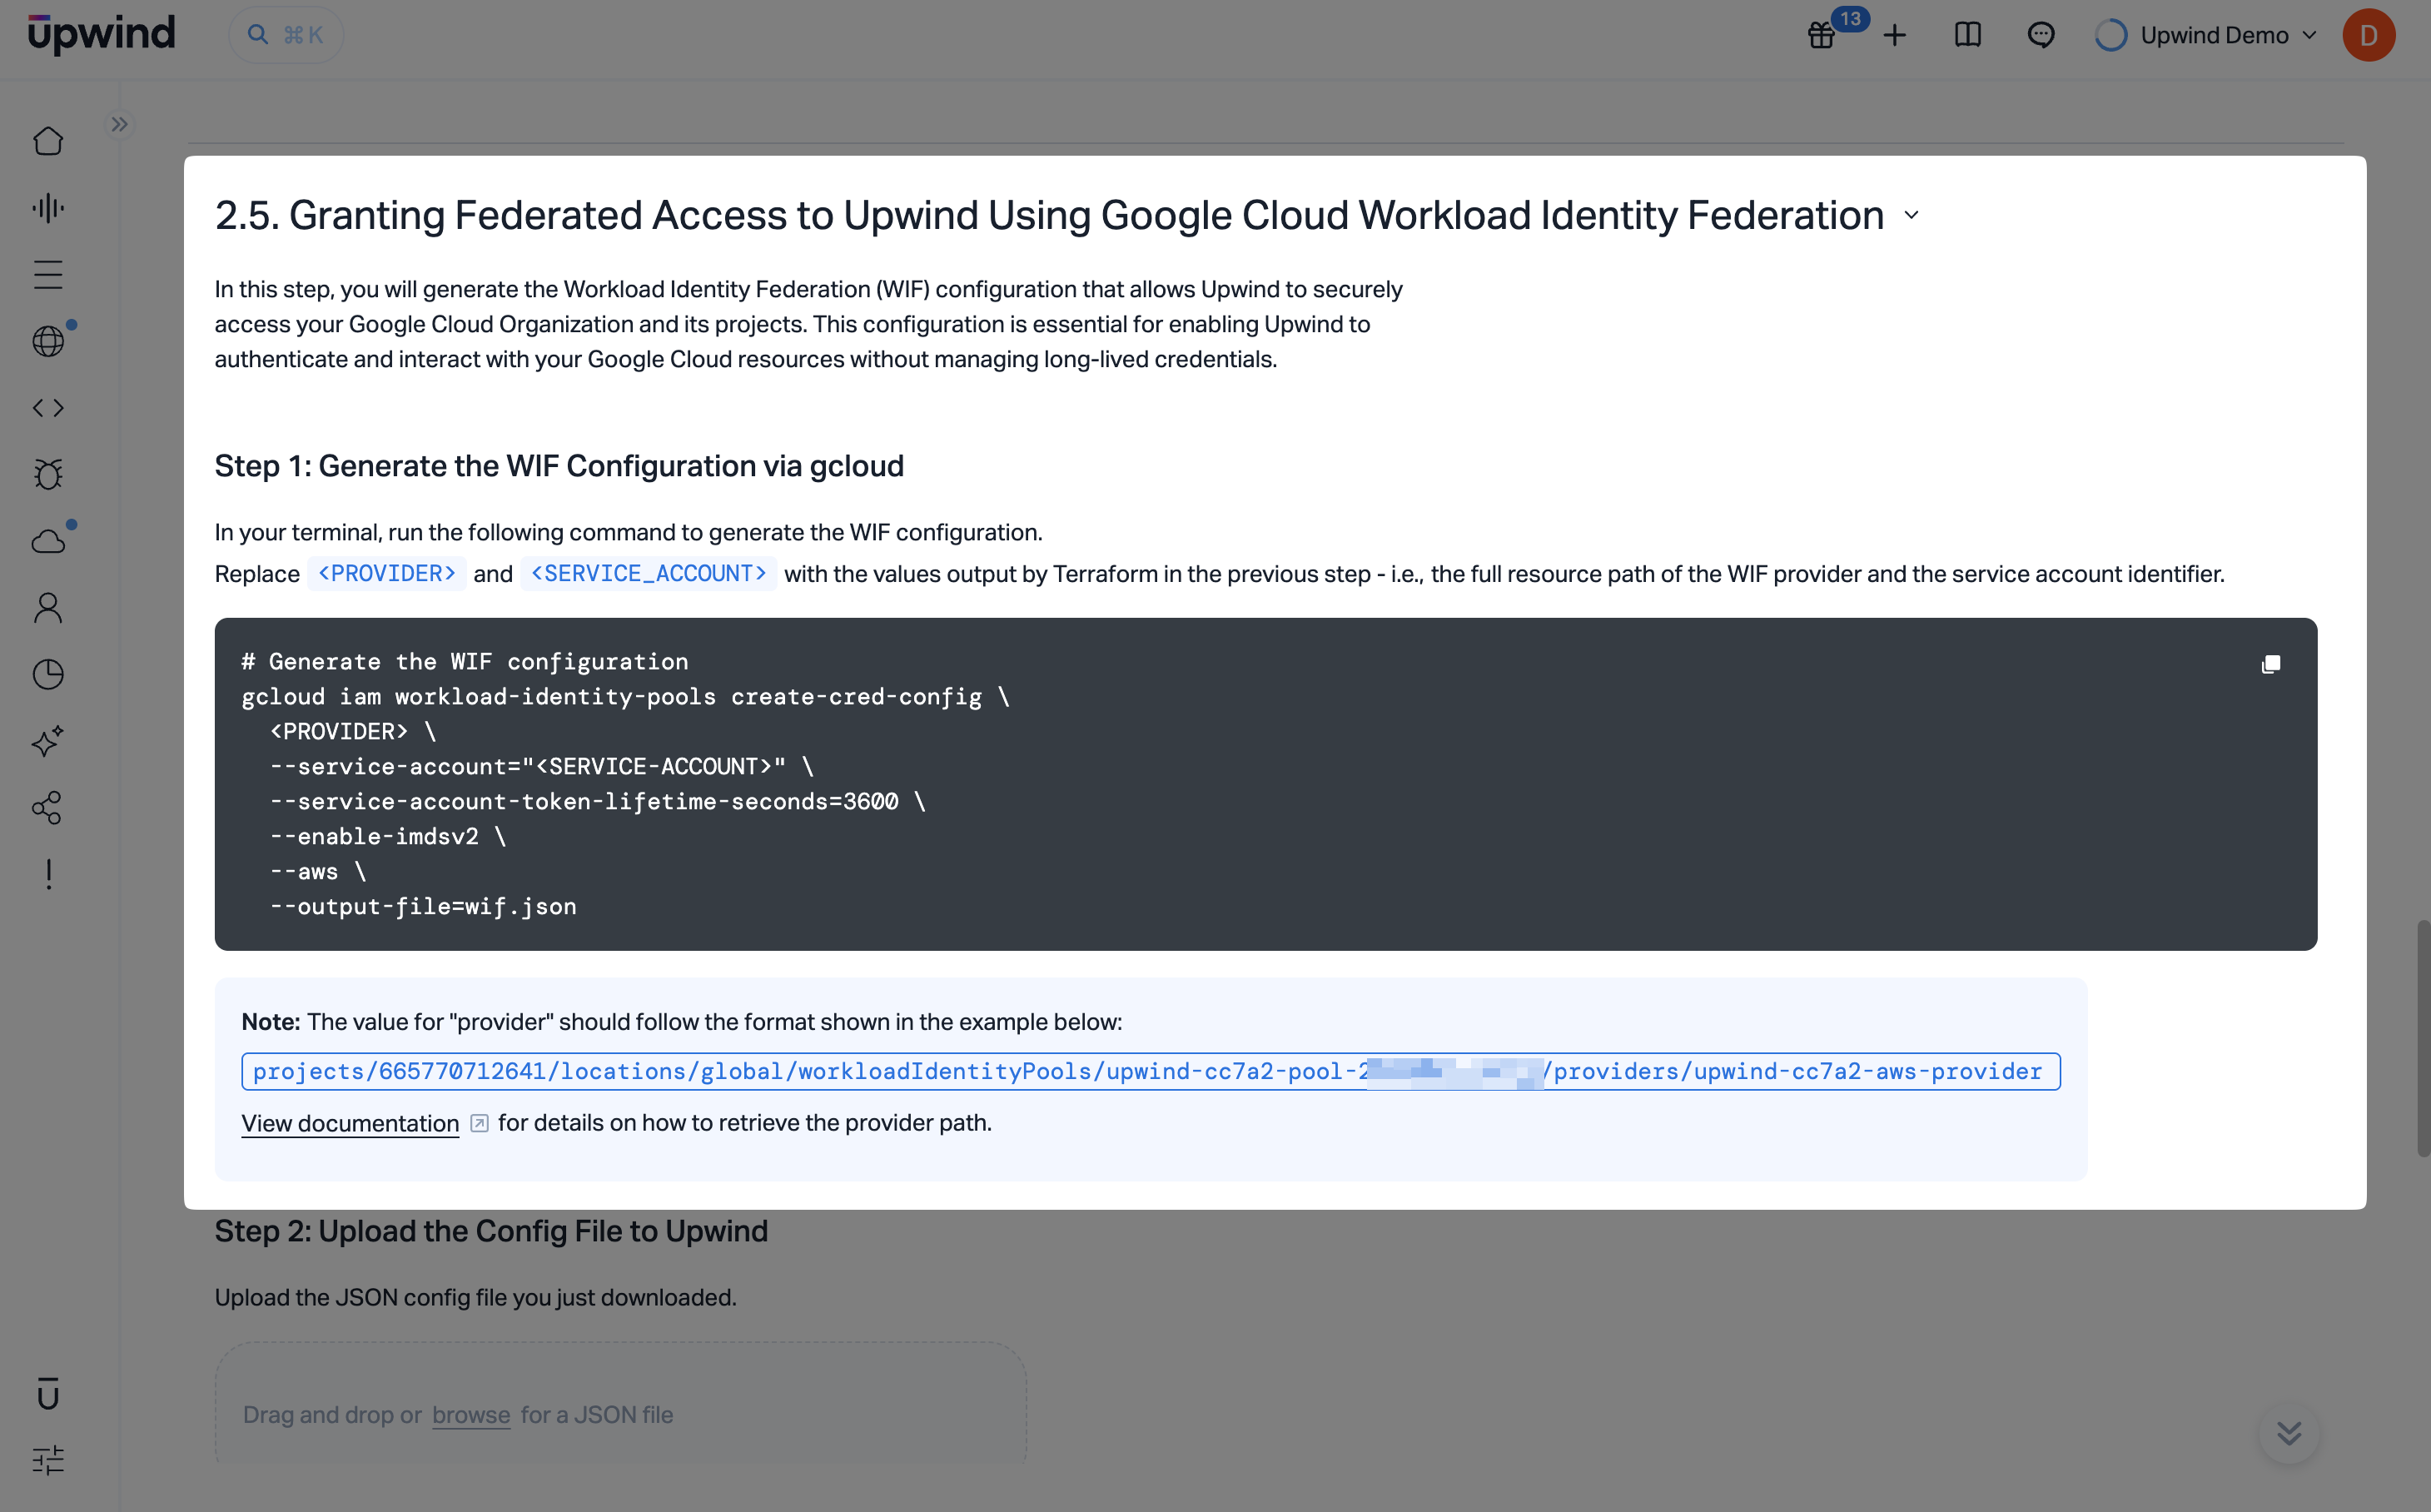
In this step, you will generate the Workload Identity Federation (WIF) configuration that allows Upwind to securely access your Google Cloud Organization and its projects. This configuration is essential for enabling Upwind to authenticate and interact with your Google Cloud resources without needing to manage long-lived credentials.
This page automatically generates a random suffix value for Terraform on each page load. Ensure that the command used to generate the WIF configuration matches the resources created by Terraform.
Some older versions of gcloud do not generate the WIF configuration with the universe_domain attribute. Ensure gcloud is up to date, and if this is not an option, inspect the configuration file and add the following line as the first attribute if missing:
"universe_domain": "googleapis.com",
-
To configure WIF via
gcloud, you will need to run the following command in your terminal:gcloud iam workload-identity-pools create-cred-config \
<PROVIDER> \
--service-account=<SERVICE_ACCOUNT> \
--service-account-token-lifetime-seconds=3600 \
--enable-imdsv2 \
--aws \
--output-file=wif.json- Replace
<PROVIDER>with the full path of the Google Cloud WIF Pool Provider generated during terraform apply, e.g.projects/665770712641/locations/global/workloadIdentityPools/upwind-cc7a2-pool-20250617-0842/providers/upwind-cc7a2-aws-provider - It can also be retrieved using the following commands:
# WORKLOAD_IDENTITY_POOL_PROJECT is the project ID where the WIF pool was created, e.g. `upwindsecurity-xa`
gcloud iam workload-identity-pools list --location=global --project=<WORKLOAD_IDENTITY_POOL_PROJECT>
# POOL is the full path of the WIF pool, e.g. `projects/665770712641/locations/global/workloadIdentityPools/upwind-cc7a2-pool-20250617-0842`
gcloud iam workload-identity-pools providers list --location=global --workload-identity-pool=<POOL>noteIt is important that the Pool name contains the project ID as a number, not as a string. Terraform may output this as a string, so ensure you convert it to a number if necessary.
- Replace
<SERVICE_ACCOUNT>with the service account email generated during terraform apply, e.g.upwind-mgmt-cc7a2-ycptwgku@upwindsecurity-xa.iam.gserviceaccount.com. - If desired, adjust the
--service-account-token-lifetime-secondsto set a different token lifetime (default is 3600 seconds).
- Replace
- Upload the generated WIF configuration file to Upwind in the Workload Identity Federation section of the Google Cloud Organization onboarding page.
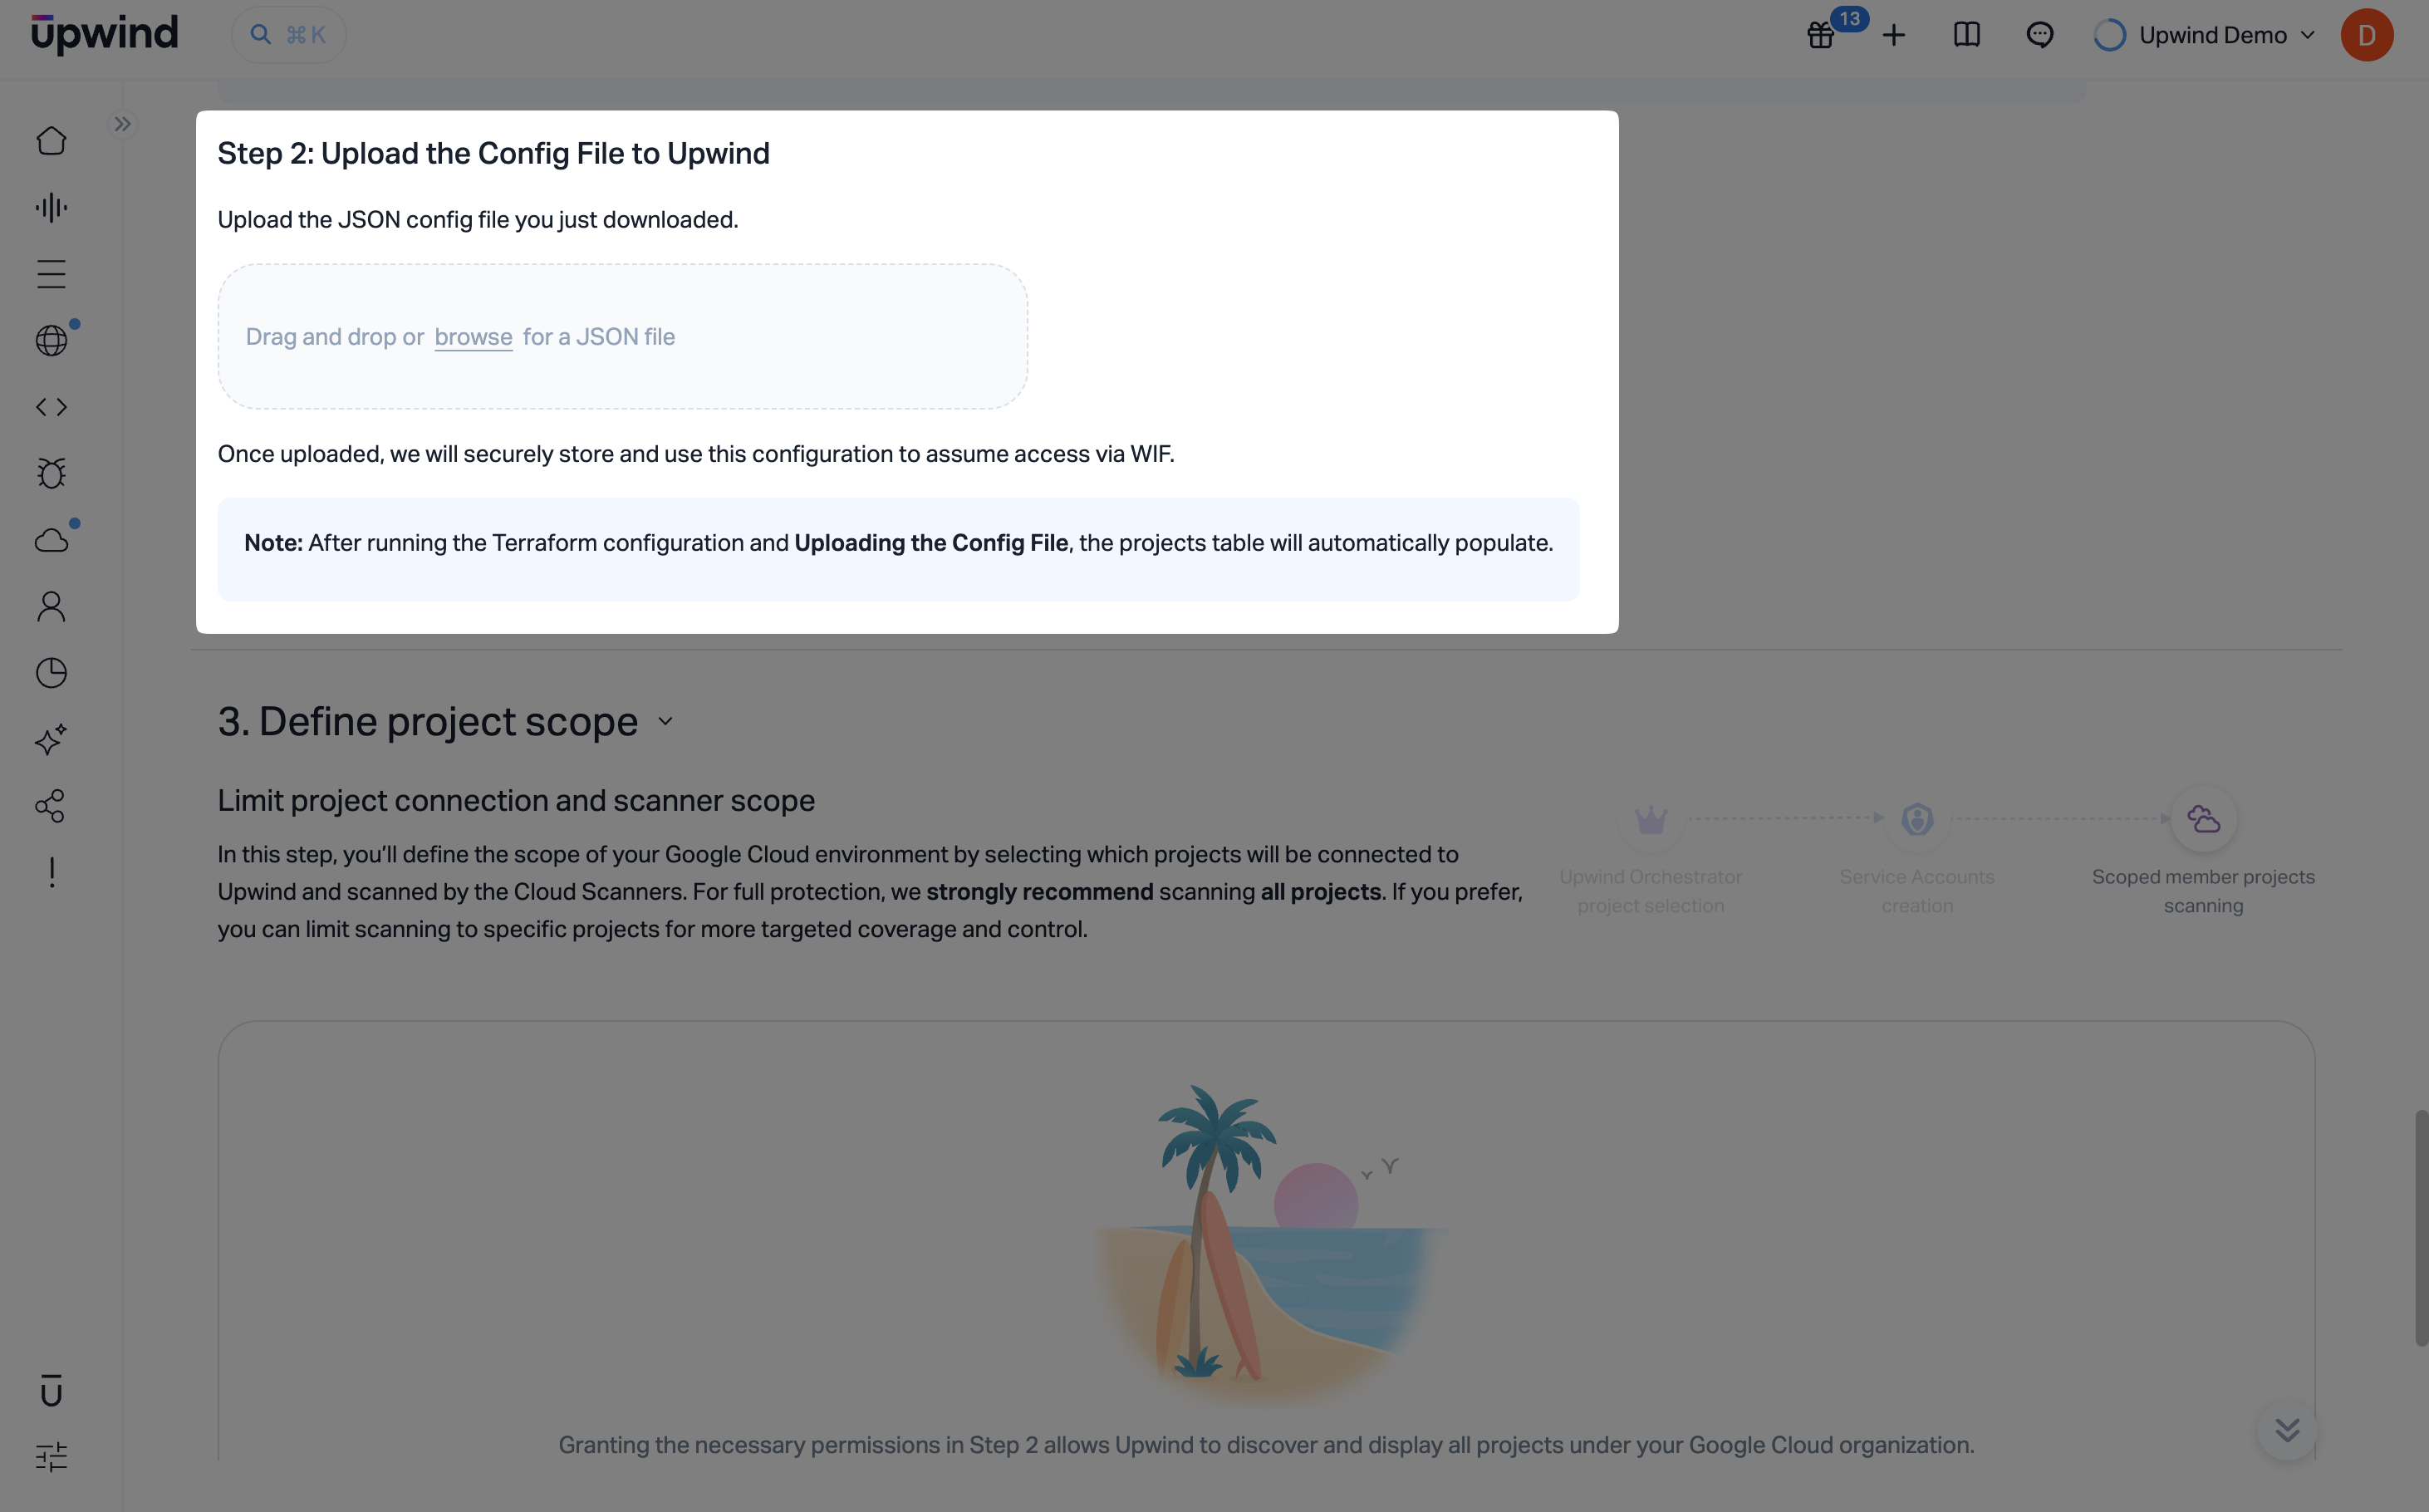
Step 4: Define Project Scope
The final step of the onboarding process allows you to define the scope for each Google Cloud project you've just connected - as well as for any new projects that may be created in the future.
-
This view displays your organization structure and connected projects, allowing you to choose which projects should be audited using Cloud APIs or scanned using Upwind Cloud Scanners.
-
Enable
Cloud APIto grant general access to the Upwind API. -
Enable
Cloud Scannerto deploy the Upwind Cloud Scanner in the selected project.Scope DependencyCloud Scanner scopes are dependent on the Cloud API scope. If you enable the Cloud Scanner scope, the Cloud API scope must also be enabled.
-
-
Enable Auto-Connect for New Projects - when enabled, all newly created projects under the organization will be automatically connected to Upwind. These projects will be granted Cloud API access and scanned by the Cloud Scanner by default, ensuring continuous visibility and protection without further setup.
Test and save
Test Connectivity by clicking the Test & Save button. This will store the scope settings and check the connection between Upwind and the Google Cloud organization. If successful, you will see a success message.
You're now fully connected to Upwind and protected across the selected Google Cloud projects.
Onboarding multiple Google Cloud Folders follows these stages:
- Step 1: Selecting the Google Cloud Folders and an Orchestrator project.
- Step 2: Deploying the Terraform module to create the necessary resources.
- Step 3: Generating a Workload Identity Federation (WIF) configuration to allow Upwind to access your Google Cloud Folders and their projects.
- Step 4: Defining which projects you want Upwind to scan.
- Log in to the Upwind Management Console .
- Select the + (plus) symbol at the top of the screen and select Connect cloud account.
- Choose Google Cloud Platform, and from there Connect Google Cloud Folders.
The Terraform module for folder onboarding uses the same permissions as organization onboarding but targets specific folders instead of the entire organization.
Step 1: Onboard your Google Cloud Folders and designate an Orchestrator Project
In this step, you will provide key identifiers from your Google Cloud environment and register them in the Upwind Management Console.
Step 1.1: Provide the parameters to identify your Google Cloud Folders
- Sign in to the Google Cloud Console using an account with organization-level access.
- Navigate to IAM & Admin → Settings.
- Copy your Folder IDs - these are the unique identifiers for the Google Cloud folders you want to onboard.
- Paste the Folder IDs into the
target_folder_idsparameter in the Terraform module, following the format["1234567890", "1234567891"].
Designate an Orchestrator Project
-
Enter the Project ID you want to designate as the Orchestrator Project. This project will be responsible for deploying and managing Cloud Scanner resources on behalf of your folders. The orchestrator project should have sufficient permissions to interact with folder-level resources and initiate scans across projects.
noteThe Orchestrator Project must belong to one of the folders you're onboarding and be granted the necessary permissions (via service account) to access and scan other projects within those folders. This does not have to be the folder's billing or parent project.
Step 1.2: Generate Credentials for Upwind
In this step, you will generate the client credentials that allow the Upwind Orchestrator Project to authenticate with the Upwind Authorization Service and interact with Upwind APIs. These credentials are required to connect your Google Cloud folders to Upwind and enable secure reporting and scanning.
You will generate two sets of credentials:
-
GoogleCloudFolderConnectionCredentials- used to authenticate and identify projects within your Google Cloud folders. These credentials are essential for allowing Upwind to discover, connect, and onboard your Google Cloud projects. -
GoogleCloudScannersReportingCredentials- used to securely report scan results from your Google Cloud projects back to Upwind. They enable continuous visibility by allowing Upwind to receive findings, metadata, and status updates from your scanned resources.
Click "Generate new client credentials" to create both sets of credentials. Once generated, they will be used in later steps to complete the onboarding process.
Step 2: Deploy the Terraform module to provision the necessary resources
In this step, you'll provision the necessary resources to enable Upwind to access and scan your Google Cloud projects within the specified folders.
The module will deploy all required resources and configure authentication via Workload Identity Federation. This will grant access to your Google Cloud environment specifically from Upwind's AWS environment.
This will then allow Upwind to automatically deploy the Cloud Scanner infrastructure - including required components like IAM roles and compute resources - ensuring full and continuous scanning coverage across your environment.
Target Folder IDs will need to be provided manually.
Step 2.1: Assign the required Google roles
-
Before proceeding, review all the settings and parameters to ensure the configuration settings are tailored to your environment.
-
Create a new directory for your Terraform project and navigate to it in your terminal. Inside the project directory.
-
Create a new file named
main.tfto hold the Terraform configuration. -
Copy the code snippet from the Terraform setup section and paste it into
main.tf.main.tfmodule "upwind_integration_gcp_folders_onboarding" {
source = "upwindsecurity/onboarding/gcp//modules/folder"
# (Optional) Specify the version of the module to use
# version = "~> x.y.z"
# Upwind Details
upwind_organization_id = "your-upwind-organization-id"
# Upwind Credentials
upwind_client_id = "your-unique-upwind-client-id"
upwind_client_secret = "your-unique-upwind-client-secret"
# Cloud Scanner Credentials
scanner_client_id = "your-unique-upwind-scanner-id"
scanner_client_secret = "your-unique-upwind-scanner-secret"
# Google Cloud Details
gcp_organization_id = "your-gcp-organization-id"
target_folder_ids = ["1234567890", "1234567891"]
# Google Cloud Project to act as the orchestrator
upwind_orchestrator_project = "orchestrator-project-name"
# Enable or disable Cloud Scanners
enable_cloudscanners = true
# Enable or disable Bucket scanning. Requires enable_cloudscanners to be true
enable_dspm_scanning = true
# (Optional) Define a custom service account display name
gcp_service_account_display_name = "Upwind Service Account"
# (Optional) Define a custom resource suffix for the Upwind resources
# This is limited to 10 characters and must be alphanumeric
resource_suffix = "upwind"
}
output "workload_identity_pool_project" {
description = "Full path name of the workload identity pool provider"
value = module.upwind_integration_gcp_onboarding.workload_identity_provider_name
}
output "service_account_email" {
description = "Email of the Upwind management service account"
value = module.upwind_integration_gcp_onboarding.upwind_management_service_account_email
}
Step 2.2: Terraform apply
The module can be run manually using terraform init && terraform apply, however, it was designed with the expectation that it will be integrated into an Infrastructure-as-Code (IaC) tool such as Terragrunt or a CI/CD pipeline.
This makes it easier to deploy the module consistently across multiple Google Cloud projects within your folders.
Ensure to inject secret values using the appropriate method for your infrastructure-as-code methodology.
Once the terraform apply command has successfully executed, the connection should be established within a few moments. Detected projects will be listed in the next section.
Step 3: Generate Workload Identity Federation (WIF) configuration
In this step, you will generate the Workload Identity Federation (WIF) configuration that allows Upwind to securely access your Google Cloud Folders and their projects. This configuration is essential for enabling Upwind to authenticate and interact with your Google Cloud resources without needing to manage long-lived credentials.
This page automatically generates a random suffix value for Terraform on each page load. Ensure that the command used to generate the WIF configuration matches the resources created by Terraform.
Some older versions of gcloud do not generate the WIF configuration with the universe_domain attribute. Ensure gcloud is up to date, and if this is not an option, inspect the configuration file and add the following line as the first attribute if missing:
"universe_domain": "googleapis.com",
-
To configure WIF via
gcloud, you will need to run the following command in your terminal:gcloud iam workload-identity-pools create-cred-config \
<PROVIDER> \
--service-account=<SERVICE_ACCOUNT> \
--service-account-token-lifetime-seconds=3600 \
--enable-imdsv2 \
--aws \
--output-file=wif.json- Replace
<PROVIDER>with the full path of the Google Cloud WIF Pool Provider generated during terraform apply, e.g.projects/665770712641/locations/global/workloadIdentityPools/upwind-cc7a2-pool-20250617-0842/providers/upwind-cc7a2-aws-provider - It can also be retrieved using the following commands:
# WORKLOAD_IDENTITY_POOL_PROJECT is the project ID where the WIF pool was created, e.g. `upwindsecurity-xa`
gcloud iam workload-identity-pools list --location=global --project=<WORKLOAD_IDENTITY_POOL_PROJECT>
# POOL is the full path of the WIF pool, e.g. `projects/665770712641/locations/global/workloadIdentityPools/upwind-cc7a2-pool-20250617-0842`
gcloud iam workload-identity-pools providers list --location=global --workload-identity-pool=<POOL>noteIt is important that the Pool name contains the project ID as a number, not as a string. Terraform may output this as a string, so ensure you convert it to a number if necessary.
- Replace
<SERVICE_ACCOUNT>with the service account email generated during terraform apply, e.g.upwind-mgmt-cc7a2-ycptwgku@upwindsecurity-xa.iam.gserviceaccount.com.
- Replace
-
Upload the generated WIF configuration file to Upwind in the Workload Identity Federation section of the Google Cloud Folders onboarding page.
Step 4: Define Project Scope
The final step of the onboarding process allows you to define the scope for each Google Cloud project you've just connected - as well as for any new projects that may be created in the future.
-
This view displays your folder structure and connected projects, allowing you to choose which projects should be audited using Cloud APIs or scanned using Upwind Cloud Scanners.
-
Enable
Cloud APIto grant general access to the Upwind API. -
Enable
Cloud Scannerto deploy the Upwind Cloud Scanner in the selected project.Scope DependencyCloud Scanner scopes are dependent on the Cloud API scope. If you enable the Cloud Scanner scope, the Cloud API scope must also be enabled.
-
-
Enable Auto-Connect for New Projects - when enabled, all newly created projects under the folders will be automatically connected to Upwind. These projects will be granted Cloud API access and scanned by the Cloud Scanner by default, ensuring continuous visibility and protection without further setup.
Test and save
Test Connectivity by clicking the Test & Save button. This will store the scope settings and check the connection between Upwind and the Google Cloud folders. If successful, you will see a success message.
You're now fully connected to Upwind and protected across the selected Google Cloud projects within your folders.
Onboarding multiple Google Cloud Projects follows these stages:
- Step 1: Selecting the Google Cloud Projects and an Orchestrator project.
- Step 2: Deploying the Terraform module to create the necessary resources.
- Step 3: Generating a Workload Identity Federation (WIF) configuration to allow Upwind to access your Google Cloud Projects.
- Step 4: Defining which projects you want Upwind to scan.
Connecting multiple projects at once would organize them together under the same organization. One of the projects is selected as an Orchestrator project, and this project will be responsible for deploying and managing Cloud Scanner resources on behalf of the others.
In the Organizations and Accounts page, these organizations are located under the same organization, and not under the single accounts section.
- Log in to the Upwind Management Console .
- Select the + (plus) symbol at the top of the screen and select Connect cloud account.
- Choose Google Cloud Platform, and from there Connect Google Cloud Projects.
Step 1: Onboard your Google Cloud Projects and designate an Orchestrator Project
In this step, you will provide key identifiers from your Google Cloud environment and register them in the Upwind Management Console.
Step 1.1: Provide the parameters to identify your Google Cloud Projects
- Sign in to the Google Cloud Console using an account with project-level access.
- Navigate to IAM & Admin → Settings.
- Copy your Project IDs - these are the unique identifiers for the Google Cloud projects you want to onboard.
- Save the Project IDs for the
target_project_idsparameter in the Terraform module later, following the format["project-id-1", "project-id-2"].
Designate an Orchestrator Project
-
Enter the Project ID you want to designate as the Orchestrator Project. This project will be responsible for deploying and managing Cloud Scanner resources on behalf of your projects. The orchestrator project should have sufficient permissions to interact with project-level resources and initiate scans.
noteThe Orchestrator Project must be one of the projects you're onboarding and be granted the necessary permissions (via service account) to access and scan other projects. This does not have to be a billing or parent project.
Step 1.2: Generate Credentials for Upwind
In this step, you will generate the client credentials that allow the Upwind Orchestrator Project to authenticate with the Upwind Authorization Service and interact with Upwind APIs. These credentials are required to connect your Google Cloud projects to Upwind and enable secure reporting and scanning.
You will generate two sets of credentials:
-
GoogleCloudProjectConnectionCredentials- used to authenticate and identify the Google Cloud projects. These credentials are essential for allowing Upwind to discover, connect, and onboard your Google Cloud projects. -
GoogleCloudScannersReportingCredentials- used to securely report scan results from your Google Cloud projects back to Upwind. They enable continuous visibility by allowing Upwind to receive findings, metadata, and status updates from your scanned resources.
Click "Generate new client credentials" to create both sets of credentials. Once generated, they will be used in later steps to complete the onboarding process.
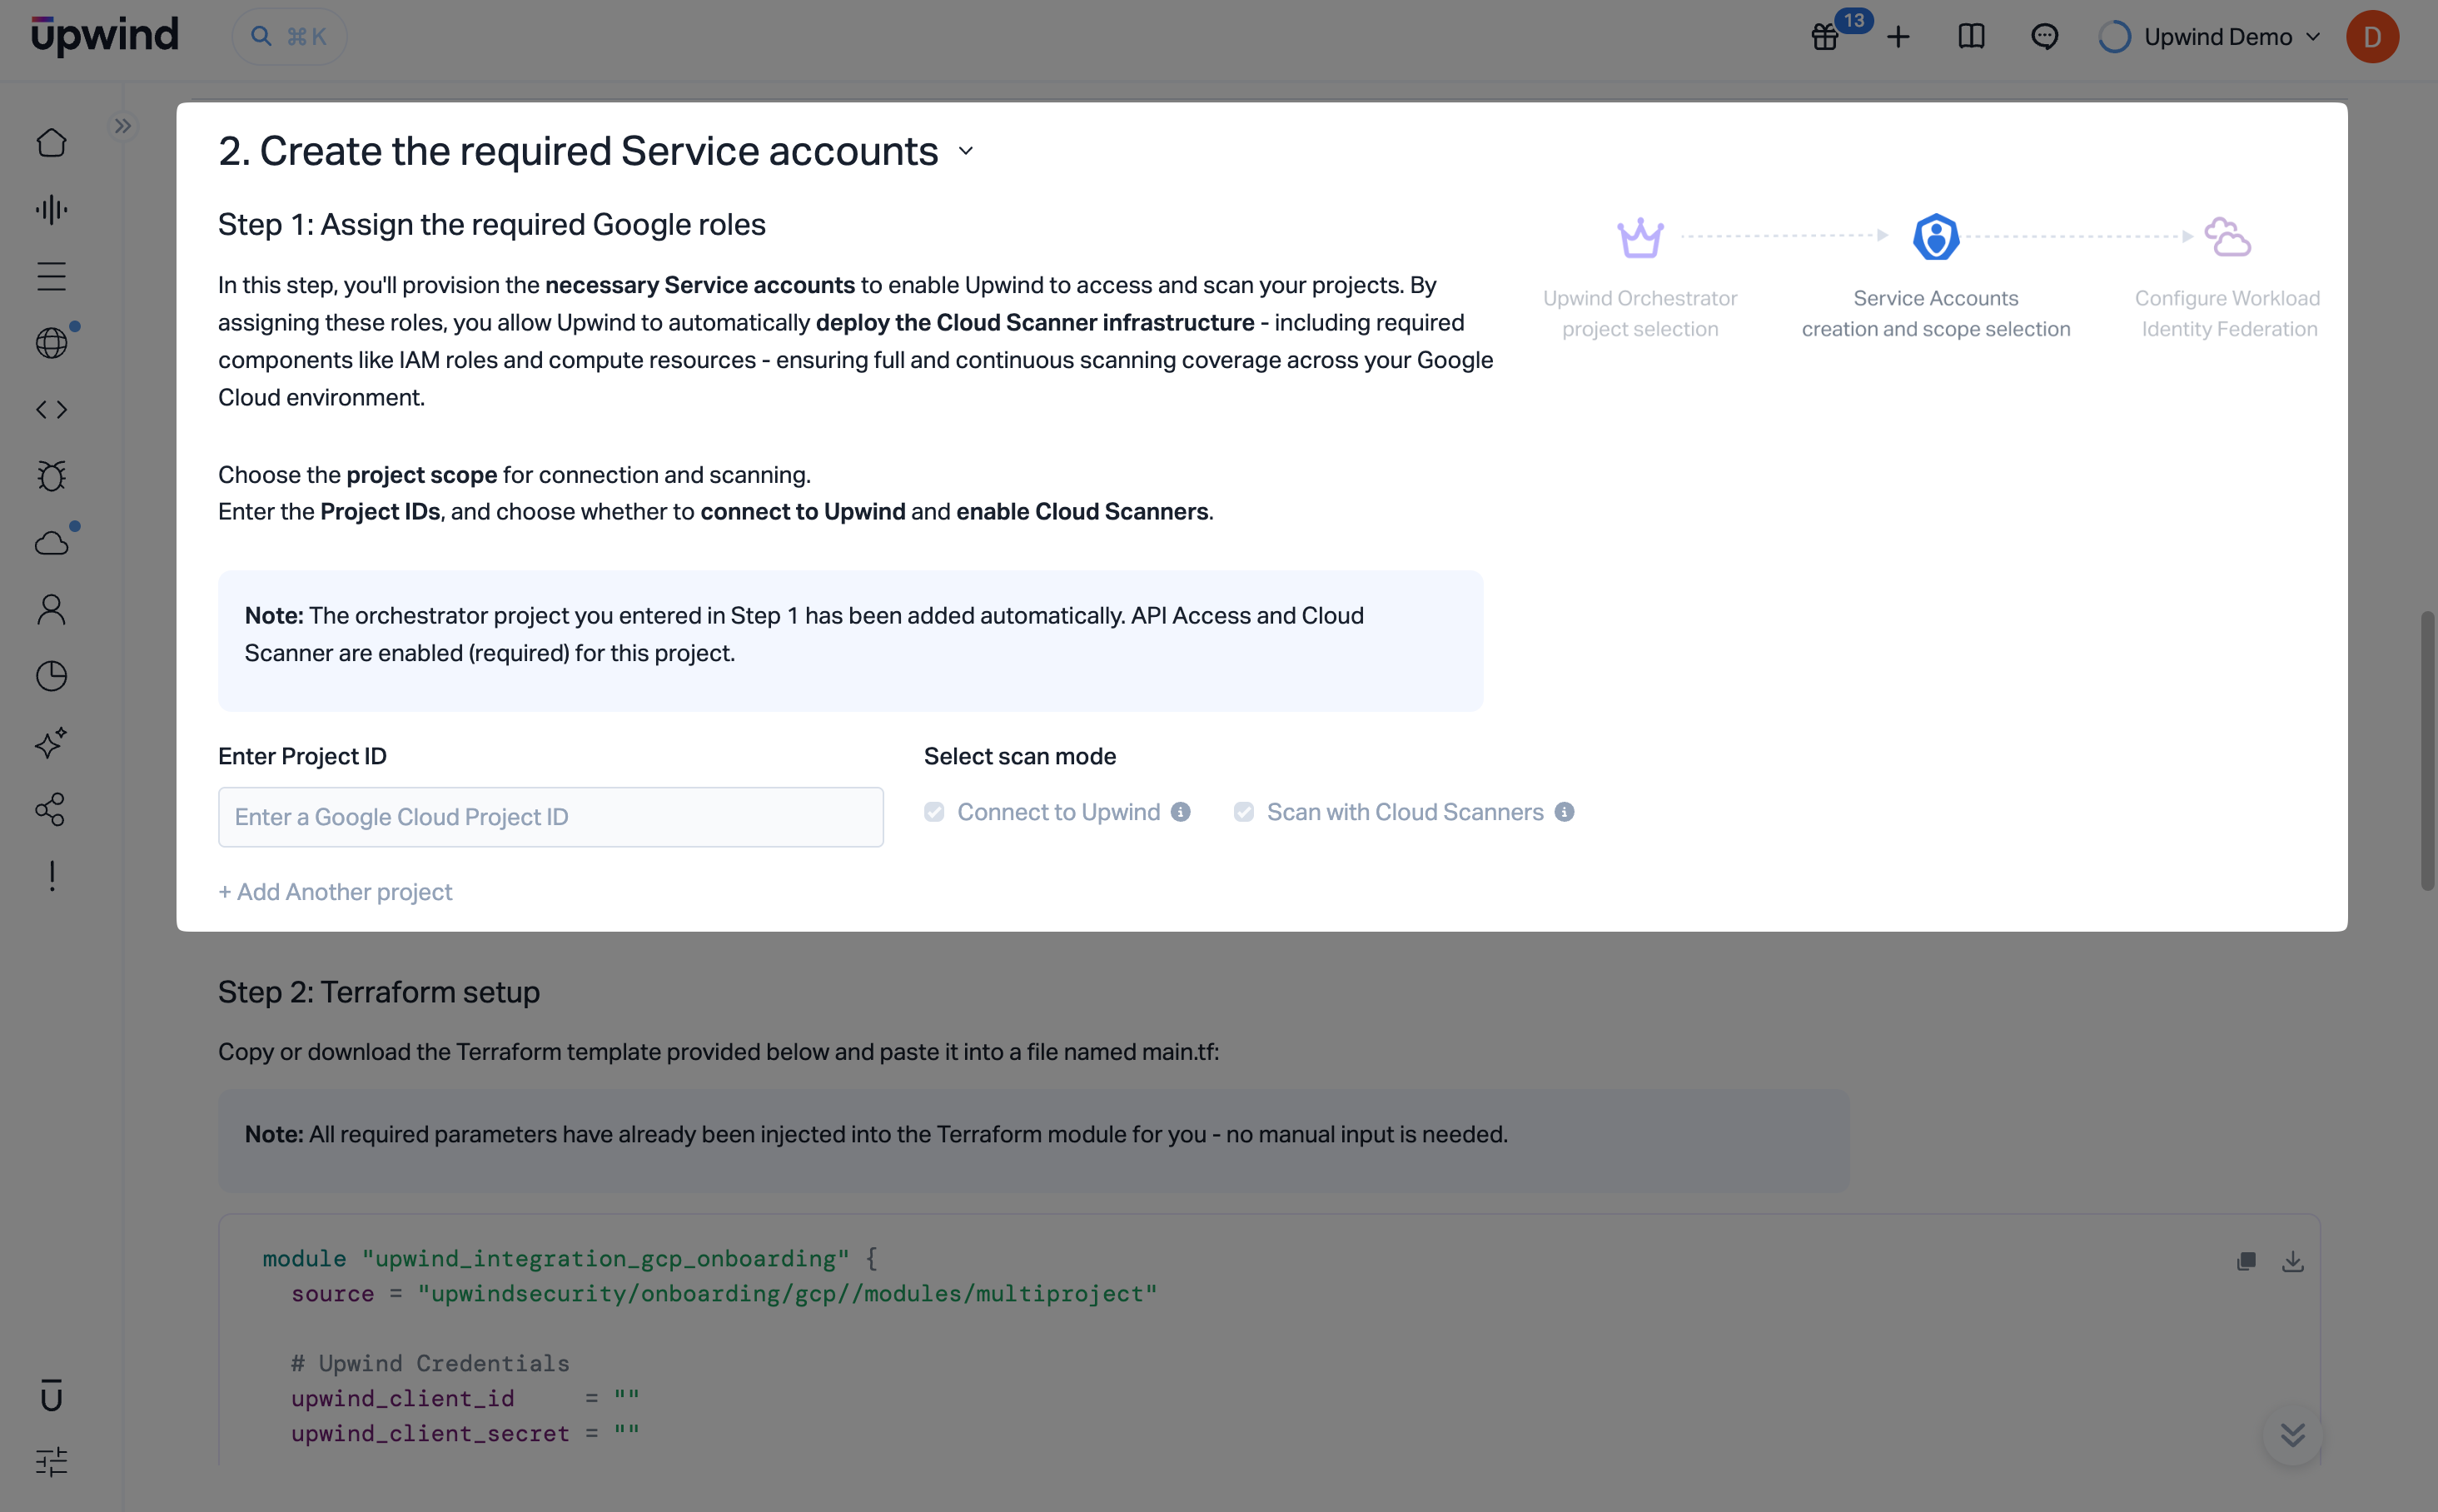
Step 2: Deploy the Terraform module to provision the necessary resources
In this step, you'll provision the necessary resources to enable Upwind to access and scan your Google Cloud project. You will also deploy a Terraform module that would set the infrastructure for Upwind's Cloud Scanner.
The Terraform module for project onboarding requires reduced permissions compared to organization or folder onboarding. You only need project admin permissions - no organization admin access is required.
The module will deploy all required resources and configure authentication via Workload Identity Federation. This will grant access to your Google Cloud environment specifically from Upwind's AWS environment.
This will then allow Upwind to automatically deploy the Cloud Scanner infrastructure - including required components like IAM roles and compute resources - ensuring full and continuous scanning coverage across your environment.
Target Project IDs will need to be provided manually.
Step 2.1: Assign the required Google roles
-
Before proceeding, review all the settings and parameters to ensure the configuration settings are tailored to your environment.
-
Create a new directory for your Terraform project and navigate to it in your terminal. Inside the project directory.
-
Create a new file named
main.tfto hold the Terraform configuration. -
Copy the code snippet from the Terraform setup section and paste it into
main.tf.main.tfmodule "upwind_integration_gcp_onboarding" {
source = "upwindsecurity/onboarding/gcp//modules/multiproject"
# Upwind Credentials
upwind_client_id = "<client-id>"
upwind_client_secret = "<client-secret>"
# Cloud Scanner Credentials
scanner_client_id = "<scanner-client-id>"
scanner_client_secret = "<scanner-client-secret>"
# Upwind Organization Info
upwind_organization_id = "<your-upwind-organization-id>"
# Google Cloud Project IDs
target_project_ids = [ <project-id - you can add multiple ids> ]
# Project to act as the orchestrator
upwind_orchestrator_project = "<orchestrator-project-id>"
# Enable or disable Cloud Scanners
enable_cloudscanners = true
# Enable or disable Bucket scanning. Requires enable_cloudscanners to be true
enable_dspm_scanning = true
workload_identity_trusted_account = "<trusted-account-id>"
resource_suffix = "<suffix - auto generated>"
google_service_account_display_name = "Upwind Management Service Account (custom)"
}
output "workload_identity_provider_name" {
description = "Full path name of the workload identity pool provider"
value = module.upwind_integration_gcp_onboarding.workload_identity_provider_name
}
output "service_account_email" {
description = "Email of the Upwind management service account"
value = module.upwind_integration_gcp_onboarding.upwind_management_service_account_email
}
Step 2.2: Terraform apply
The module can be run manually using terraform init && terraform apply, however, it was designed with the expectation that it will be integrated into an Infrastructure-as-Code (IaC) tool such as Terragrunt or a CI/CD pipeline.
This makes it easier to deploy the module consistently across multiple Google Cloud projects.
Ensure to inject secret values using the appropriate method for your infrastructure-as-code methodology.
Once the terraform apply command has successfully executed, the connection should be established within a few moments. Detected projects will be listed in the next section.
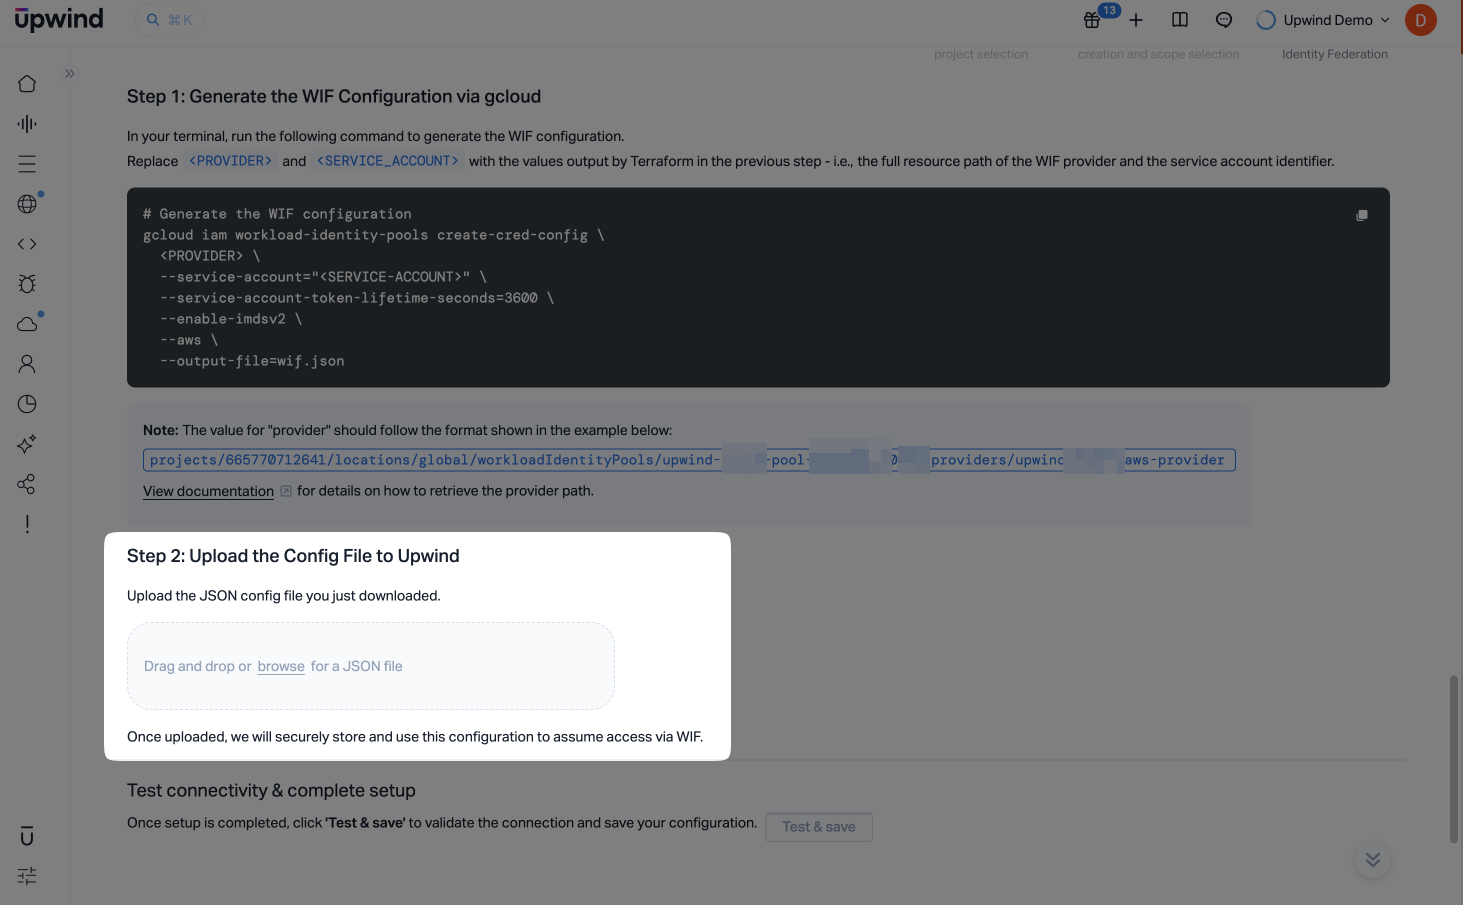
Step 3: Generate Workload Identity Federation (WIF) configuration
In this step, you will generate the Workload Identity Federation (WIF) configuration that allows Upwind to securely access your Google Cloud Projects. This configuration is essential for enabling Upwind to authenticate and interact with your Google Cloud resources without needing to manage long-lived credentials.
This page automatically generates a random suffix value for Terraform on each page load. Ensure that the command used to generate the WIF configuration matches the resources created by Terraform.
Some older versions of gcloud do not generate the WIF configuration with the universe_domain attribute. Ensure gcloud is up to date, and if this is not an option, inspect the configuration file and add the following line as the first attribute if missing:
"universe_domain": "googleapis.com",
-
To configure WIF via
gcloud, you will need to run the following command in your terminal:gcloud iam workload-identity-pools create-cred-config \
<PROVIDER> \
--service-account=<SERVICE_ACCOUNT> \
--service-account-token-lifetime-seconds=3600 \
--enable-imdsv2 \
--aws \
--output-file=wif.json- Replace
<PROVIDER>with the full path of the Google Cloud WIF Pool Provider generated during terraform apply, e.g.projects/665770712641/locations/global/workloadIdentityPools/upwind-cc7a2-pool-20250617-0842/providers/upwind-cc7a2-aws-provider - It can also be retrieved using the following commands:
# WORKLOAD_IDENTITY_POOL_PROJECT is the project ID where the WIF pool was created, e.g. `upwindsecurity-xa`
gcloud iam workload-identity-pools list --location=global --project=<WORKLOAD_IDENTITY_POOL_PROJECT>
# POOL is the full path of the WIF pool, e.g. `projects/665770712641/locations/global/workloadIdentityPools/upwind-cc7a2-pool-20250617-0842`
gcloud iam workload-identity-pools providers list --location=global --workload-identity-pool=<POOL>noteIt is important that the Pool name contains the project ID as a number, not as a string. Terraform may output this as a string, so ensure you convert it to a number if necessary.
- Replace
<SERVICE_ACCOUNT>with the service account email generated during terraform apply, e.g.upwind-mgmt-cc7a2-ycptwgku@upwindsecurity-xa.iam.gserviceaccount.com.
- Replace
- Upload the generated WIF configuration file to Upwind in the Workload Identity Federation section of the Google Cloud Projects onboarding page.
Step 4: Define Project Scope
The final step of the onboarding process allows you to define the scope for each Google Cloud project you've just connected.
- This view displays your connected projects, allowing you to choose which projects should be audited using Cloud APIs or scanned using Upwind Cloud Scanners.
-
Enable
Cloud APIto grant general access to the Upwind API. -
Enable
Cloud Scannerto deploy the Upwind Cloud Scanner in the selected project.Scope DependencyCloud Scanner scopes are dependent on the Cloud API scope. If you enable the Cloud Scanner scope, the Cloud API scope must also be enabled.
-
Test and save
Test Connectivity by clicking the Test & Save button. This will store the scope settings and check the connection between Upwind and the Google Cloud projects. If successful, you will see a success message.
You're now fully connected to Upwind and protected across the selected Google Cloud projects.
Troubleshooting
If you encounter issues during deployment or operation, consult the Troubleshooting guide for solutions and best practices.