Instructions
Overview
This article walks through connecting Azure to Upwind using the onboarding flows in the Upwind Management Console .
Under Integration Steps, choose the scope that matches what you are connecting, then follow the deployment method tab that matches the console:
- Connect Azure tenant: Use this path when you want to onboard a full Azure tenant. You will validate access with a preflight check, register the tenant root and an orchestrator subscription, generate credentials, and complete app registration and role assignments so Upwind can reach your environment. Then deploy with either Terraform or Azure Resource Manager (ARM), choose which subscriptions participate in Cloud API and Cloud Scanner coverage, and finish with Test & Save.
- Connect Azure subscription(s): Use this path when you want to onboard several subscriptions or one or more management groups without a full-tenant integration. The flow is similar: preflight check, tenant root and orchestrator subscription, and credentials so Upwind knows where to run from. You then define which subscriptions or management groups to include, complete app registration and role assignments, apply the generated Terraform, and use Test & Save to confirm the connection.
The sections below the tabs cover platform limits and troubleshooting for Cloud Scanner deployments.
Integration Steps
- Connect Azure tenant
- Connect Azure subscription(s)
- Terraform
- Azure Resource Manager
Onboarding an Azure tenant with Terraform follows these stages:
- Choose the Azure tenant integration path and Terraform as the deployment method in the Upwind Management Console.
- Provide the tenant root management group and an orchestrator subscription, then generate Upwind client credentials.
- Complete app registration and role assignment steps in the console, then copy the generated Terraform into
main.tfand runterraform apply. - Define which subscriptions use Cloud API auditing and Cloud Scanner coverage, then use Test & Save to verify and store the connection.
- Log in to the Upwind Management Console .
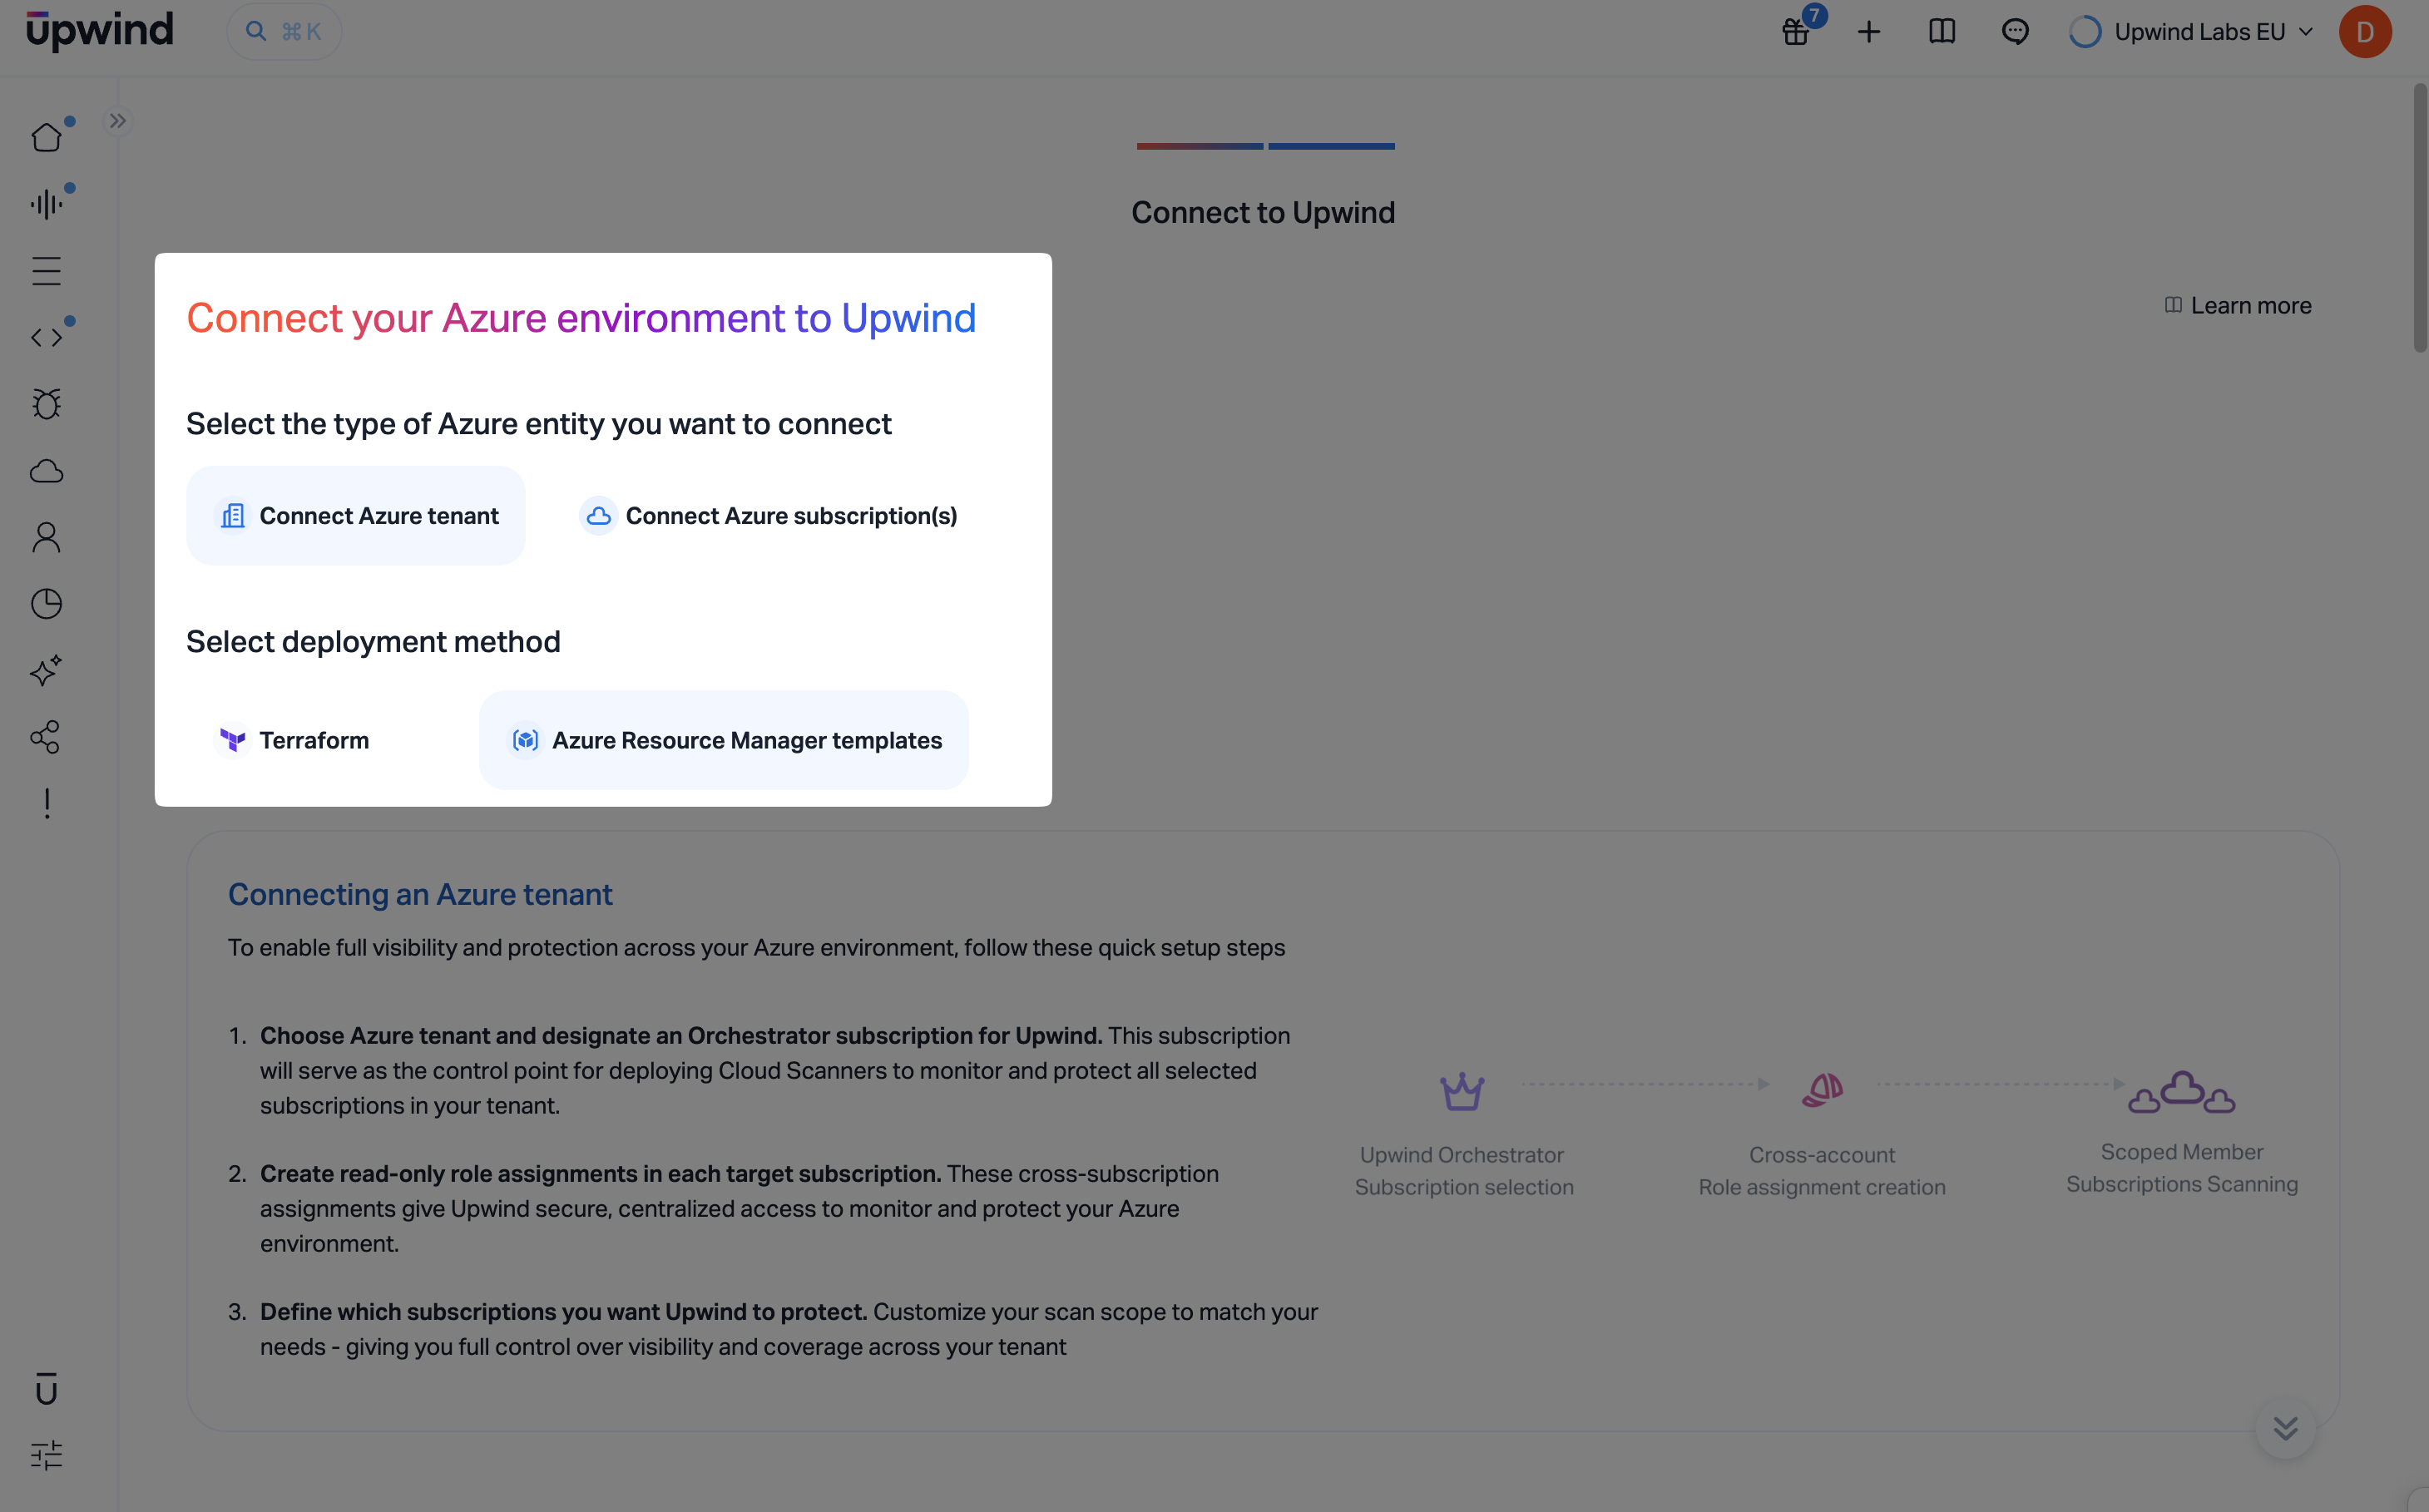
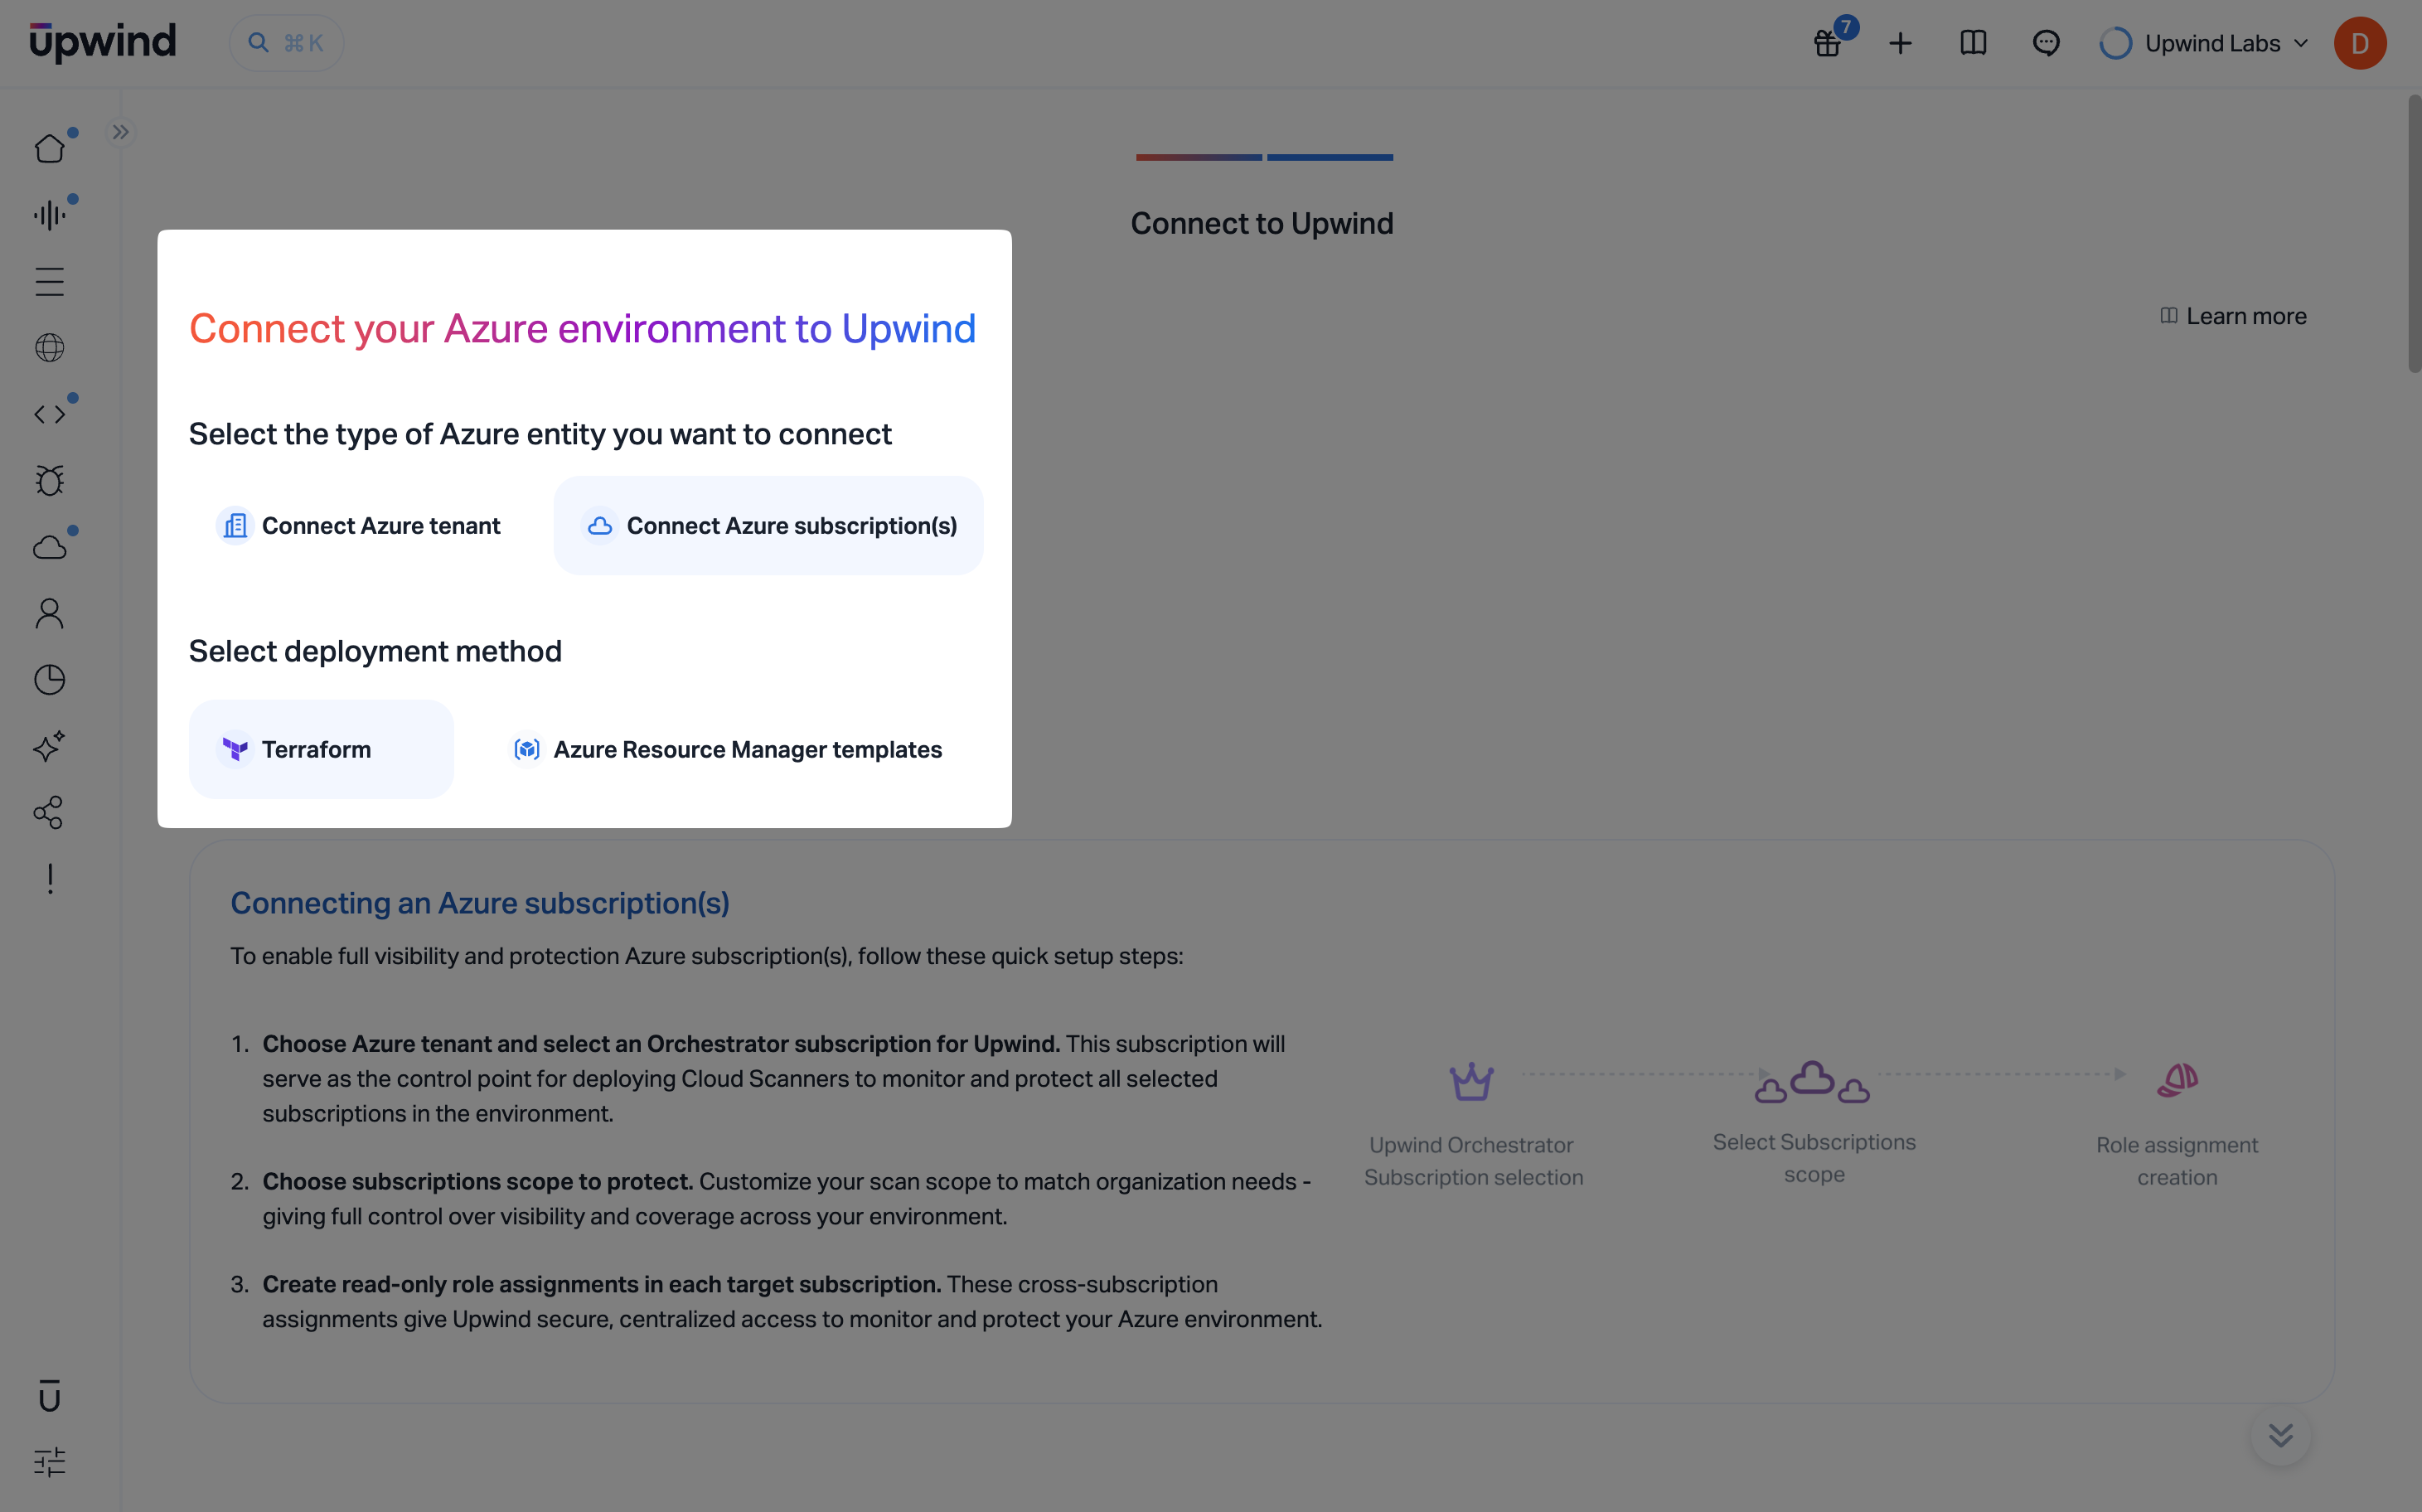
- Select the plus symbol at the top of the screen and choose Connect cloud account.
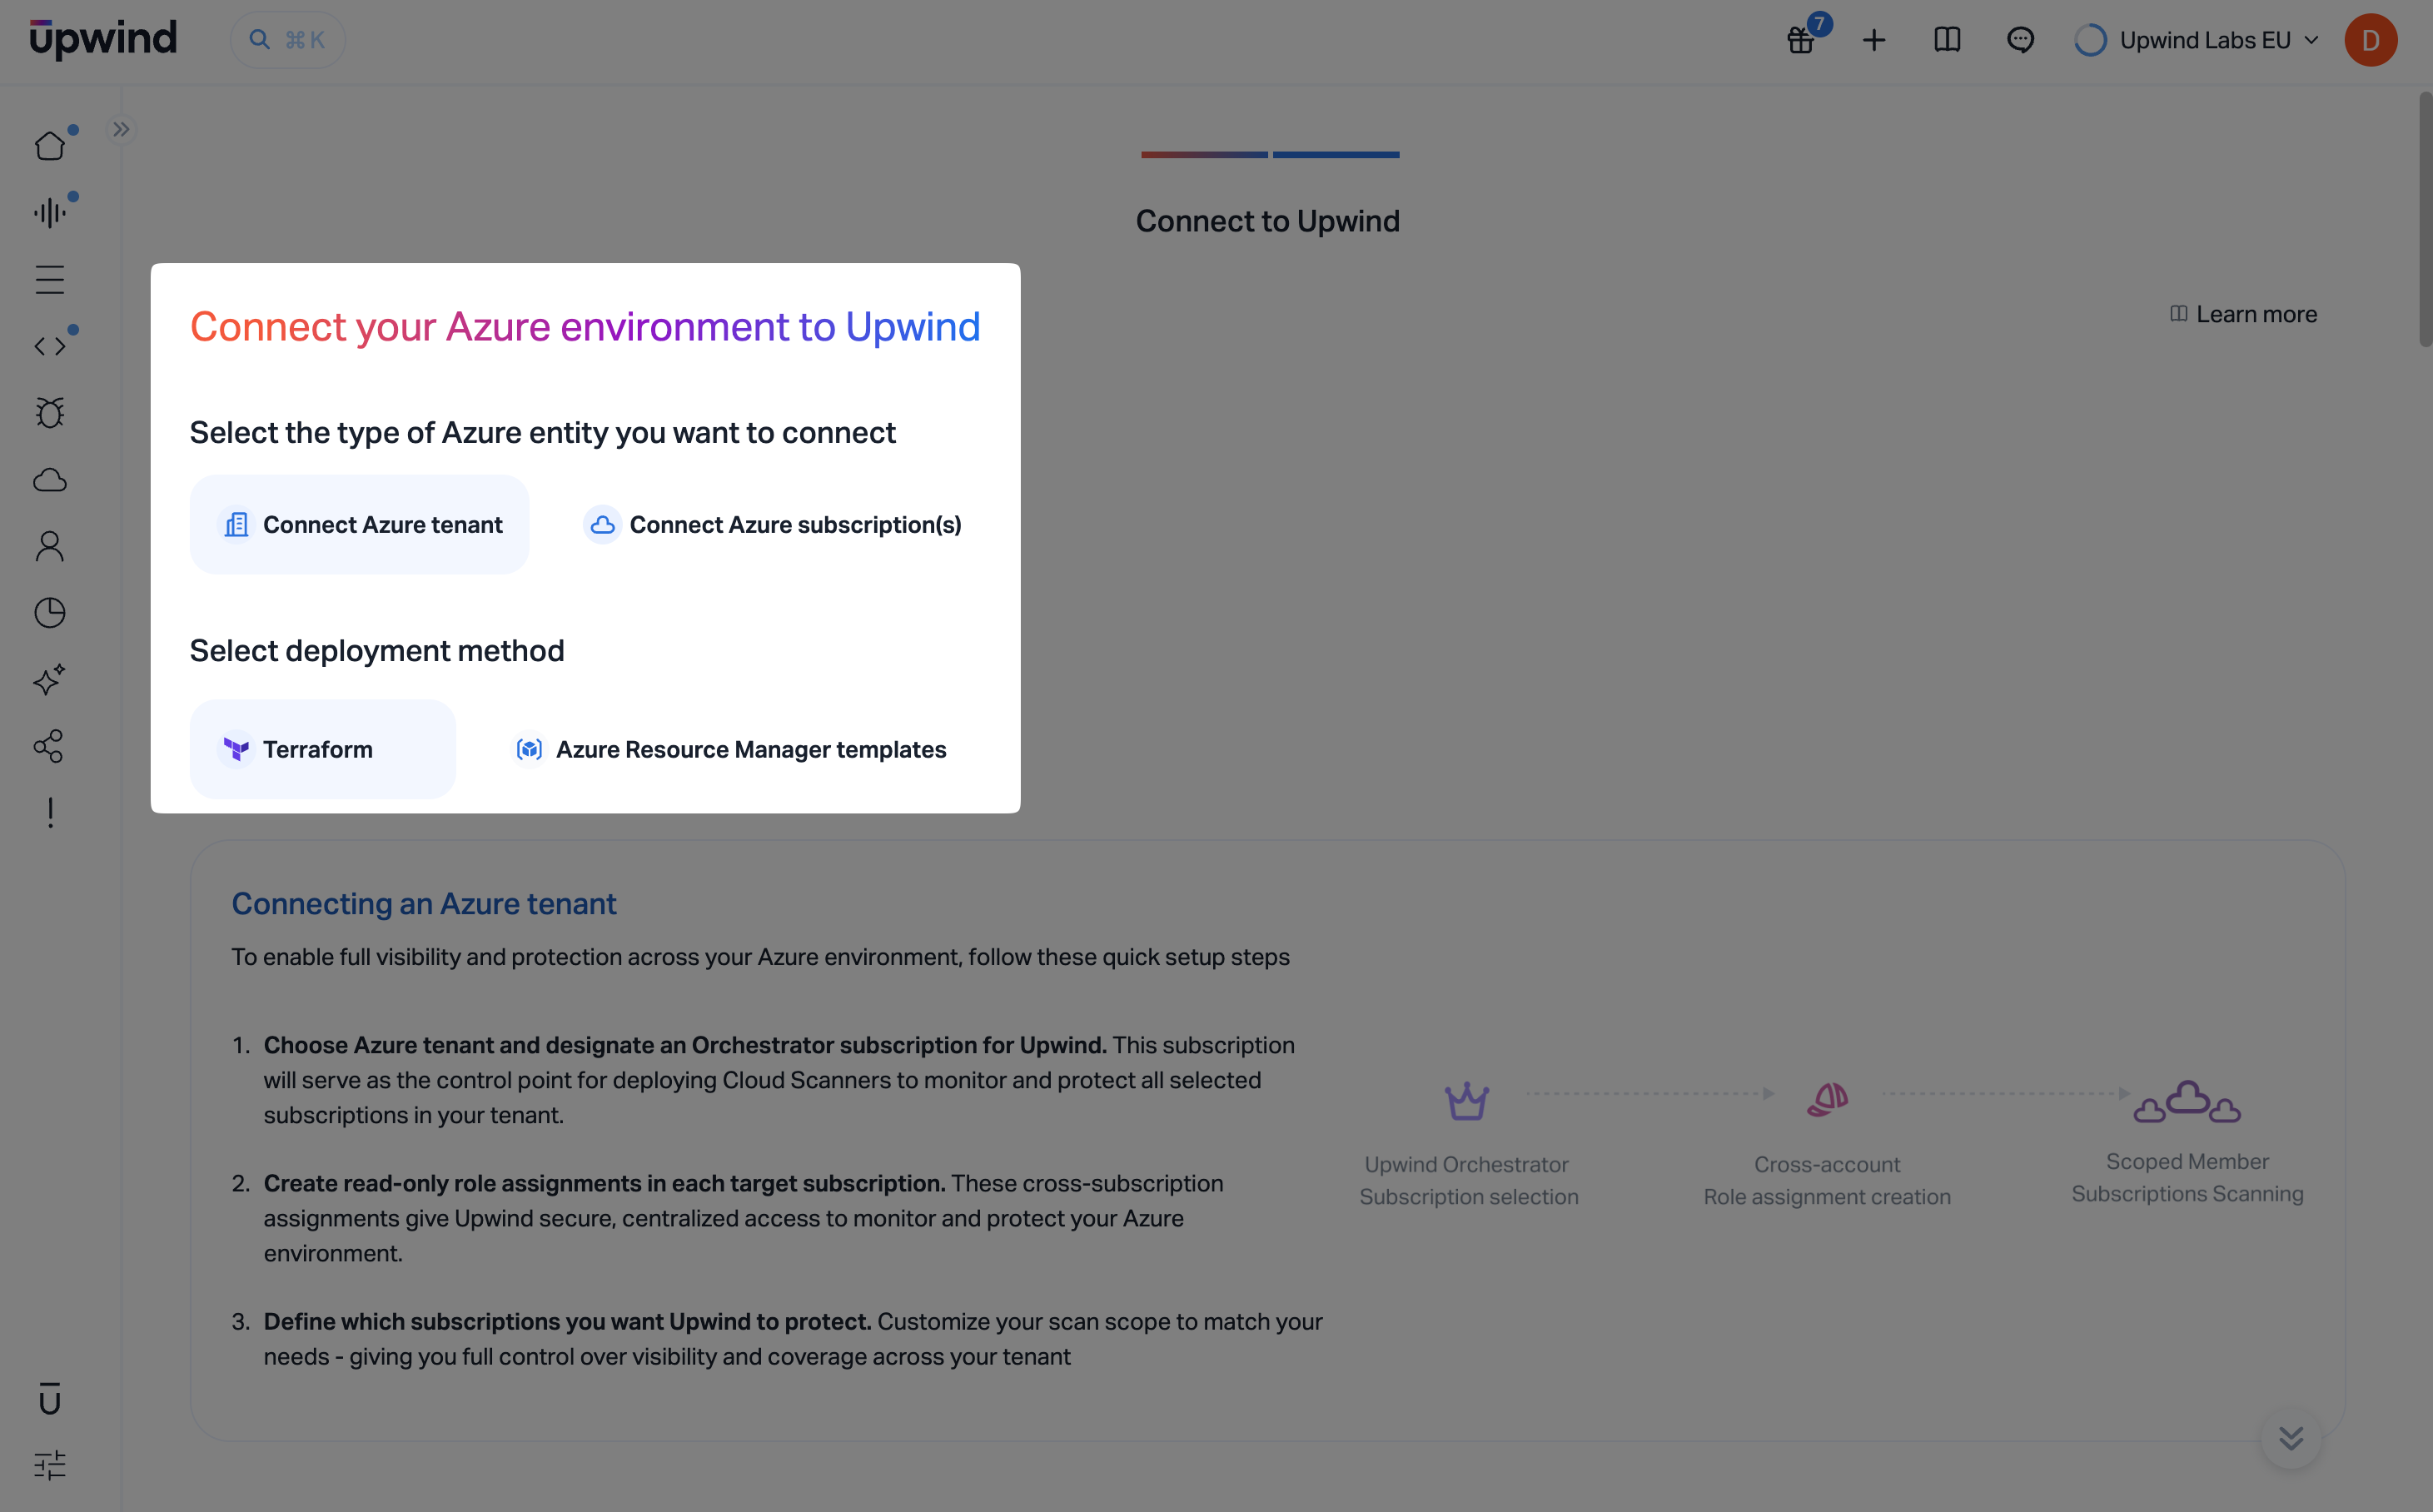
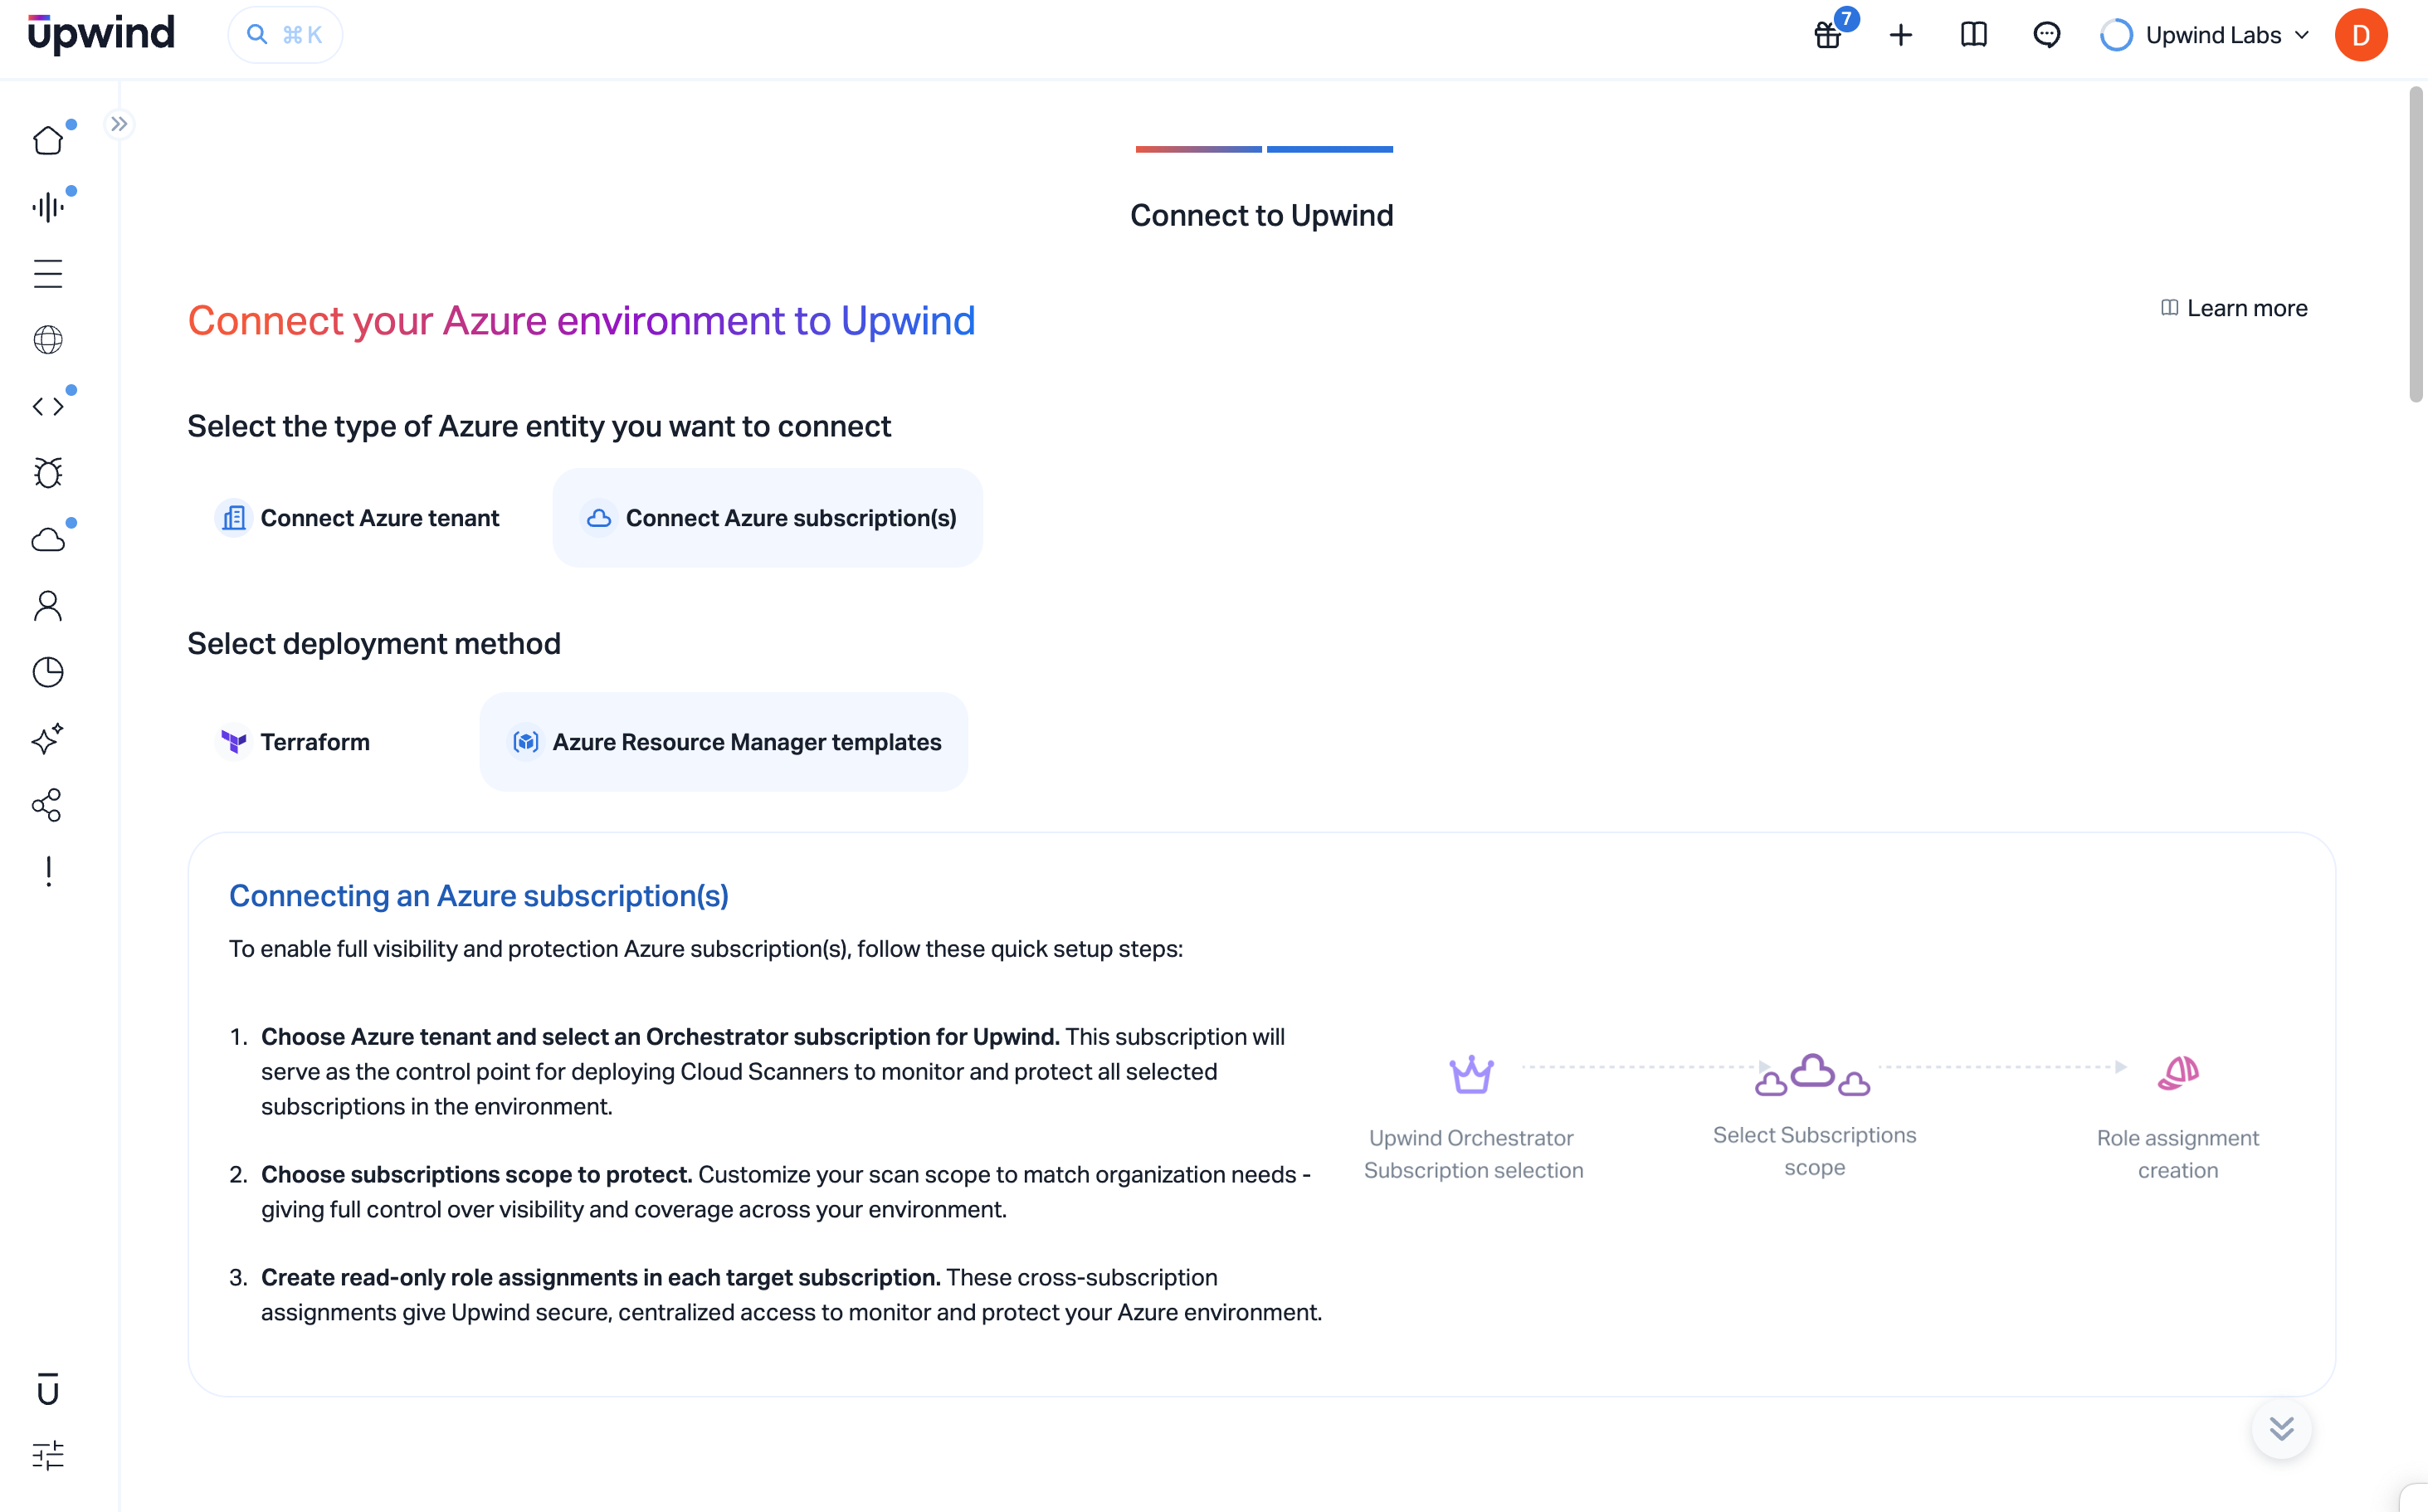
- Select Azure, open the flow to connect your Azure environment to Upwind, choose Connect Azure tenant, then under Select deployment method choose Terraform.
The onboarding screen summarizes what you are setting up: you will designate an orchestrator subscription that deploys and coordinates Cloud Scanners, create cross-subscription role assignments so Upwind can reach member subscriptions, and later confine scanning to the subscription scope you choose.
Verify Azure access before onboarding (preflight check)
Before starting onboarding, run the preflight check script shown in the UI. The script validates required Azure permissions and configuration and highlights missing access so you can fix issues before proceeding.
The UI provides both PowerShell and Bash options. Use the one that matches your environment.
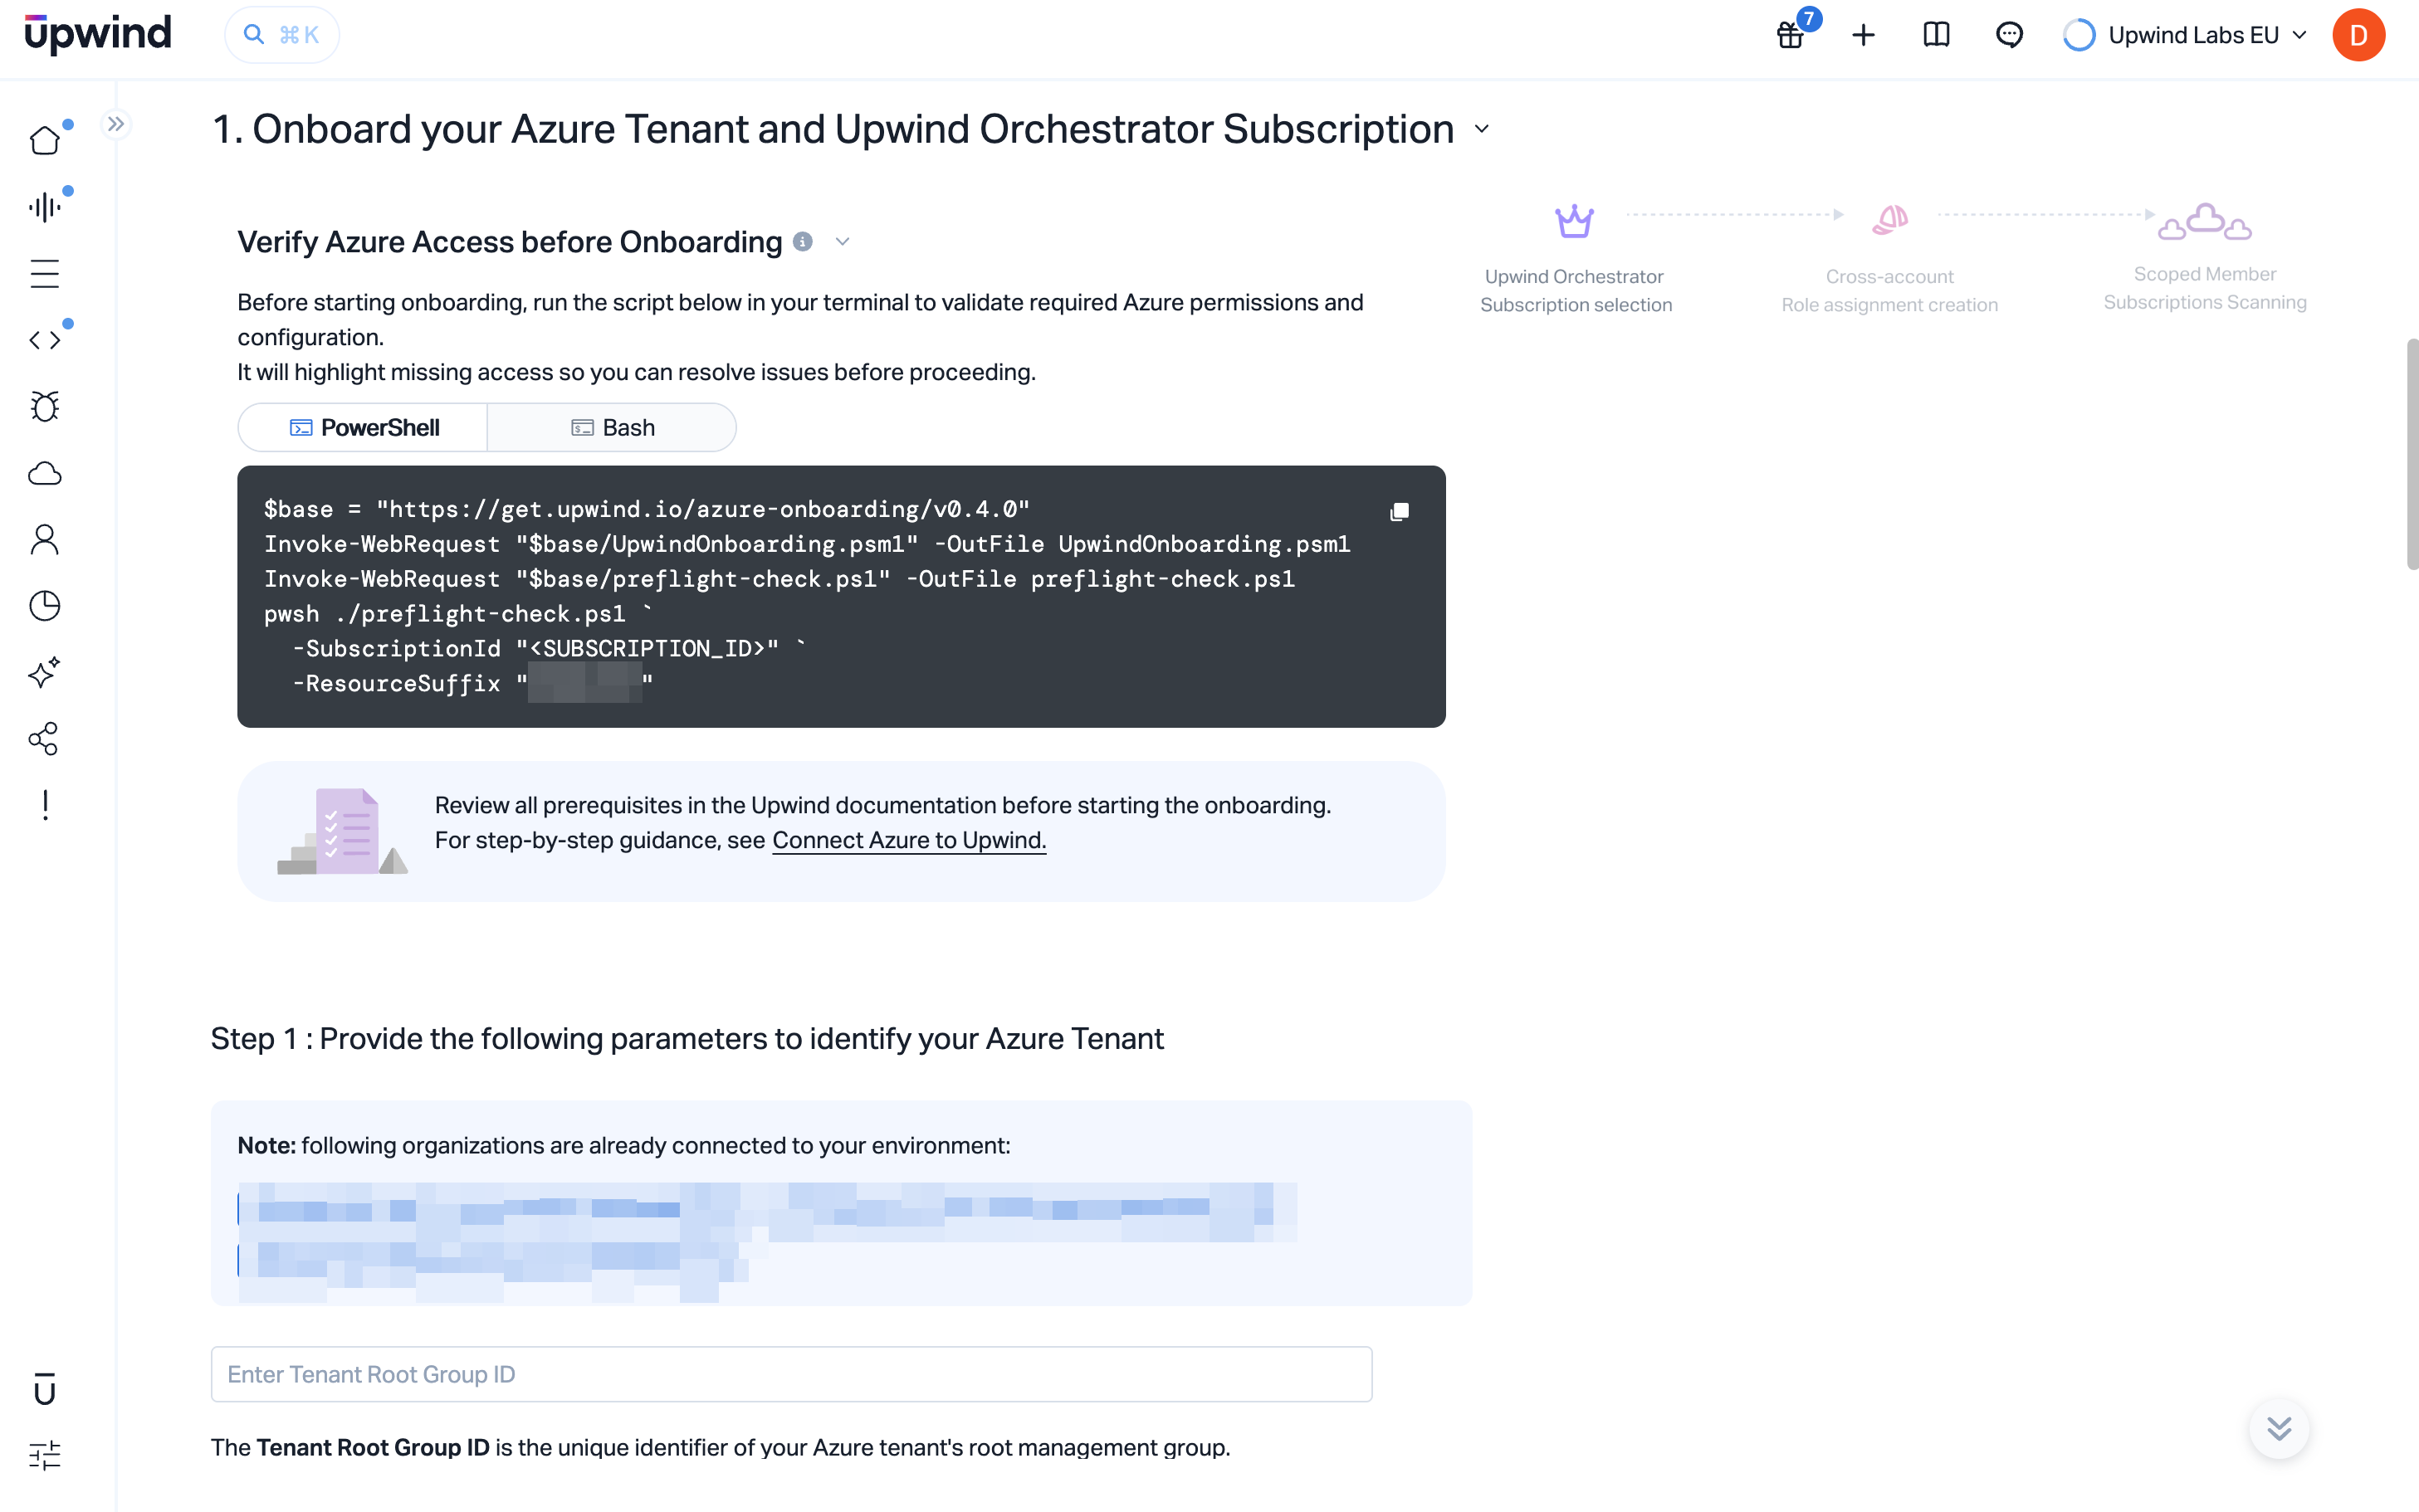
Step 1: Identify the tenant and orchestrator subscription
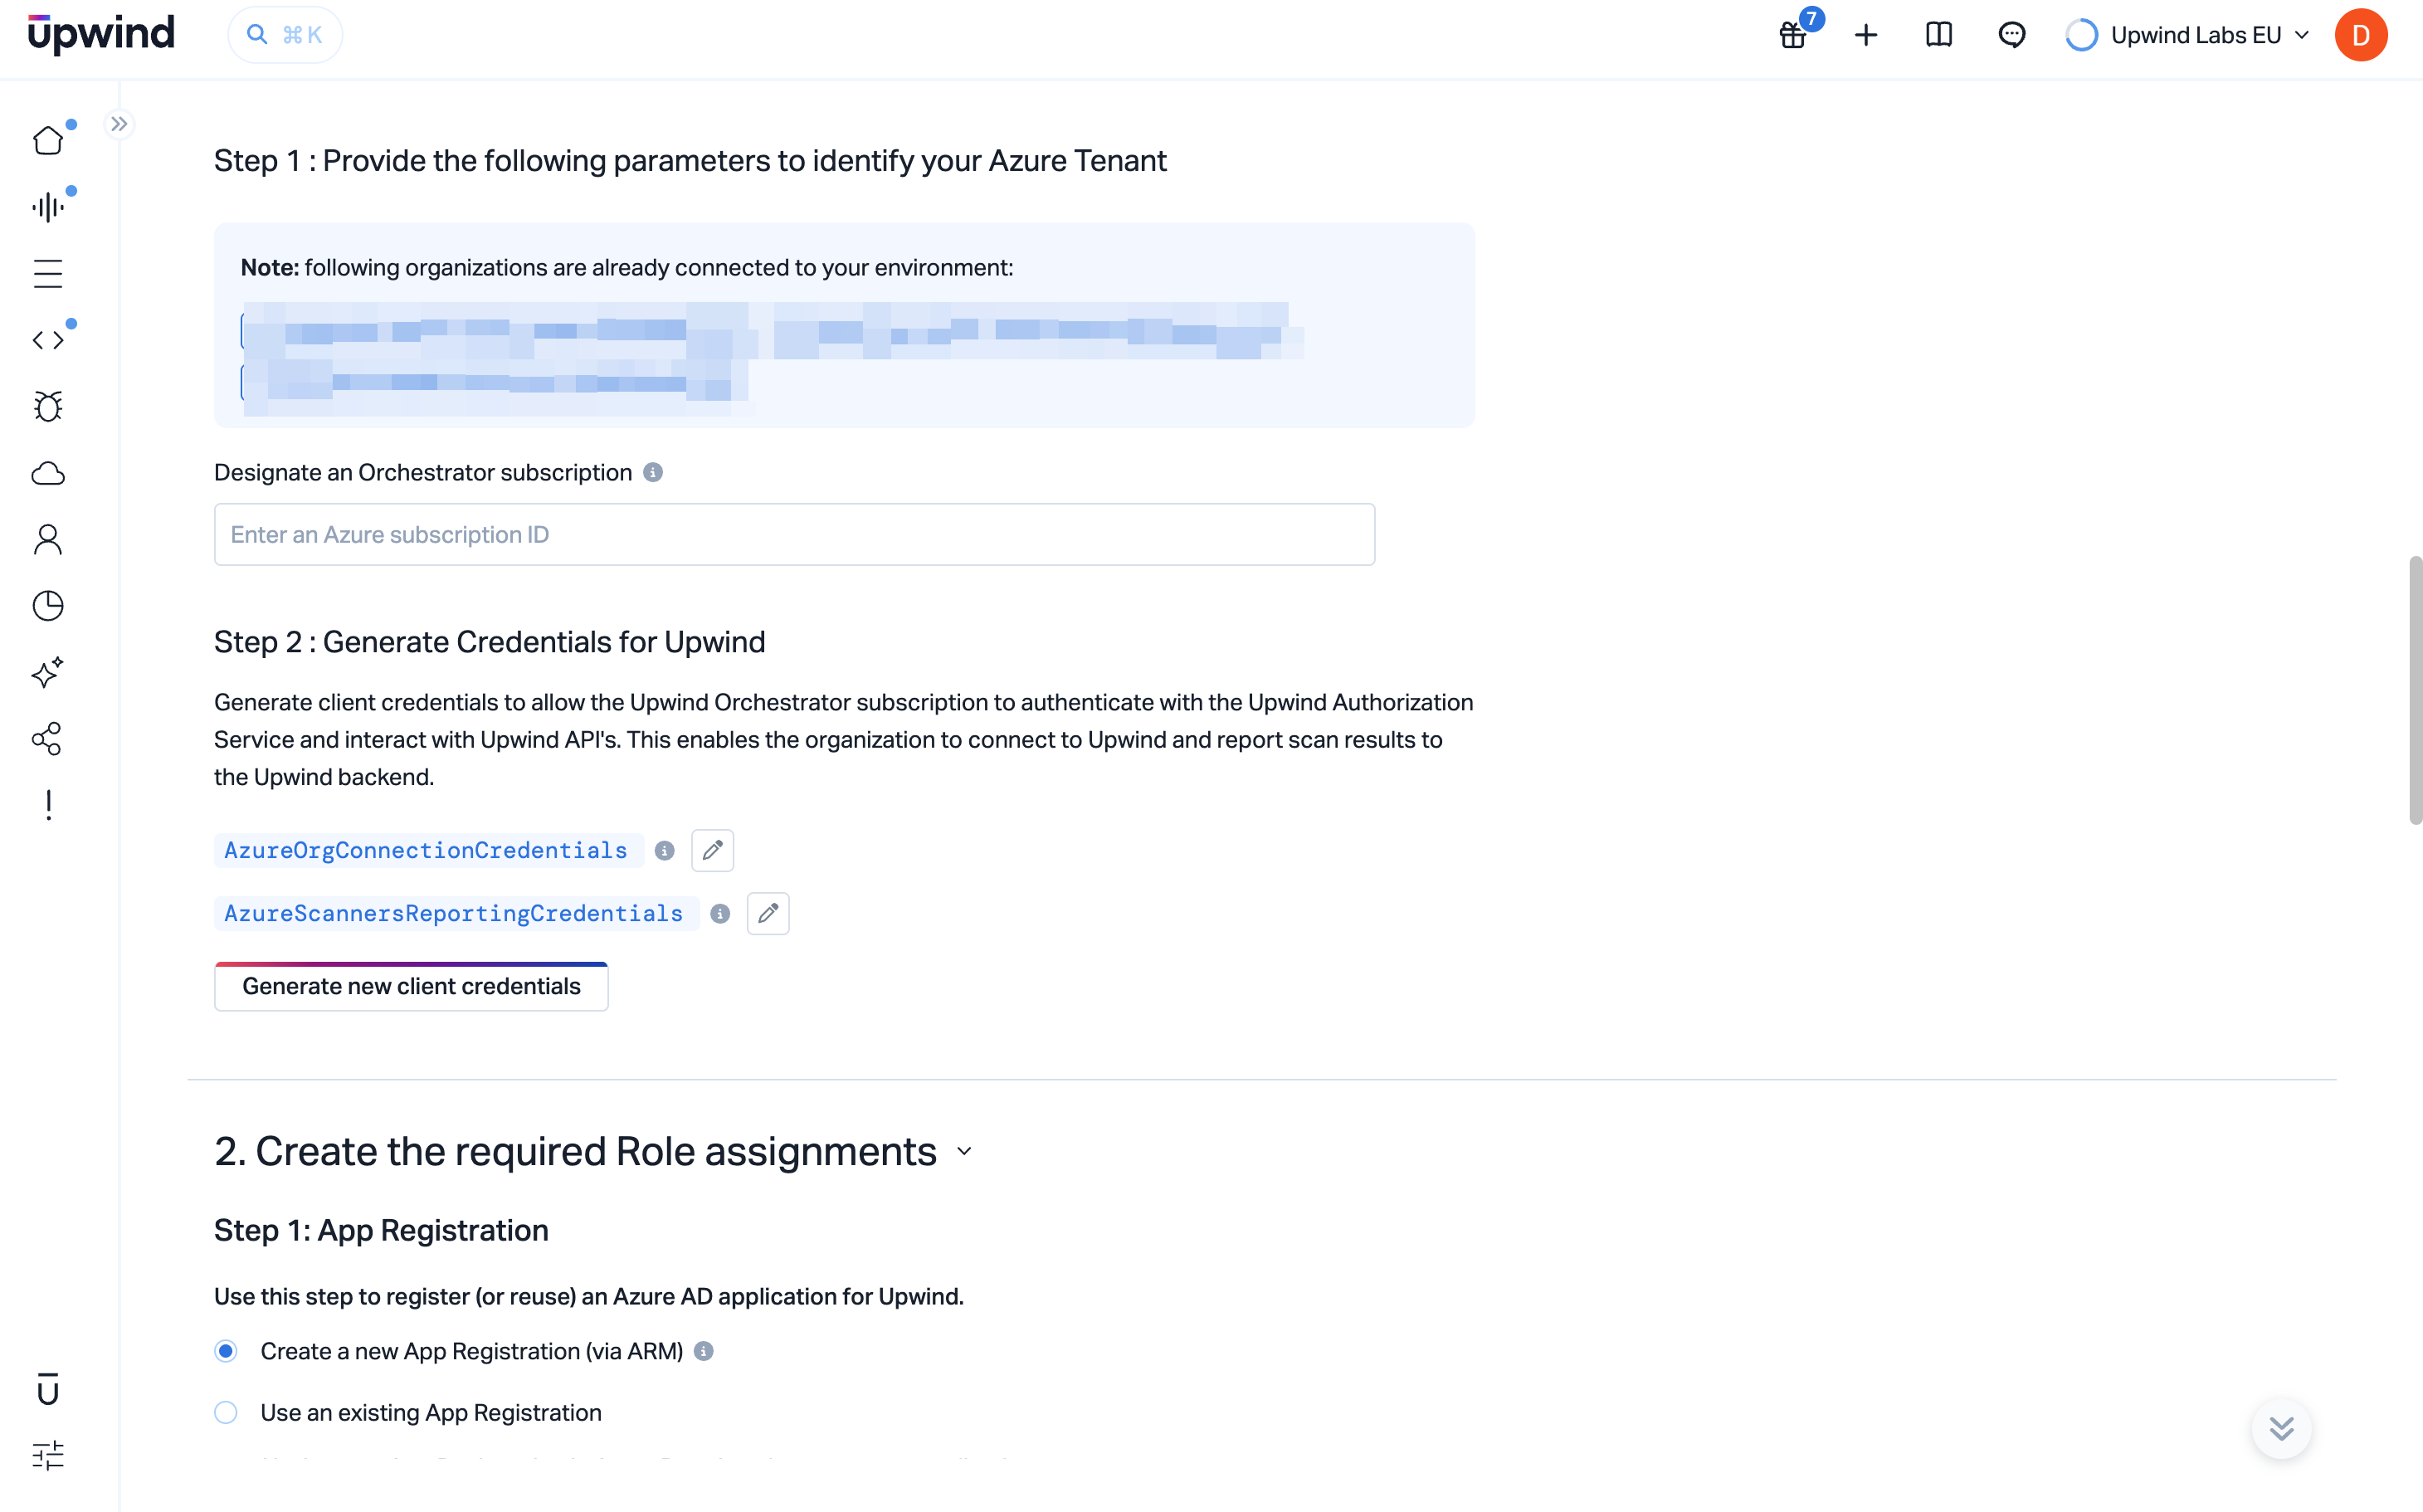
In Step 1, provide identifiers so Upwind can anchor the integration at the tenant root and know which subscription hosts orchestration workloads.
Enter the Tenant Root Group ID for your Azure tenant. This is the object ID of the root management group (the tenant root). In the Azure portal, open Management groups and select the root group; copy its ID. The value is typically a UUID (xxxxxxxx-xxxx-xxxx-xxxx-xxxxxxxxxxxx) and represents the top of the management group hierarchy.
Under Designate an orchestrator subscription, enter the Azure subscription ID that will act as the Upwind orchestrator subscription. This subscription is the control plane for deploying Cloud Scanners and related resources that monitor and protect the subscriptions you include in scope.

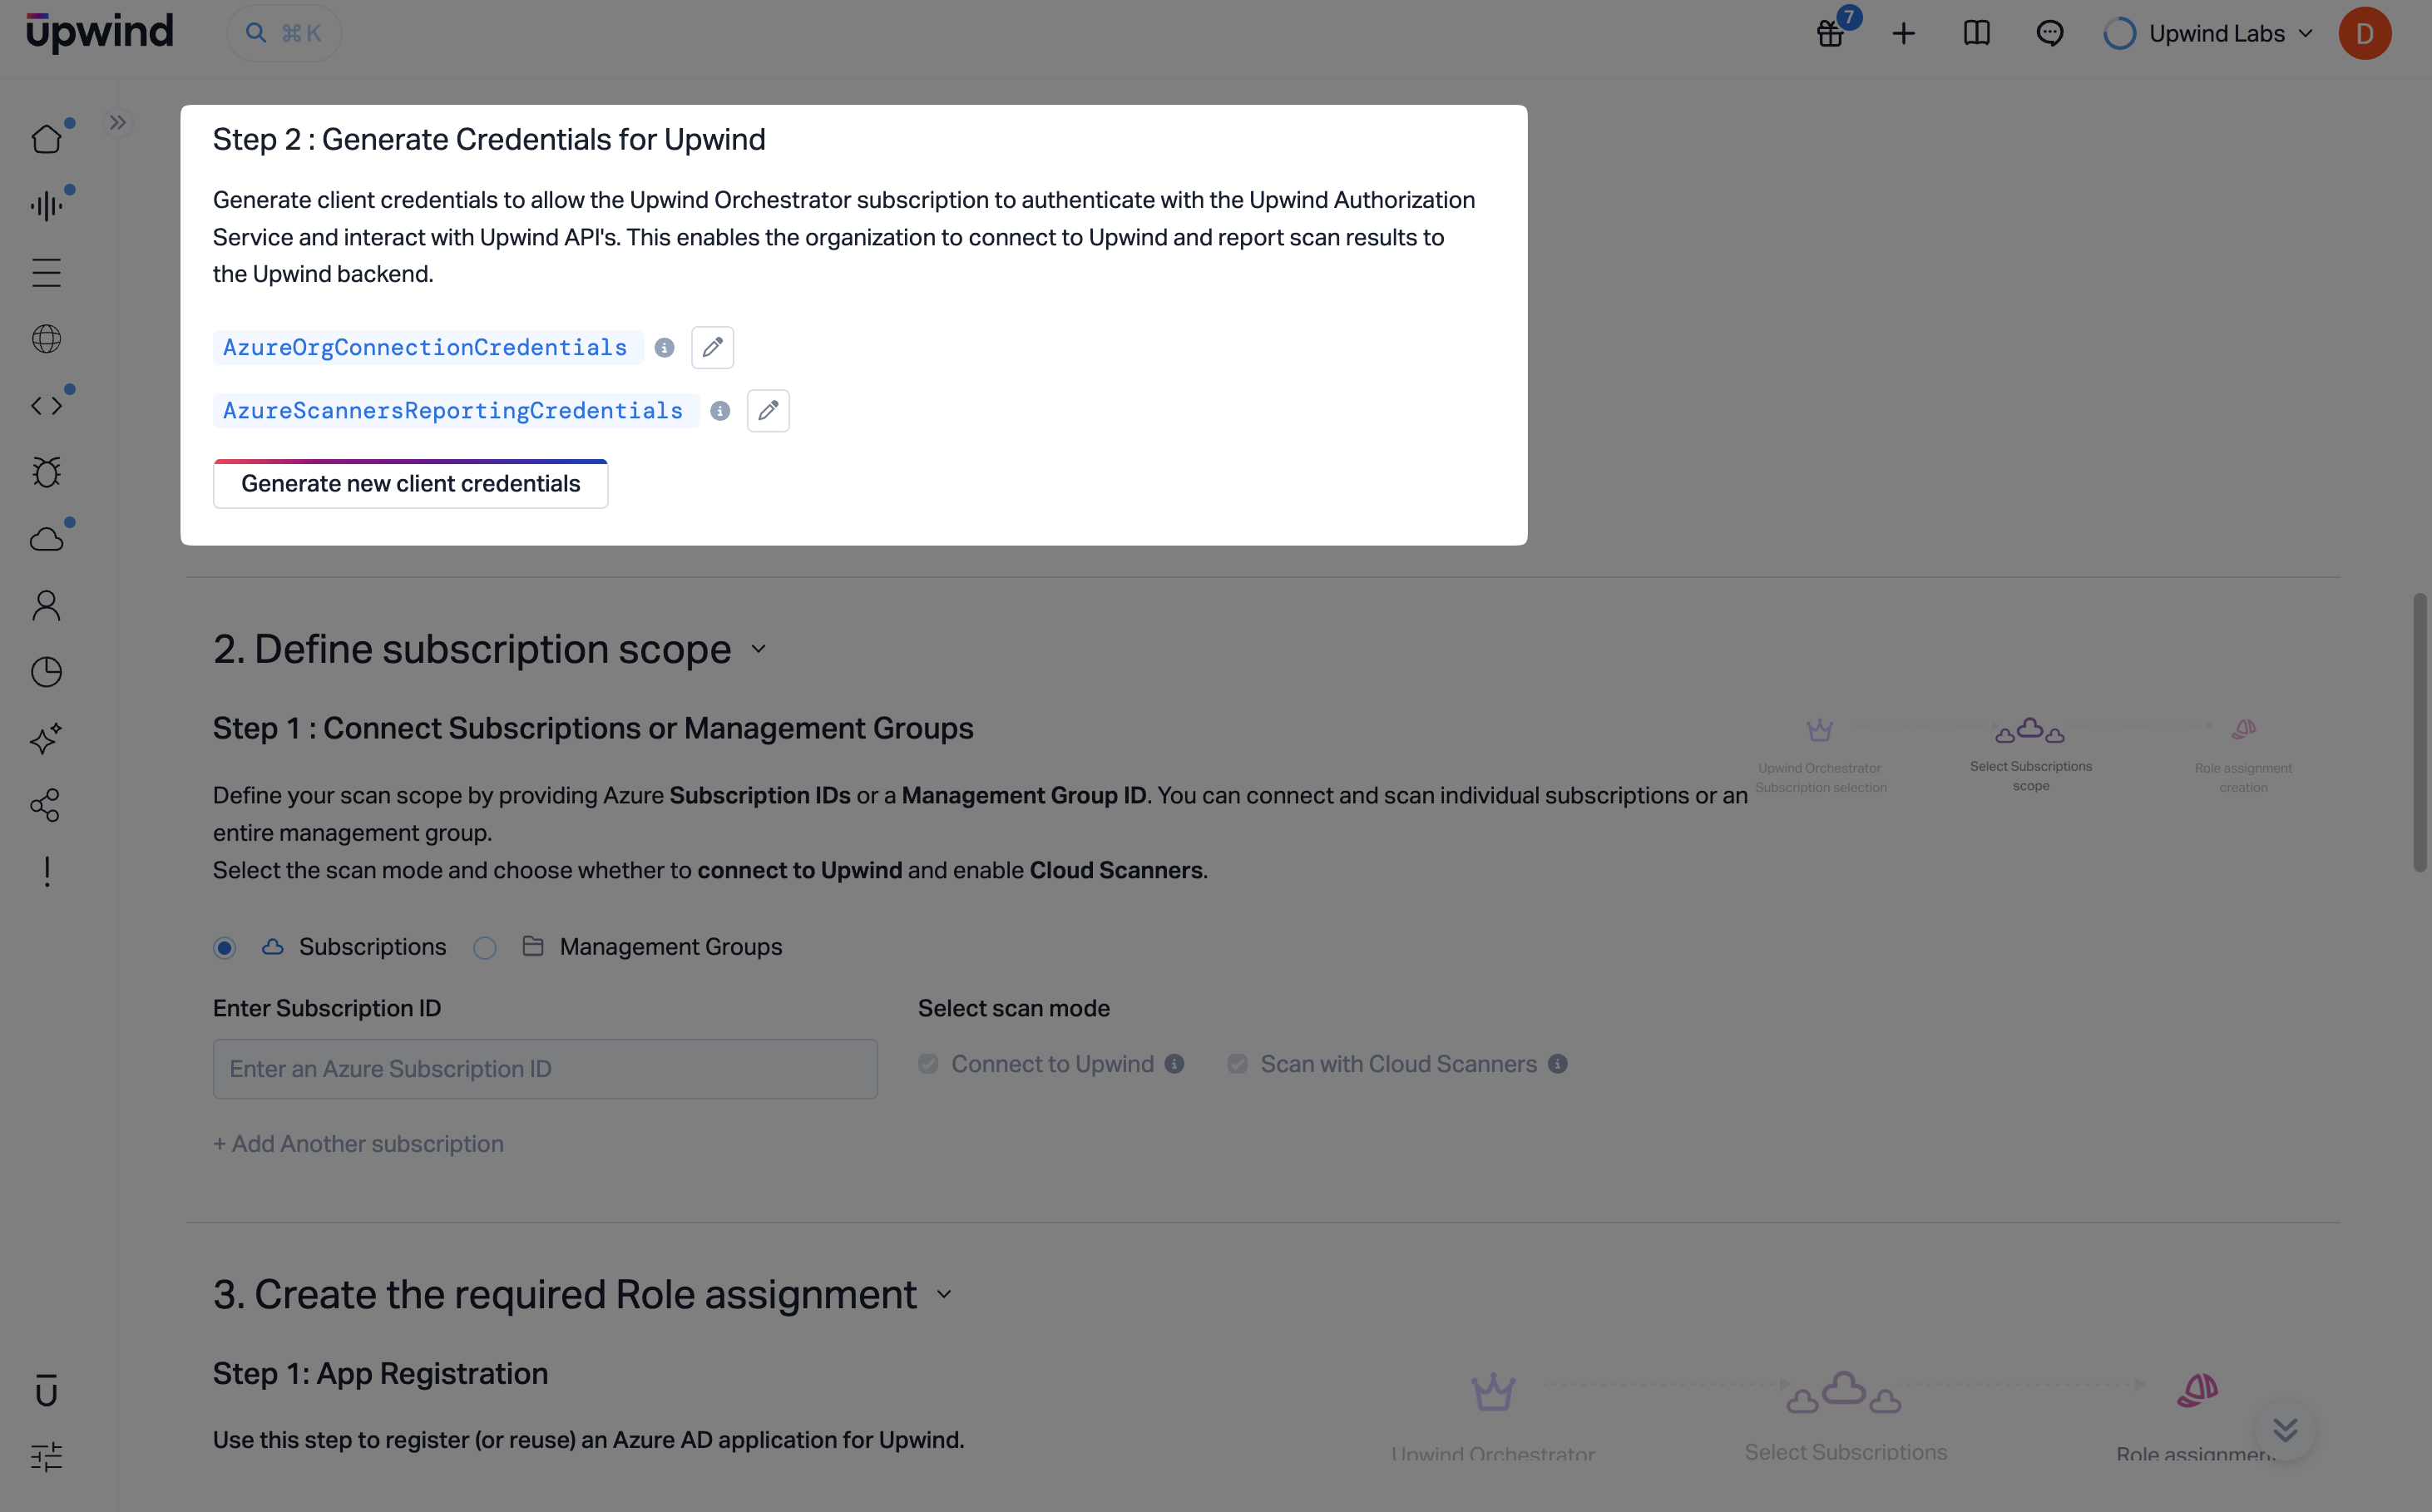
Step 2: Generate credentials for Upwind
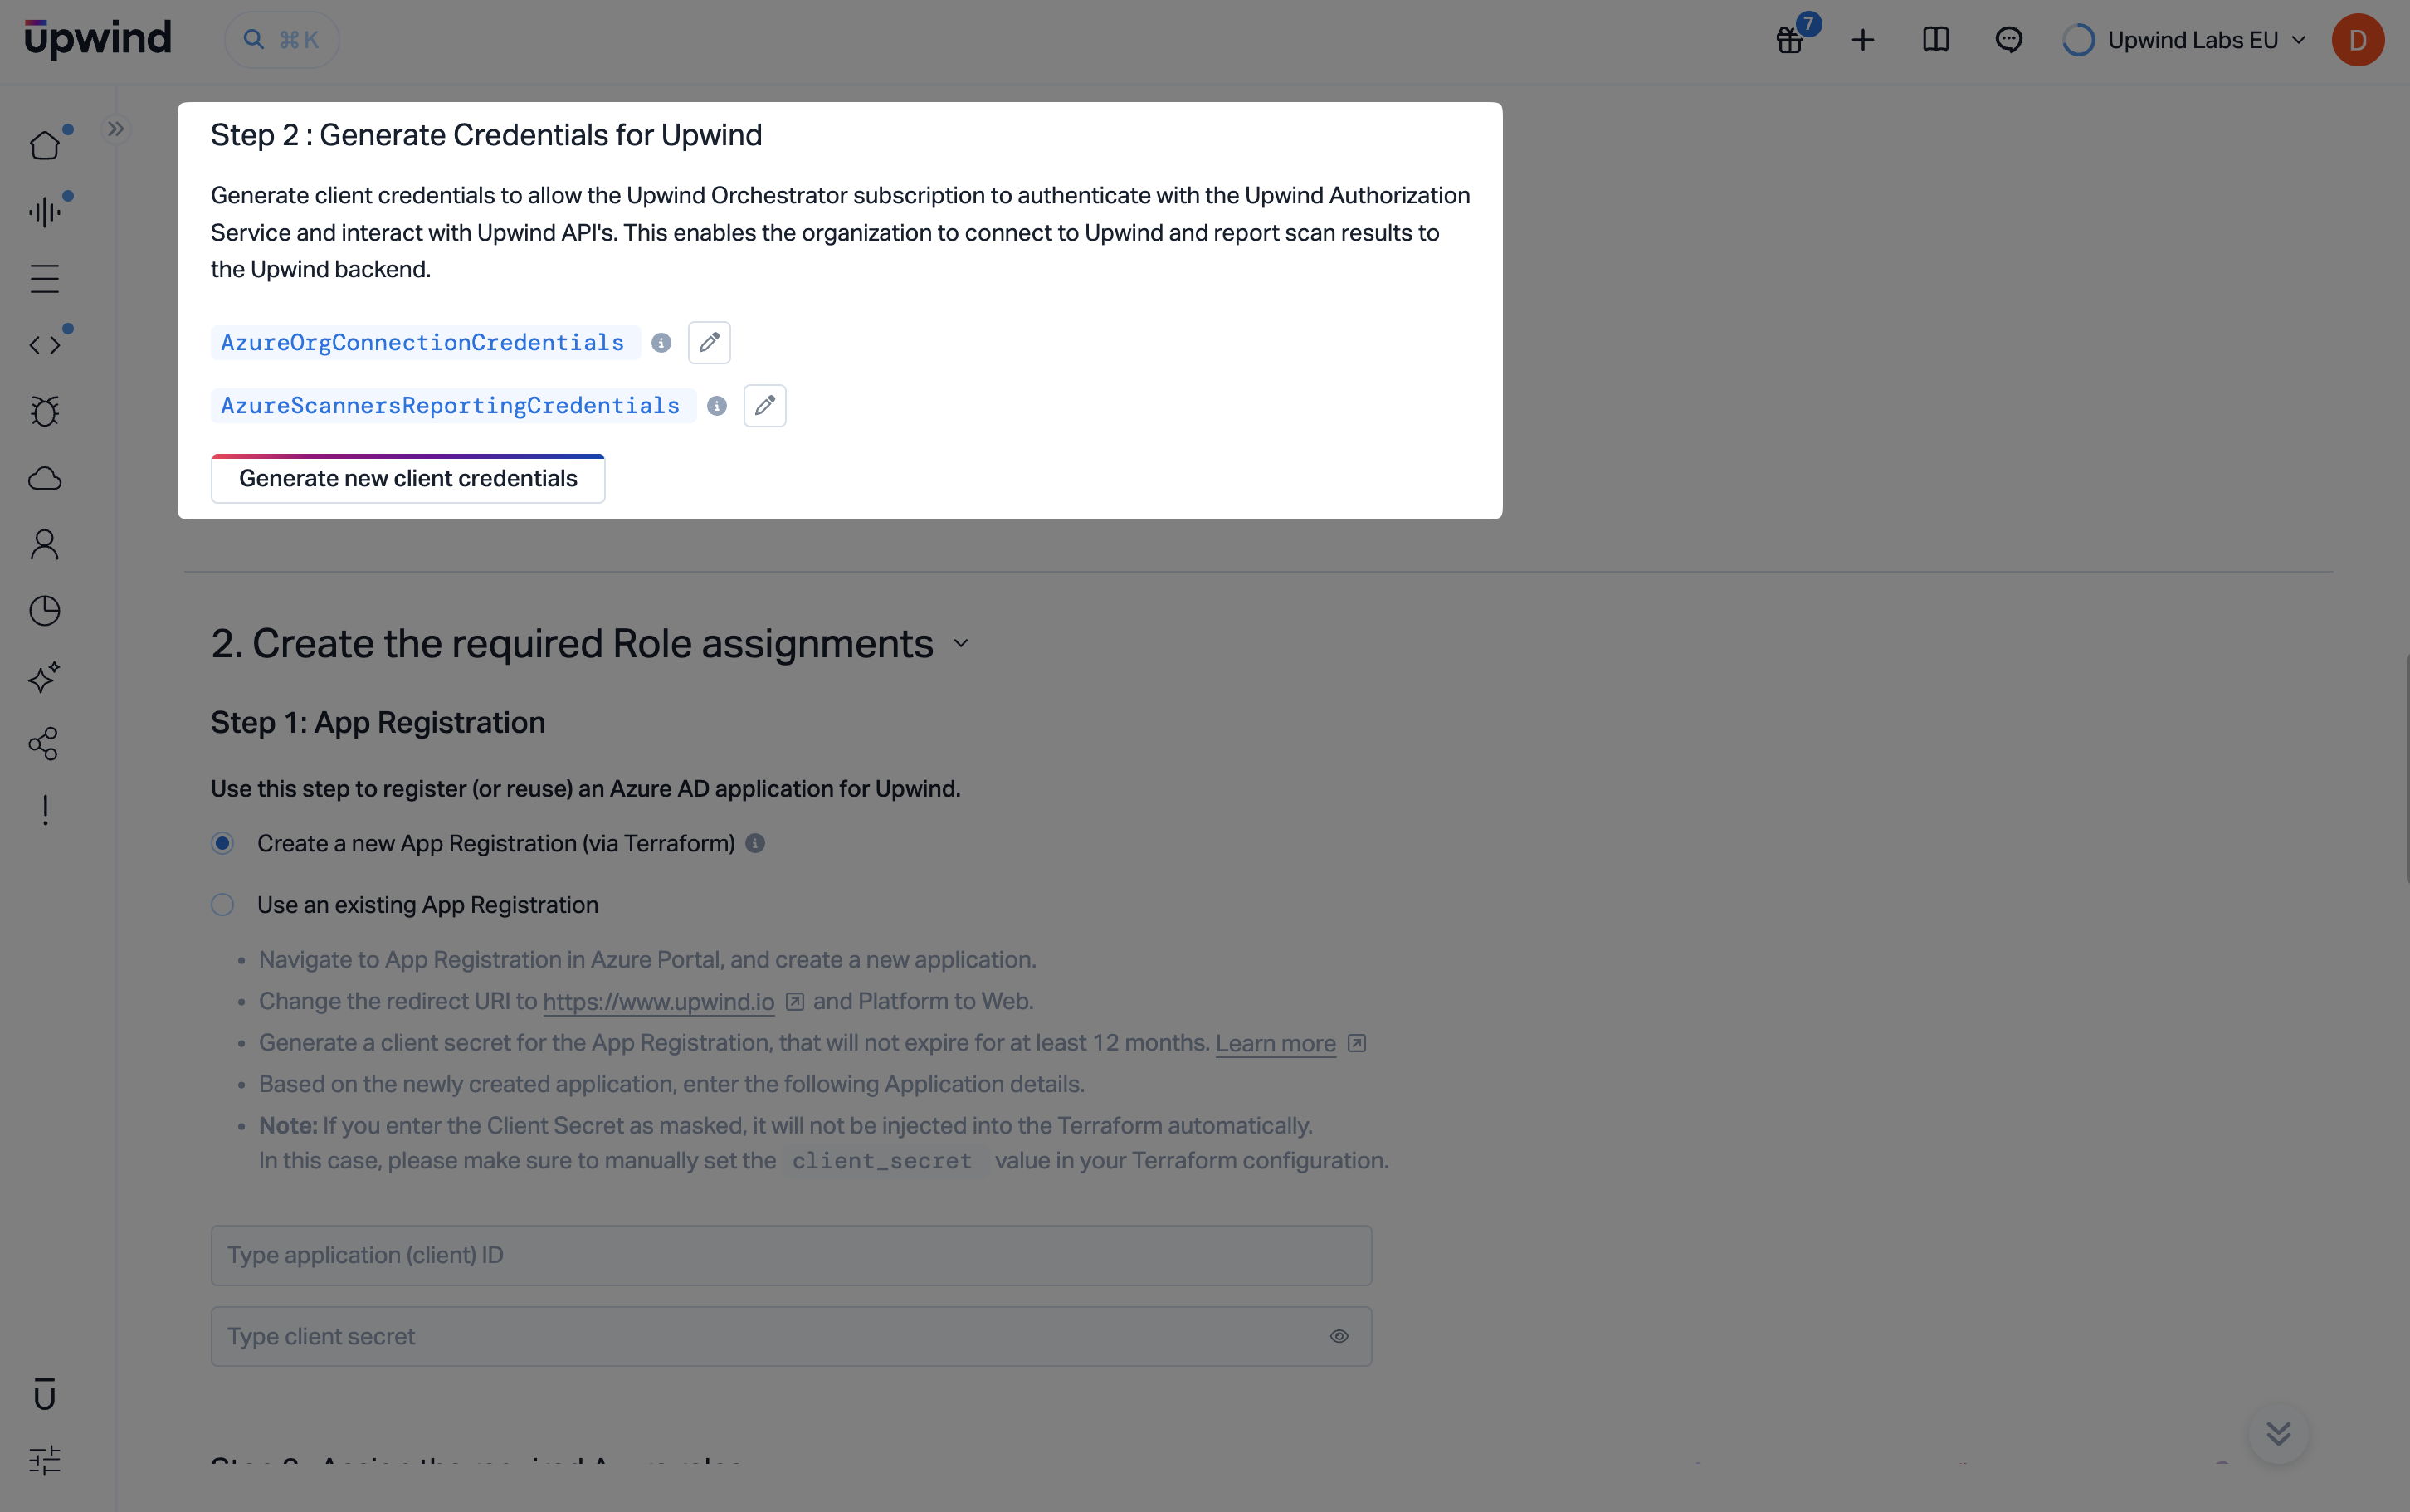
Open Step 2: Generate credentials for Upwind. This creates client credentials the orchestrator subscription uses to authenticate to the Upwind authorization service and Upwind APIs so your organization can connect and report scan results.
You will see two credential slots, AzureOrgConnectionCredentials and AzureScannersReportingCredentials. The first is used for organization-level connection and discovery; the second is used for scanners to report results back to Upwind.
Select Generate new client credentials and wait until both sets are created before continuing to role assignment and Terraform steps.
Create the required role assignments
The next major section walks through app registration and Azure RBAC so Upwind can deploy scanner infrastructure and read what it needs across subscriptions.
App registration
Use this step to register a new Microsoft Entra application for Upwind or reuse an existing one. For the Terraform path described here, choose Create a new App registration (via Terraform) when that option is available.
If you instead use an existing app registration, create or select the application in the Azure portal under App registrations, set the redirect URI to https://www.upwind.io with platform type Web, and create a client secret valid for at least twelve months. Enter the application (client) ID and client secret in the form.
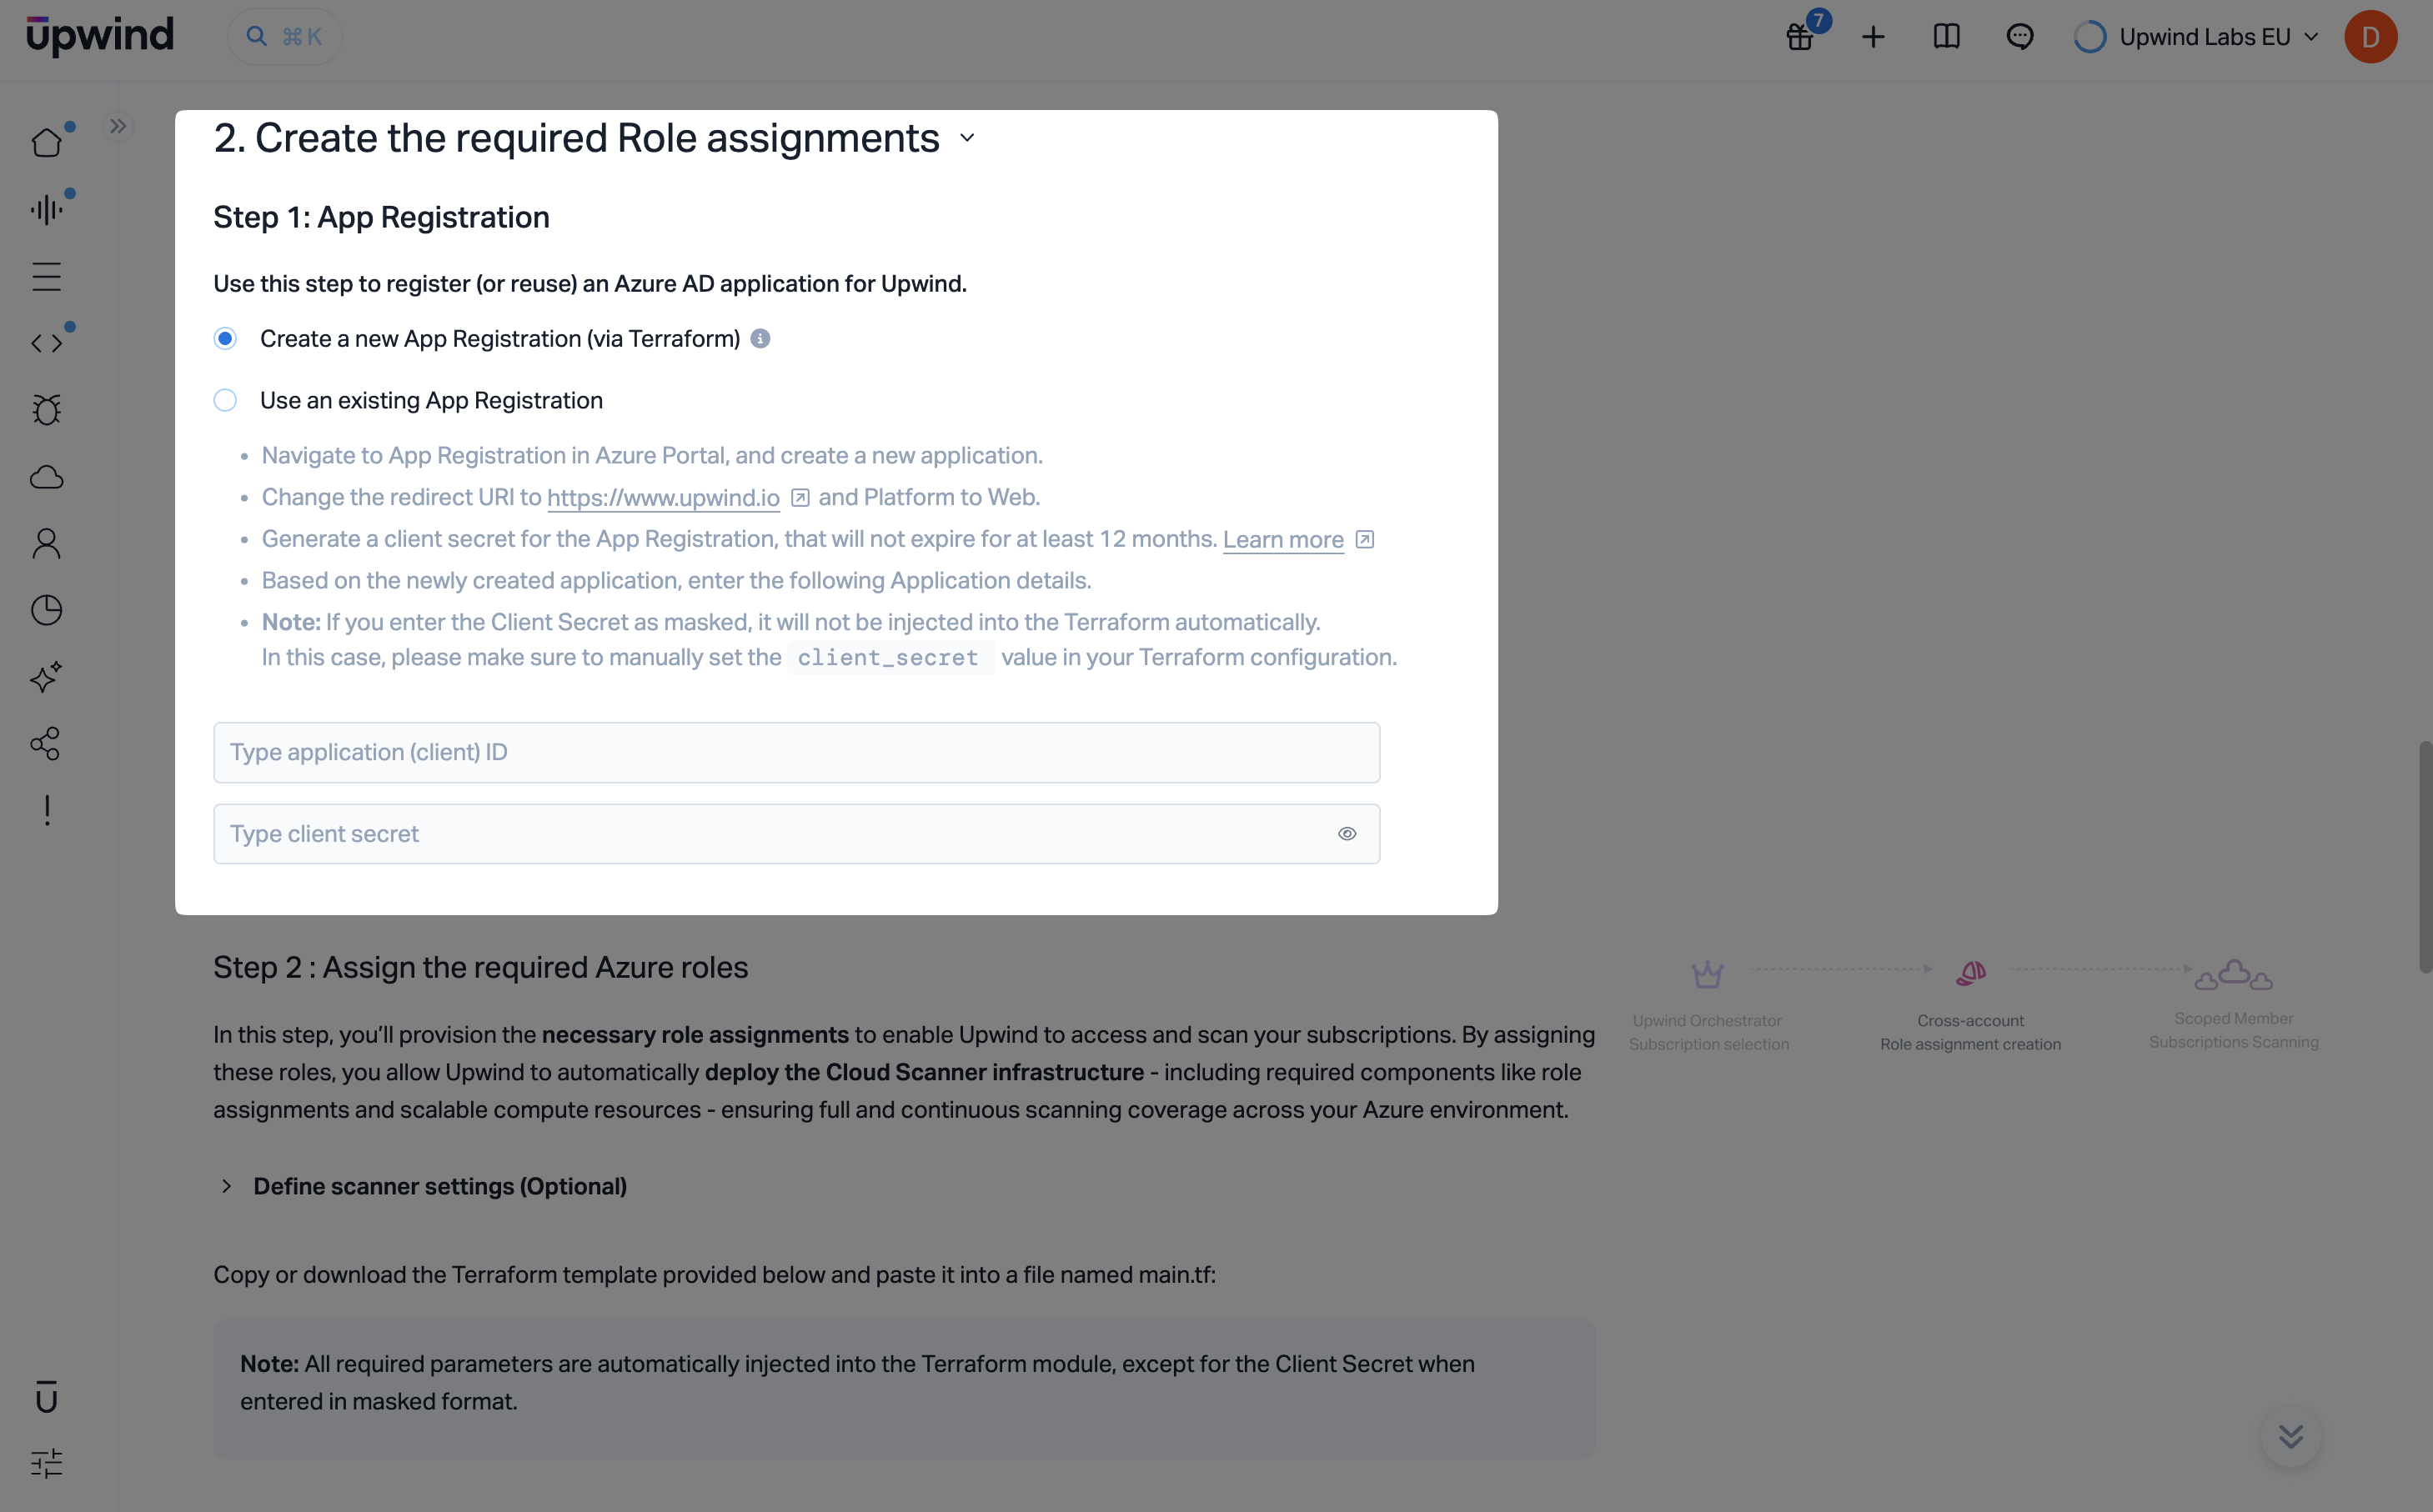
Assign the required Azure roles
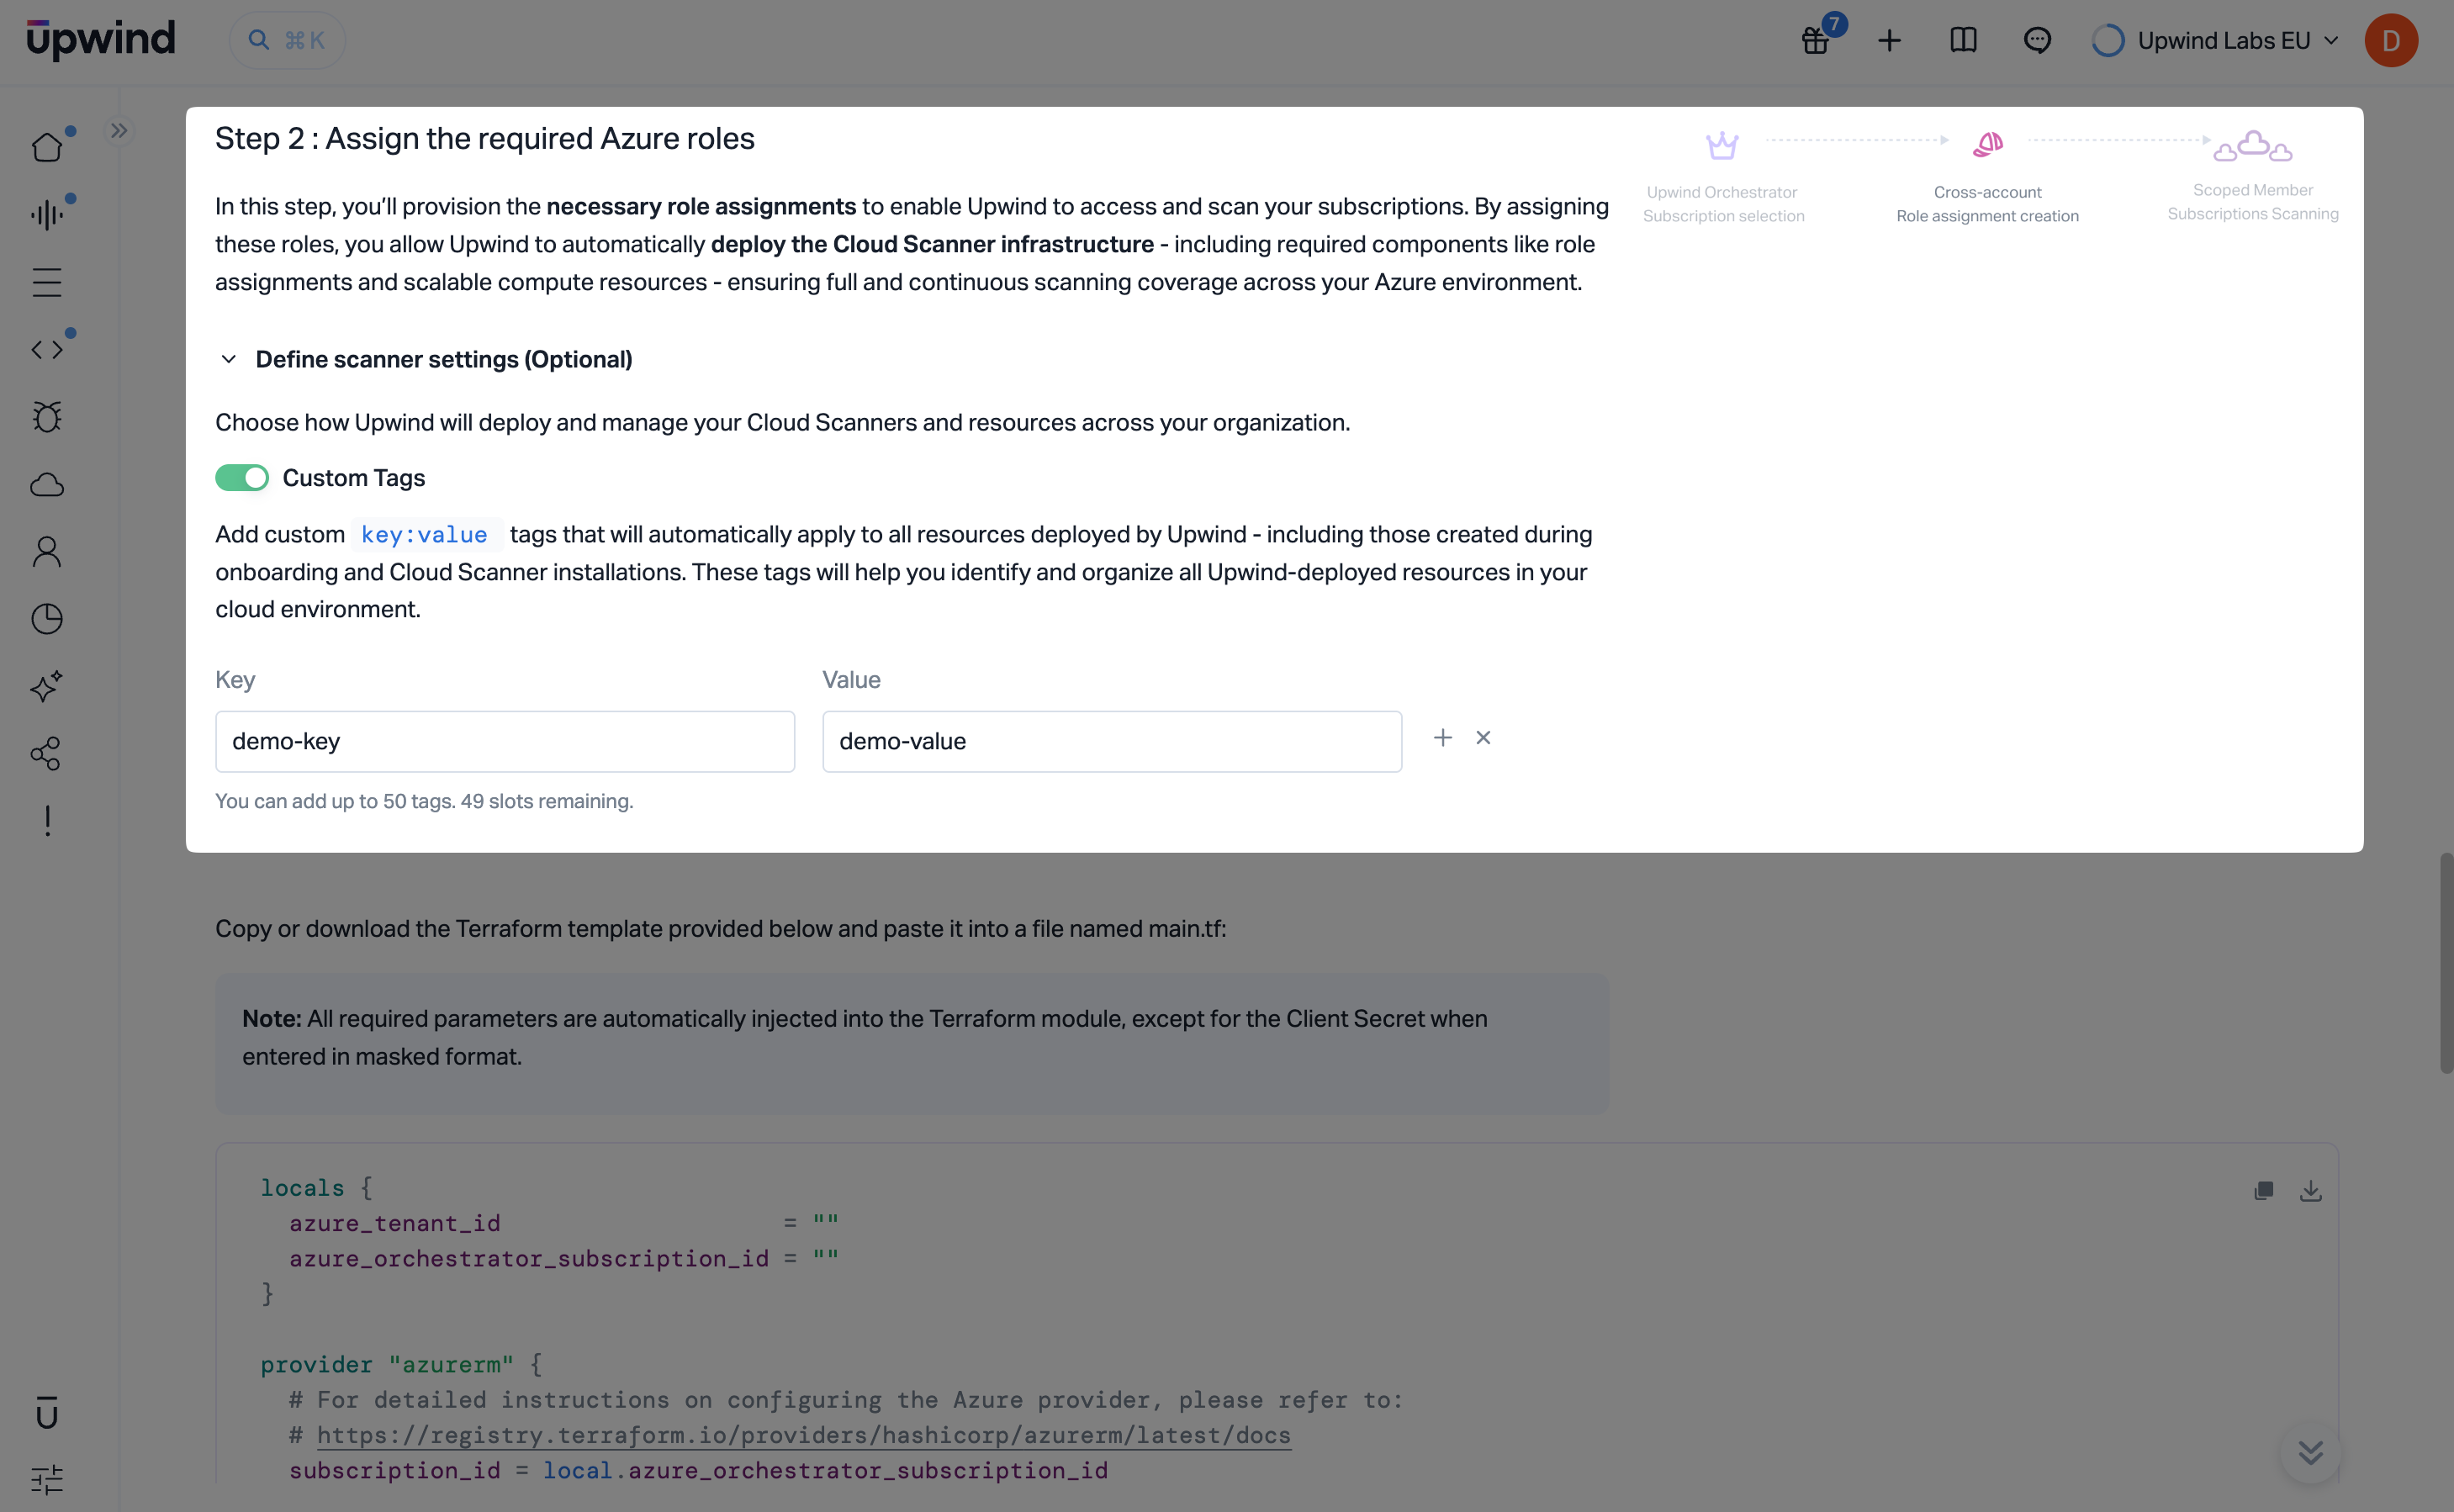
Assign the required Azure roles, review the explanation of how role assignments let Upwind access subscriptions and deploy Cloud Scanner infrastructure (including compute and supporting RBAC).
Expand Define scanner settings (optional) if you need custom tags on resources Upwind creates during onboarding and later scanner operations. You can supply key/value pairs (subject to the limit shown in the UI) so FinOps and policy teams can recognize Upwind-managed resources.
Copy and apply the Terraform configuration
Copy or download the Terraform module shown in the console and save it as main.tf in an empty working directory.
Use the copy and download controls next to the snippet if you need to move the file to a secure workstation or pipeline artifact store.
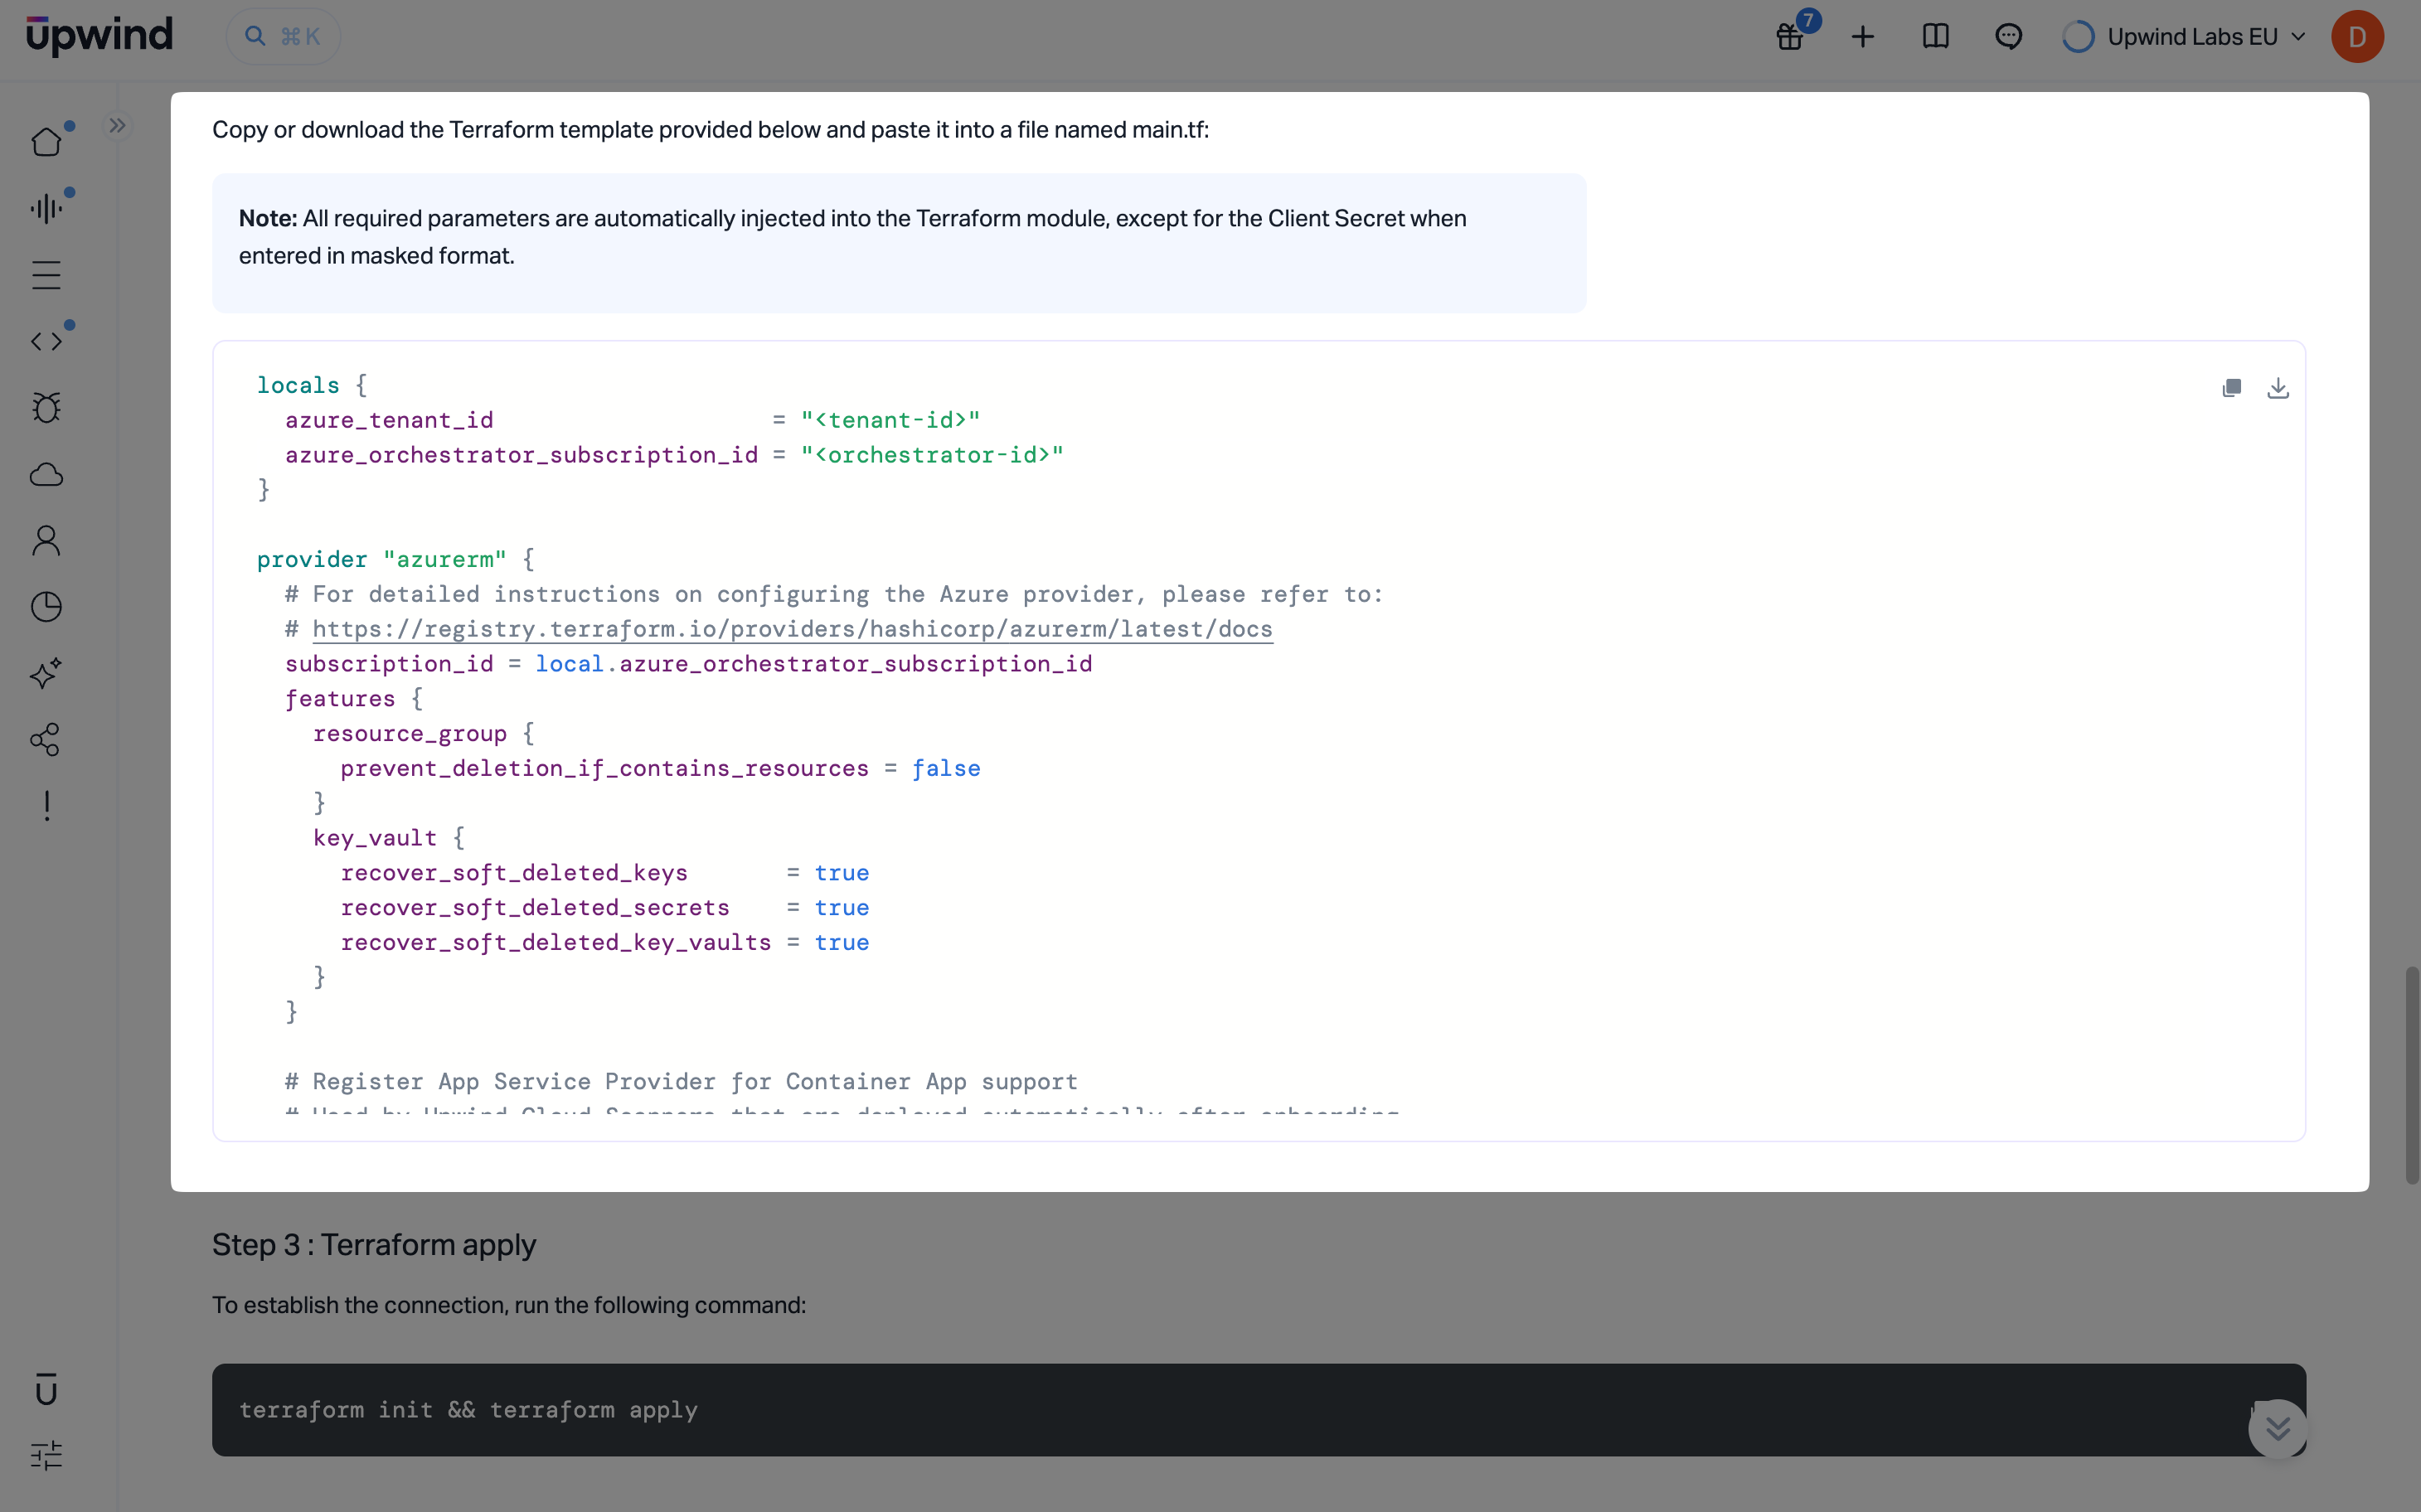
Run Terraform from that directory:
terraform init && terraform apply
After the apply succeeds and role assignments exist, the console’s projects or discovery views begin to reflect the linked subscriptions as expected for your tenant.
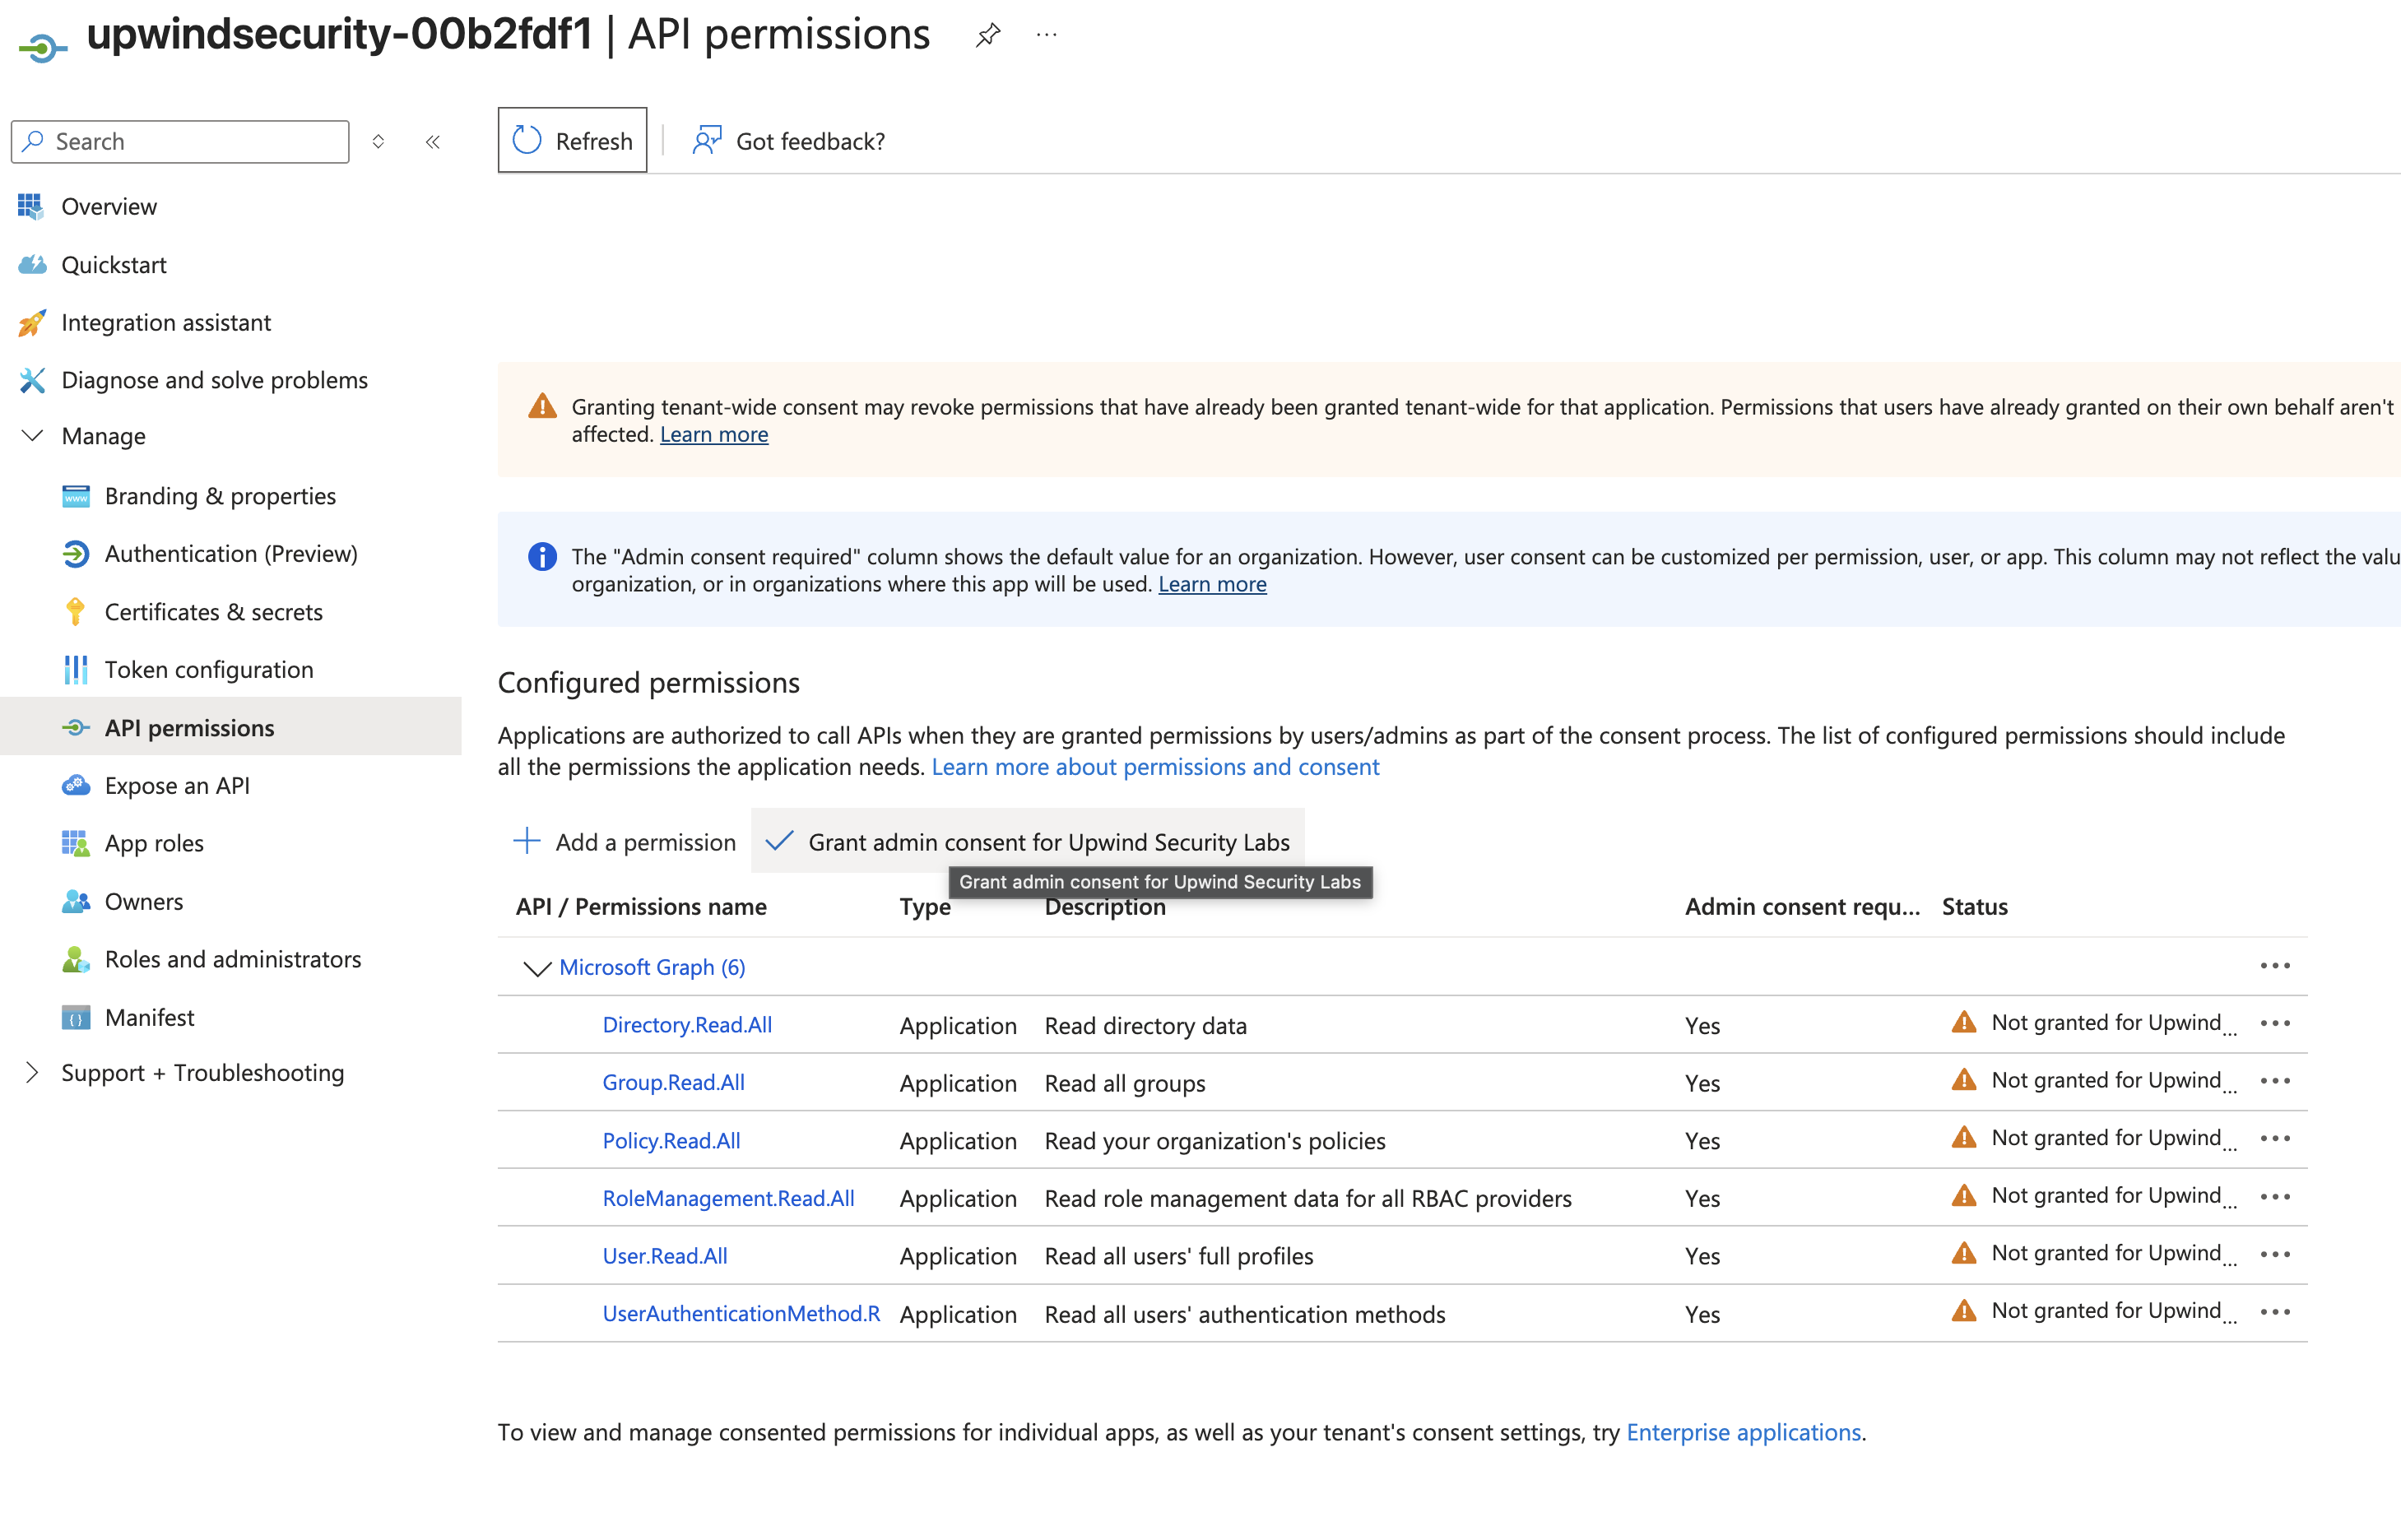
Grant admin consent for Microsoft Graph permissions
After terraform apply creates the Upwind app registration and assigns its Microsoft Graph permissions, an Entra administrator must grant admin consent so Upwind can fetch Entra entities such as service principals.
- In the Azure portal, open Microsoft Entra ID and select
App registrations. - Locate the Upwind app registration. When Terraform creates it, the name follows the pattern
upwindsecurity-{xx}. - Under
Manage, selectAPI permissions. - Click
Grant admin consent for '<tenant\>'and confirm.
After consent is granted, the Status column shows Granted for <tenant> for each Microsoft Graph permission, and Upwind can read directory entities such as service principals.
Define subscription scope
Open the Define subscription scope section. There you limit which subscriptions are connected for inventory and auditing via Cloud APIs and which subscriptions should receive Cloud Scanner deployments.
The UI lists the subscriptions available under your tenant integration. For each subscription, choose whether Upwind may use Cloud APIs for metadata and configuration auditing and whether a Cloud Scanner should be deployed there. For broad coverage, enable both for every subscription you want protected. You can instead limit scanning to a subset if you need tighter control.
Cloud Scanner coverage depends on Cloud API access for the same subscription. Enable Cloud API before or together with Cloud Scanner for any row where you want scanner-based assessment.
You can revisit subscription scope later under Organizations and accounts.
Test and save
Scroll to the bottom of the onboarding page and click Test & Save. That action stores your scope choices and runs connectivity checks between Upwind and your Azure tenant. When the checks pass, the UI confirms success and you can continue exploring the Upwind console or return to the onboarding center.
Onboarding an Azure tenant with Azure Resource Manager templates follows these stages:
- Choose the tenant integration path and Azure Resource Manager templates as the deployment method in the Upwind Management Console.
- Run the preflight access check, then provide the orchestrator subscription.
- Generate Upwind client credentials.
- Complete app registration and deploy the supplied ARM onboarding script.
- Define which subscriptions use Cloud API auditing and Cloud Scanner coverage, then use Test & Save to verify and store the connection.
- Log in to the Upwind Management Console .
- Select the plus symbol at the top of the screen and choose Connect cloud account.
- Select Azure, open the flow to connect your Azure environment to Upwind, choose Connect Azure tenant, then under Select deployment method choose Azure Resource Manager templates.
The onboarding screen summarizes what you are setting up: you will designate an orchestrator subscription that deploys and coordinates Cloud Scanners, create cross-subscription role assignments so Upwind can reach member subscriptions, and later confine scanning to the subscription scope you choose.
Verify Azure access before onboarding (preflight check)
Before starting onboarding, run the preflight check script shown in the UI. The script validates required Azure permissions and configuration and highlights missing access so you can fix issues before proceeding.
The UI provides both PowerShell and Bash options. Use the one that matches your environment.
ARM template onboarding deploys resources using deployment stacks, which requires the built-in Azure Deployment Stack Contributor role at the onboarding scope (for example, the tenant root), in addition to User Access Administrator. The preflight check does not verify the Azure Deployment Stack Contributor role, so confirm it is assigned before deploying. Having the Global Administrator role with elevated access does not guarantee this permission - elevated access may grant only User Access Administrator on the root tenant rather than Owner.
Step 1: Designate the orchestrator subscription
In Step 1 you designate the orchestrator subscription. Enter the Azure subscription ID shown under Designate an orchestrator subscription. That subscription is the control plane for deploying Cloud Scanners and related resources that monitor and protect the subscriptions you include in scope.
Step 2: Generate credentials for Upwind
Open Step 2: Generate credentials for Upwind. This creates client credentials the orchestrator subscription uses to authenticate to the Upwind authorization service and Upwind APIs so your organization can connect and report scan results.
You will see two credential slots, AzureOrgConnectionCredentials and AzureScannersReportingCredentials. The first is used for organization-level connection and discovery; the second is used for scanners to report results back to Upwind.
Select Generate new client credentials and wait until both sets are created before continuing to role assignment and deployment steps.
Create the required role assignments
The next major section walks through app registration and Azure RBAC so Upwind can deploy scanner infrastructure and read what it needs across subscriptions.
App registration
Use this step to register a new Microsoft Entra application for Upwind or reuse an existing one. When you use ARM templates, choose the option that registers or reuses an app through the ARM deployment flow when shown.
If you use an existing app registration, create or select the application in the Azure portal under App registrations, set the redirect URI to https://www.upwind.io with platform type Web, and create a client secret valid for at least twelve months. Enter the application (client) ID and client secret in the form.
Assign the required Azure roles
Assign the required Azure roles, review the explanation of how role assignments let Upwind access subscriptions and deploy Cloud Scanner infrastructure (including compute and supporting RBAC).
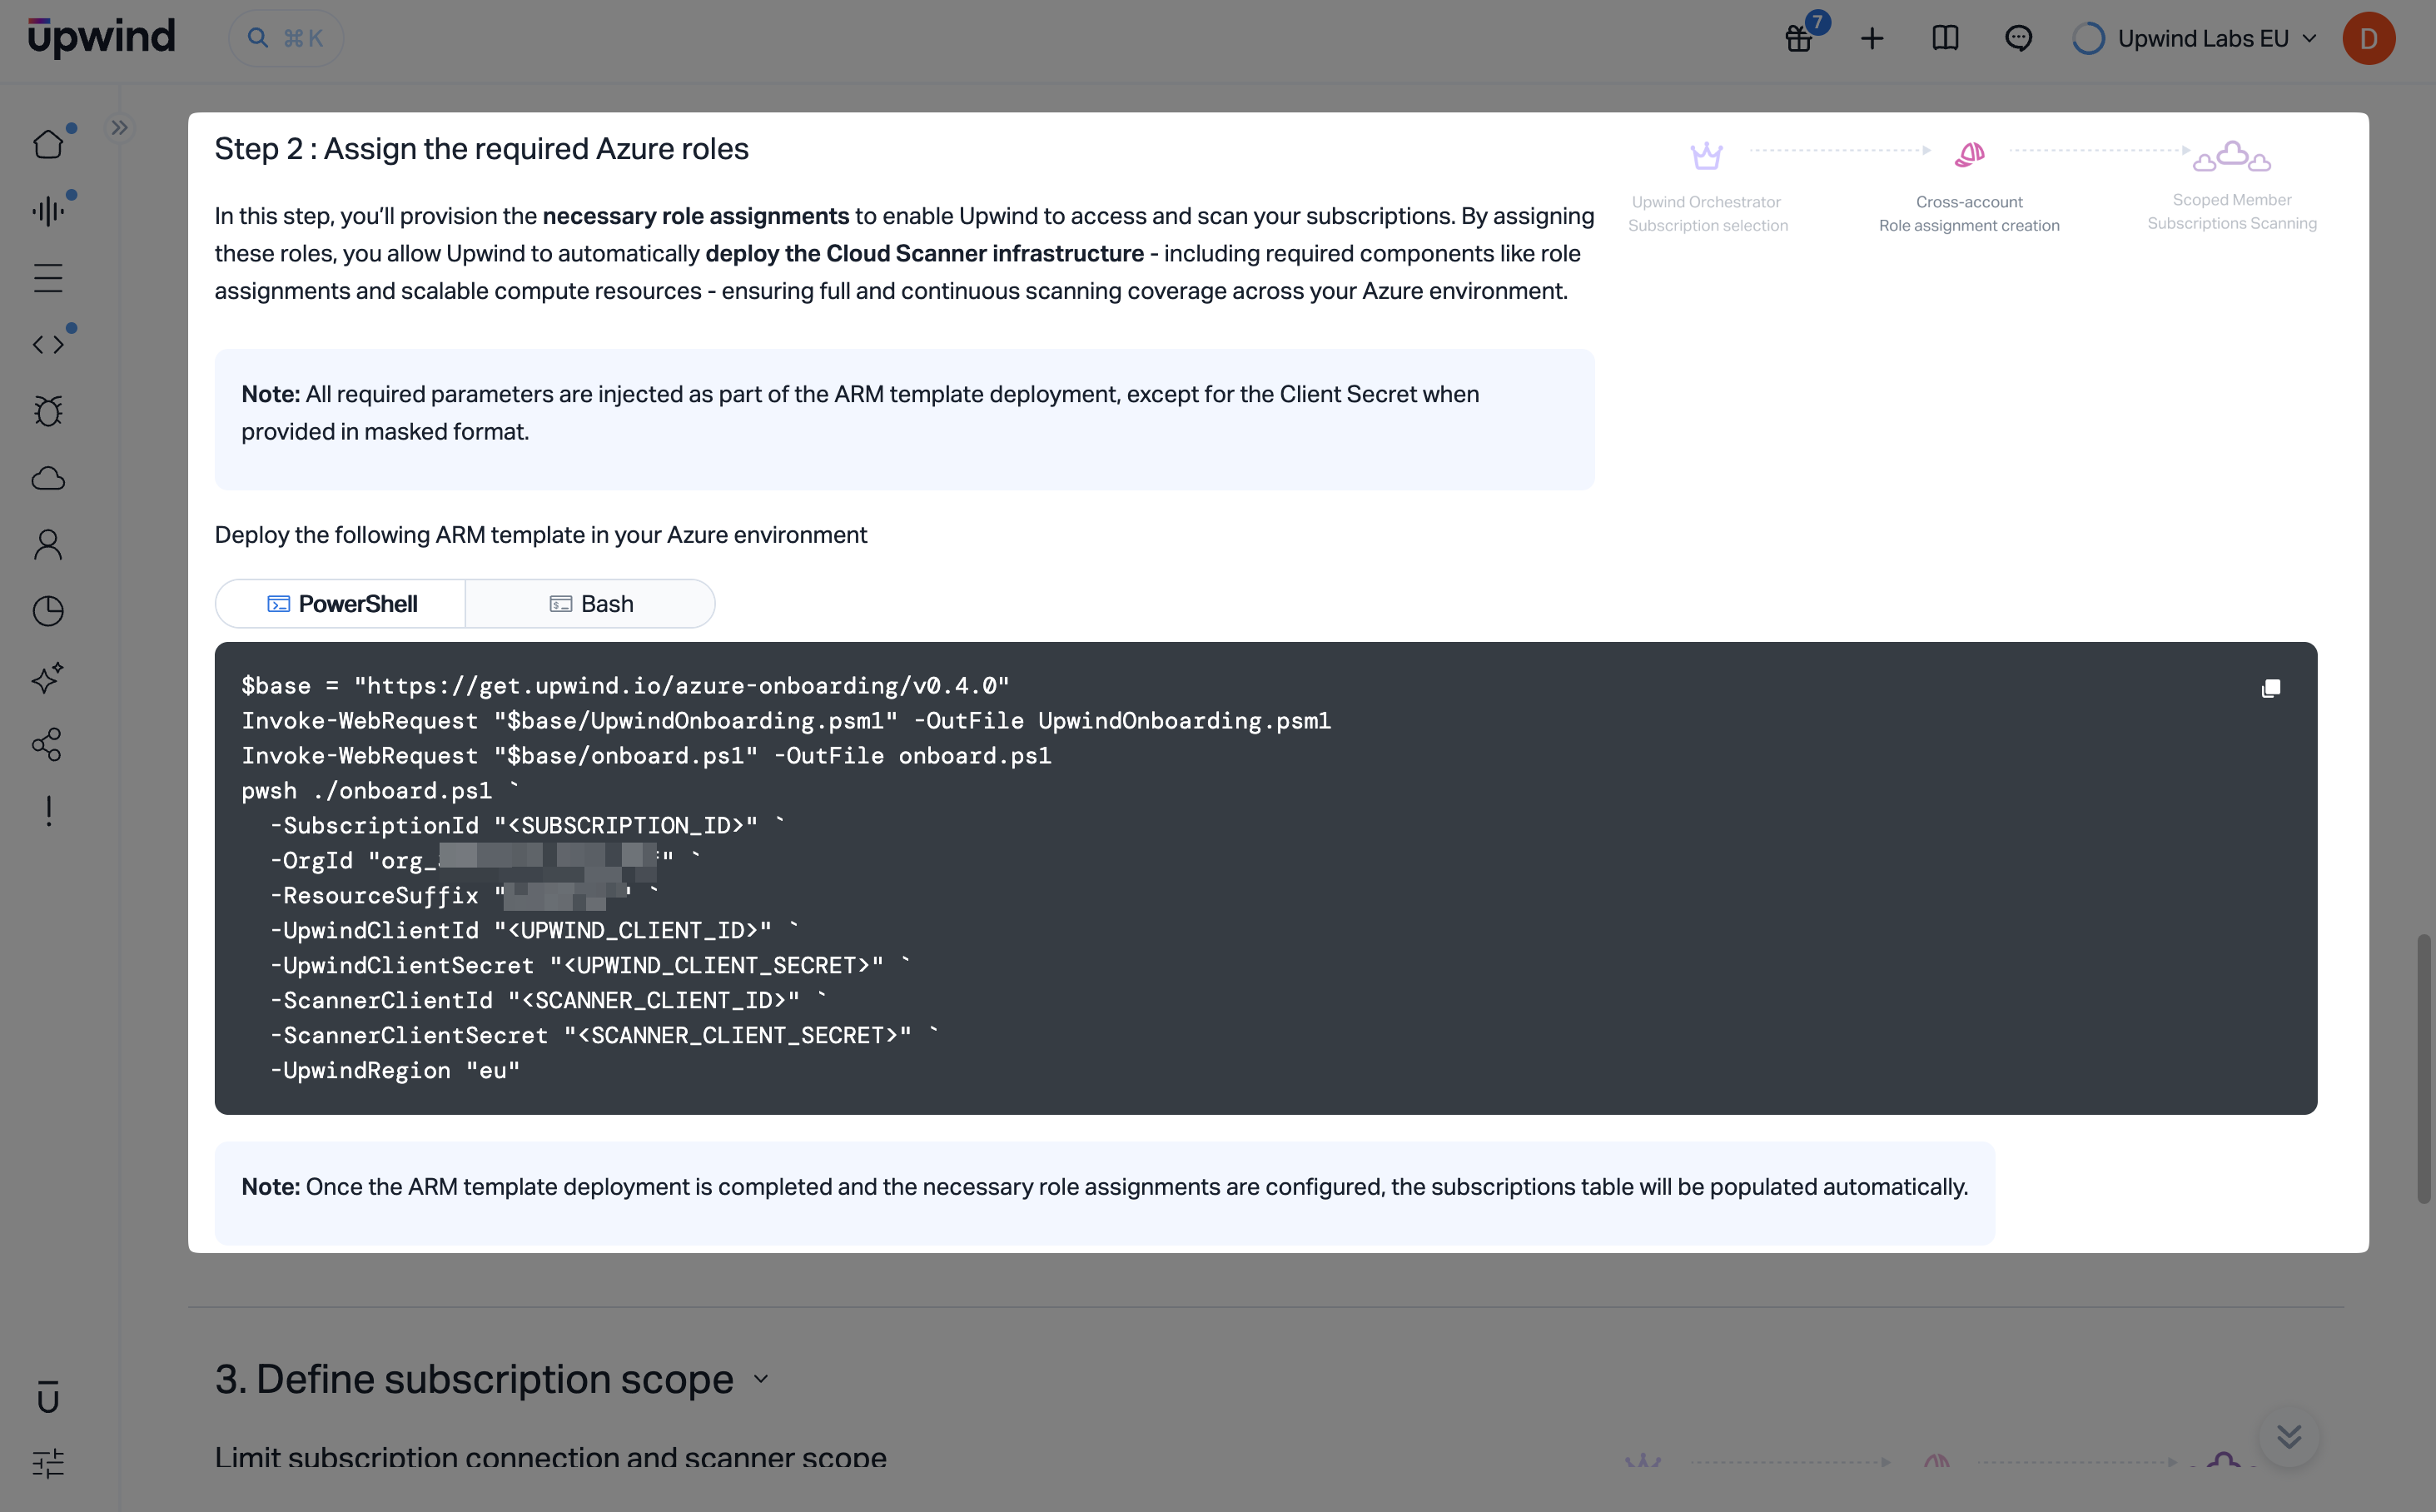
Deploy the ARM template script
Deploy the ARM template script supplied in this step. Copy or save the commands from the Deploy the following ARM template in your Azure environment section. The UI offers PowerShell and Bash tabs; choose the variant that fits your workstation or automation environment.
The onboarding script bundle version embedded in the download URL may change over time (for example, v0.4.0 in screenshots). Always use the URLs and parameters Upwind shows in your session.
Run the downloaded script according to the block shown by Upwind so that the ARM-based deployment completes in your orchestrator subscription. After deployment finishes and role assignments are in place, the subscriptions or projects views in Upwind populate as integration completes.
After the deployment succeeds, go back to the Upwind management console to define your scope.
Grant admin consent for Microsoft Graph permissions
After terraform apply creates the Upwind app registration and assigns its Microsoft Graph permissions, an Entra administrator must grant admin consent so Upwind can fetch Entra entities such as service principals.
- In the Azure portal, open Microsoft Entra ID and select
App registrations. - Locate the Upwind app registration. When Terraform creates it, the name follows the pattern
upwindsecurity-{xx}. - Under
Manage, selectAPI permissions. - Click
Grant admin consent for '<tenant\>'and confirm.
After consent is granted, the Status column shows Granted for <tenant> for each Microsoft Graph permission, and Upwind can read directory entities such as service principals.
Define subscription scope
Open the Define subscription scope section. There you limit which subscriptions are connected for inventory and auditing via Cloud APIs and which subscriptions should receive Cloud Scanner deployments.
The UI lists the subscriptions available under your tenant integration. For each subscription, choose whether Upwind may use Cloud APIs for metadata and configuration auditing and whether a Cloud Scanner should be deployed there. For broad coverage, enable both for every subscription you want protected. You can instead limit scanning to a subset if you need tighter control.
Cloud Scanner coverage depends on Cloud API access for the same subscription. Enable Cloud API before or together with Cloud Scanner for any row where you want scanner-based assessment.
You can revisit subscription scope later under Organizations and accounts.
Test and save
Scroll to the bottom of the onboarding page and click Test & Save. That action stores your scope choices and runs connectivity checks between Upwind and your Azure tenant. When the checks pass, the UI confirms success and you can continue exploring the Upwind console or return to the onboarding center.
- Terraform
- Azure Resource Manager
Connecting Azure subscription(s) with Terraform follows these stages:
- Choose the subscription(s) integration path and Terraform as the deployment method in the Upwind Management Console.
- Run the preflight access check, then provide the tenant root management group and an orchestrator subscription.
- Generate Upwind client credentials.
- Define the scope by adding one or more subscriptions and/or management groups, and choose whether to connect them to Upwind and deploy Cloud Scanners.
- Complete app registration and role assignment steps, then copy the generated Terraform into
main.tfand runterraform apply. - Click Test & Save to verify the connection and store the configuration.
- Log in to the Upwind Management Console .
- Select the plus symbol at the top of the screen and choose Connect cloud account.
- Select Azure, then choose Connect Azure subscription(s). Under Select deployment method choose Terraform.
Verify Azure access before onboarding (preflight check)
Before starting onboarding, run the preflight check script shown in the UI. The script validates required Azure permissions and configuration and highlights missing access so you can fix issues before proceeding.
The UI provides both PowerShell and Bash options. Use the one that matches your environment.
The Terraform module version shown in the console may change over time (for example, you might see 0.4.0 in screenshots). Always use the version and template Upwind provides in the onboarding flow.
Step 1: Provide the parameters to identify your Azure tenant
In Step 1, provide identifiers so Upwind can anchor the integration at the tenant root and know which subscription hosts orchestration workloads.
- Enter the Tenant Root Group ID. In the Azure portal, open Management groups and select the root group; copy its ID.
- Under Designate an orchestrator subscription, enter the Azure subscription ID that will act as the Upwind orchestrator subscription.
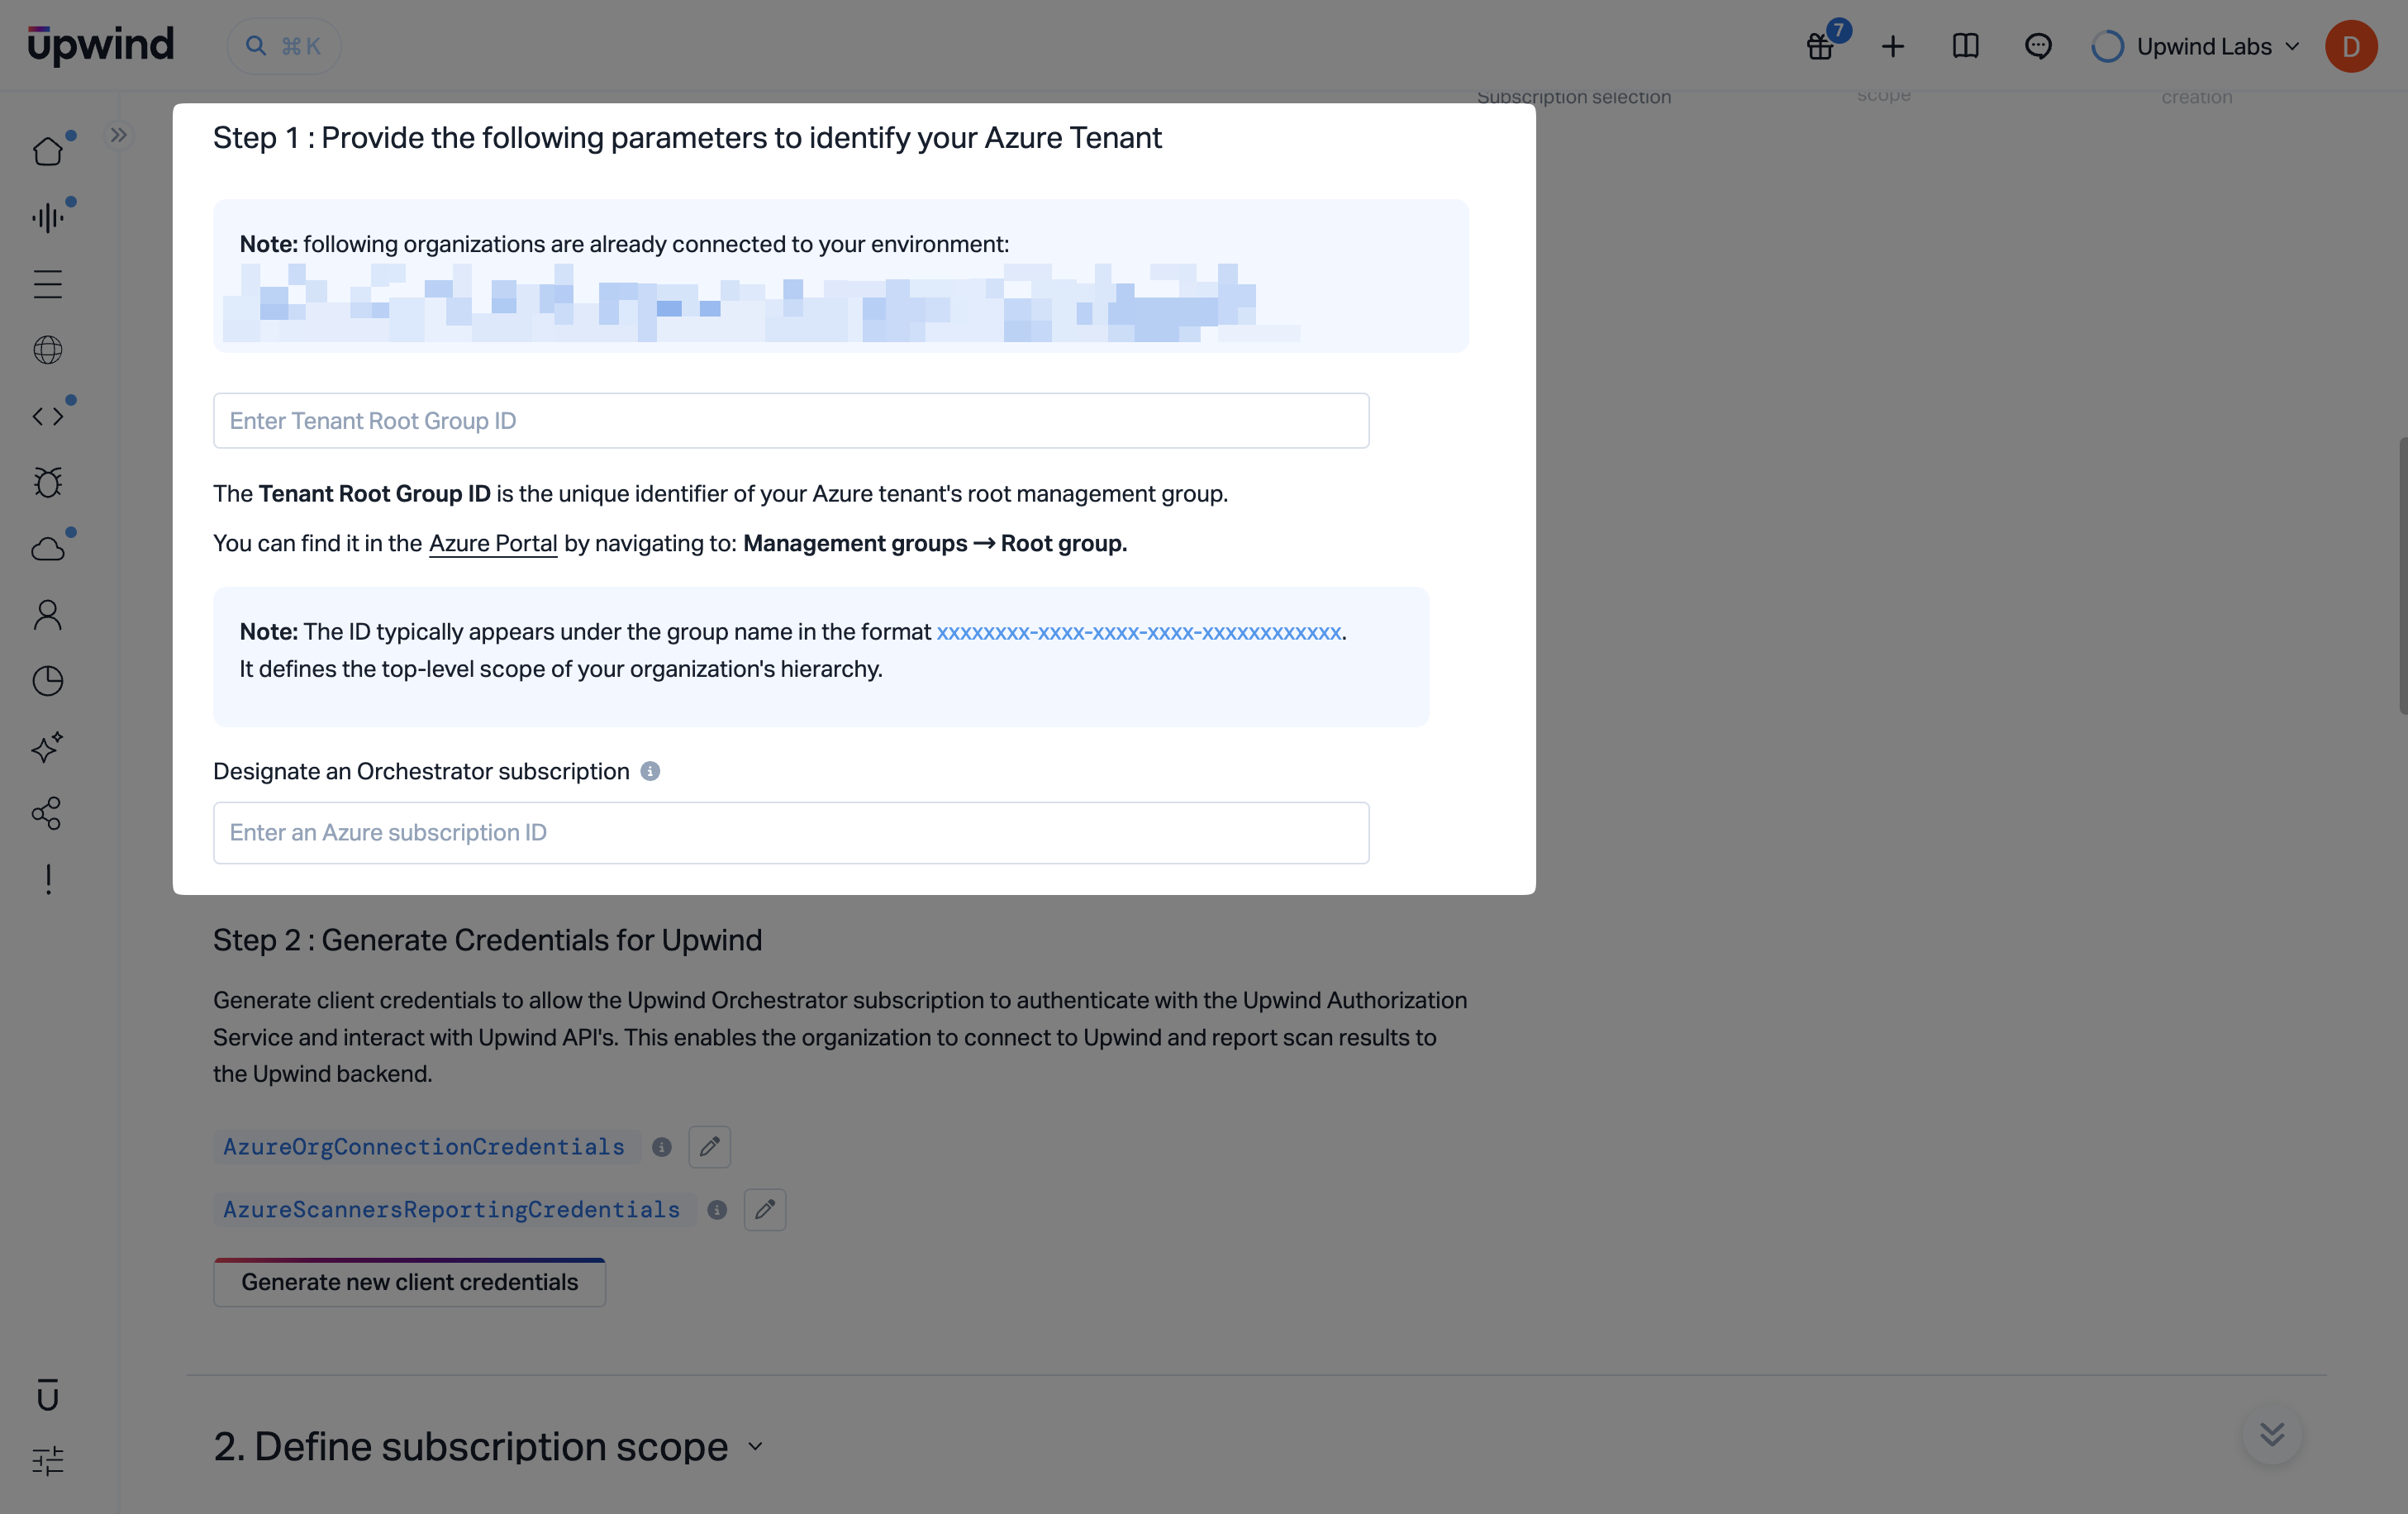
Step 2: Generate credentials for Upwind
Open Step 2: Generate credentials for Upwind and click Generate new client credentials. This creates the client credentials required for your organization to connect to Upwind and for Cloud Scanners to report results back to Upwind.
You will see two credential slots, AzureOrgConnectionCredentials and AzureScannersReportingCredentials.
Define subscription scope
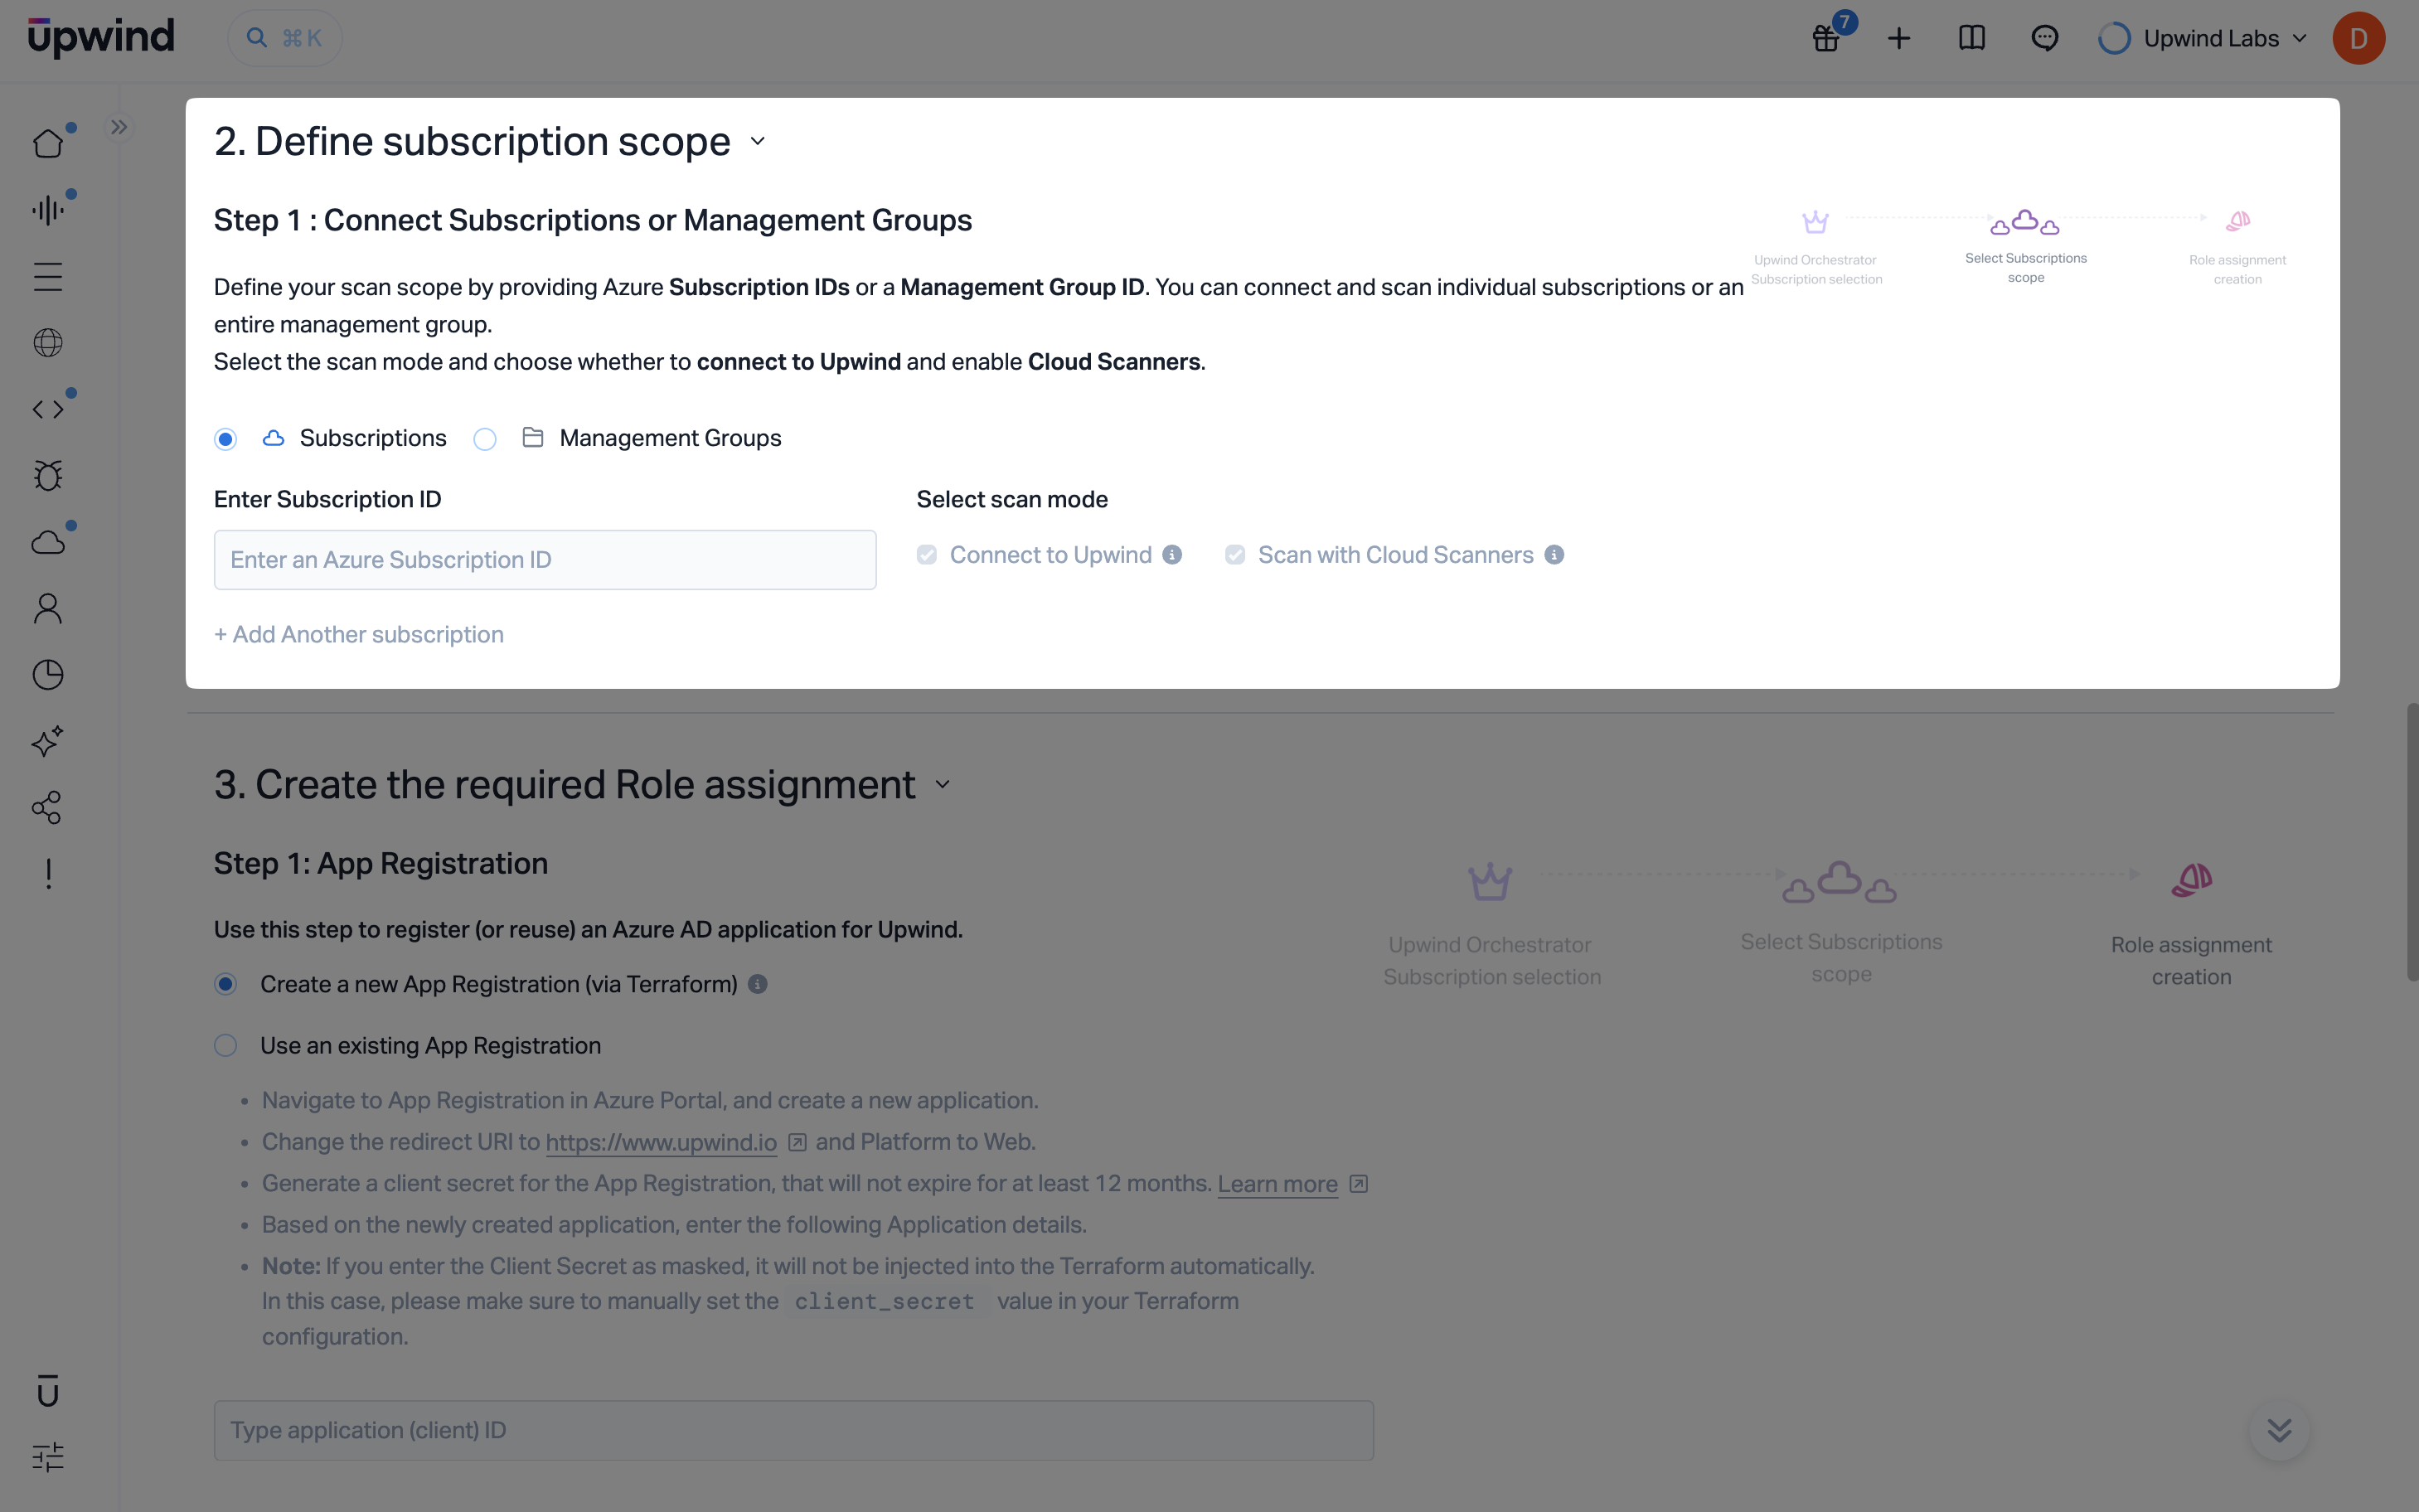
Open the Define subscription scope section. This step controls what you connect and what gets scanned.
Choose what to connect
Under Connect subscriptions or management groups, you can connect:
- One or more subscriptions by entering Azure subscription IDs
- One or more management groups by entering a management group ID
You can add multiple entries. Use Add another to include additional subscriptions or management groups.
Choose the scan mode per entry
For each connected entry, select the scan mode:
- Connect to Upwind: enables Cloud API access for inventory and auditing
- Scan with Cloud Scanners: deploys Upwind Cloud Scanners for deeper coverage
Cloud Scanner coverage depends on Cloud API access. If you select Scan with Cloud Scanners, you must also connect that entry to Upwind.
If you defined a scope using management groups, a table would appear at the bottom of the page, in which you can easily select which subscriptions to include in your scope.
Create the required role assignment
After defining scope, continue to the section that creates the required role assignments.
In App registration, register a new Microsoft Entra application for Upwind or reuse an existing one. For the Terraform path described here, choose Create a new App registration (via Terraform) when that option is available.
If you use an existing app registration, set the redirect URI to https://www.upwind.io with platform type Web, create a client secret valid for at least twelve months, and enter the application (client) ID and client secret in the form.

Copy and apply the Terraform configuration
Copy or download the Terraform module shown in the console and save it as main.tf in an empty working directory, then run:
terraform init && terraform apply
Grant admin consent for Microsoft Graph permissions
After terraform apply creates the Upwind app registration and assigns its Microsoft Graph permissions, an Entra administrator must grant admin consent so Upwind can fetch Entra entities such as service principals.
- In the Azure portal, open Microsoft Entra ID and select
App registrations. - Locate the Upwind app registration. When Terraform creates it, the name follows the pattern
upwindsecurity-{xx}. - Under
Manage, selectAPI permissions. - Click
Grant admin consent for '<tenant\>'and confirm.
After consent is granted, the Status column shows Granted for <tenant> for each Microsoft Graph permission, and Upwind can read directory entities such as service principals.
Test and save
Scroll to the bottom of the onboarding page and click Test & Save. That action stores your scope choices and runs connectivity checks between Upwind and the connected Azure subscription(s) and/or management groups. When the checks pass, the UI confirms success and you can continue exploring the Upwind console or return to the onboarding center.
Connecting Azure subscription(s) with Azure Resource Manager templates follows these stages:
- Choose the subscription(s) integration path and Azure Resource Manager templates as the deployment method in the Upwind Management Console.
- Run the preflight access check, then provide the tenant root management group and an orchestrator subscription.
- Generate Upwind client credentials.
- Define the scope by adding one or more subscriptions and/or management groups, and choose whether to connect them to Upwind and deploy Cloud Scanners.
- Assign the required Azure roles by deploying the supplied ARM onboarding script.
- Click Test & Save to verify the connection and store the configuration.
- Log in to the Upwind Management Console .
- Select the plus symbol at the top of the screen and choose Connect cloud account.
- Select Azure, then choose Connect Azure subscription(s). Under Select deployment method choose Azure Resource Manager templates.
Verify Azure access before onboarding (preflight check)
Before starting onboarding, run the preflight check script shown in the UI. The script validates required Azure permissions and configuration and highlights missing access so you can fix issues before proceeding.
The UI provides both PowerShell and Bash options. Use the one that matches your environment.
ARM template onboarding deploys resources using deployment stacks, which requires the built-in Azure Deployment Stack Contributor role at the onboarding scope (for example, the tenant root), in addition to User Access Administrator. If your account has the Global Administrator role with elevated access, you already have sufficient permissions. The preflight check does not verify the Azure Deployment Stack Contributor role, so confirm it is assigned before deploying.
Step 1: Provide the parameters to identify your Azure tenant
In Step 1, provide identifiers so Upwind can anchor the integration at the tenant root and know which subscription hosts orchestration workloads.
- Enter the Tenant Root Group ID. In the Azure portal, open Management groups and select the root group; copy its ID.
- Under Designate an orchestrator subscription, enter the Azure subscription ID that will act as the Upwind orchestrator subscription.
Step 2: Generate credentials for Upwind
Open Step 2: Generate credentials for Upwind and click Generate new client credentials. This creates the client credentials required for your organization to connect to Upwind and for Cloud Scanners to report results back to Upwind.
You will see two credential slots, AzureOrgConnectionCredentials and AzureScannersReportingCredentials.
Define subscription scope
Open the Define subscription scope section. This step controls what you connect and what gets scanned.
Choose what to connect
Under Connect subscriptions or management groups, you can connect:
- One or more subscriptions by entering Azure subscription IDs
- One or more management groups by entering a management group ID
You can add multiple entries. Use Add another to include additional subscriptions or management groups.
Choose the scan mode per entry
For each connected entry, select the scan mode:
- Connect to Upwind: enables Cloud API access for inventory and auditing
- Scan with Cloud Scanners: deploys Upwind Cloud Scanners for deeper coverage
Cloud Scanner coverage depends on Cloud API access. If you select Scan with Cloud Scanners, you must also connect that entry to Upwind.
If you defined a scope using management groups, a table would appear at the bottom of the page, in which you can easily select which subscriptions to include in your scope.
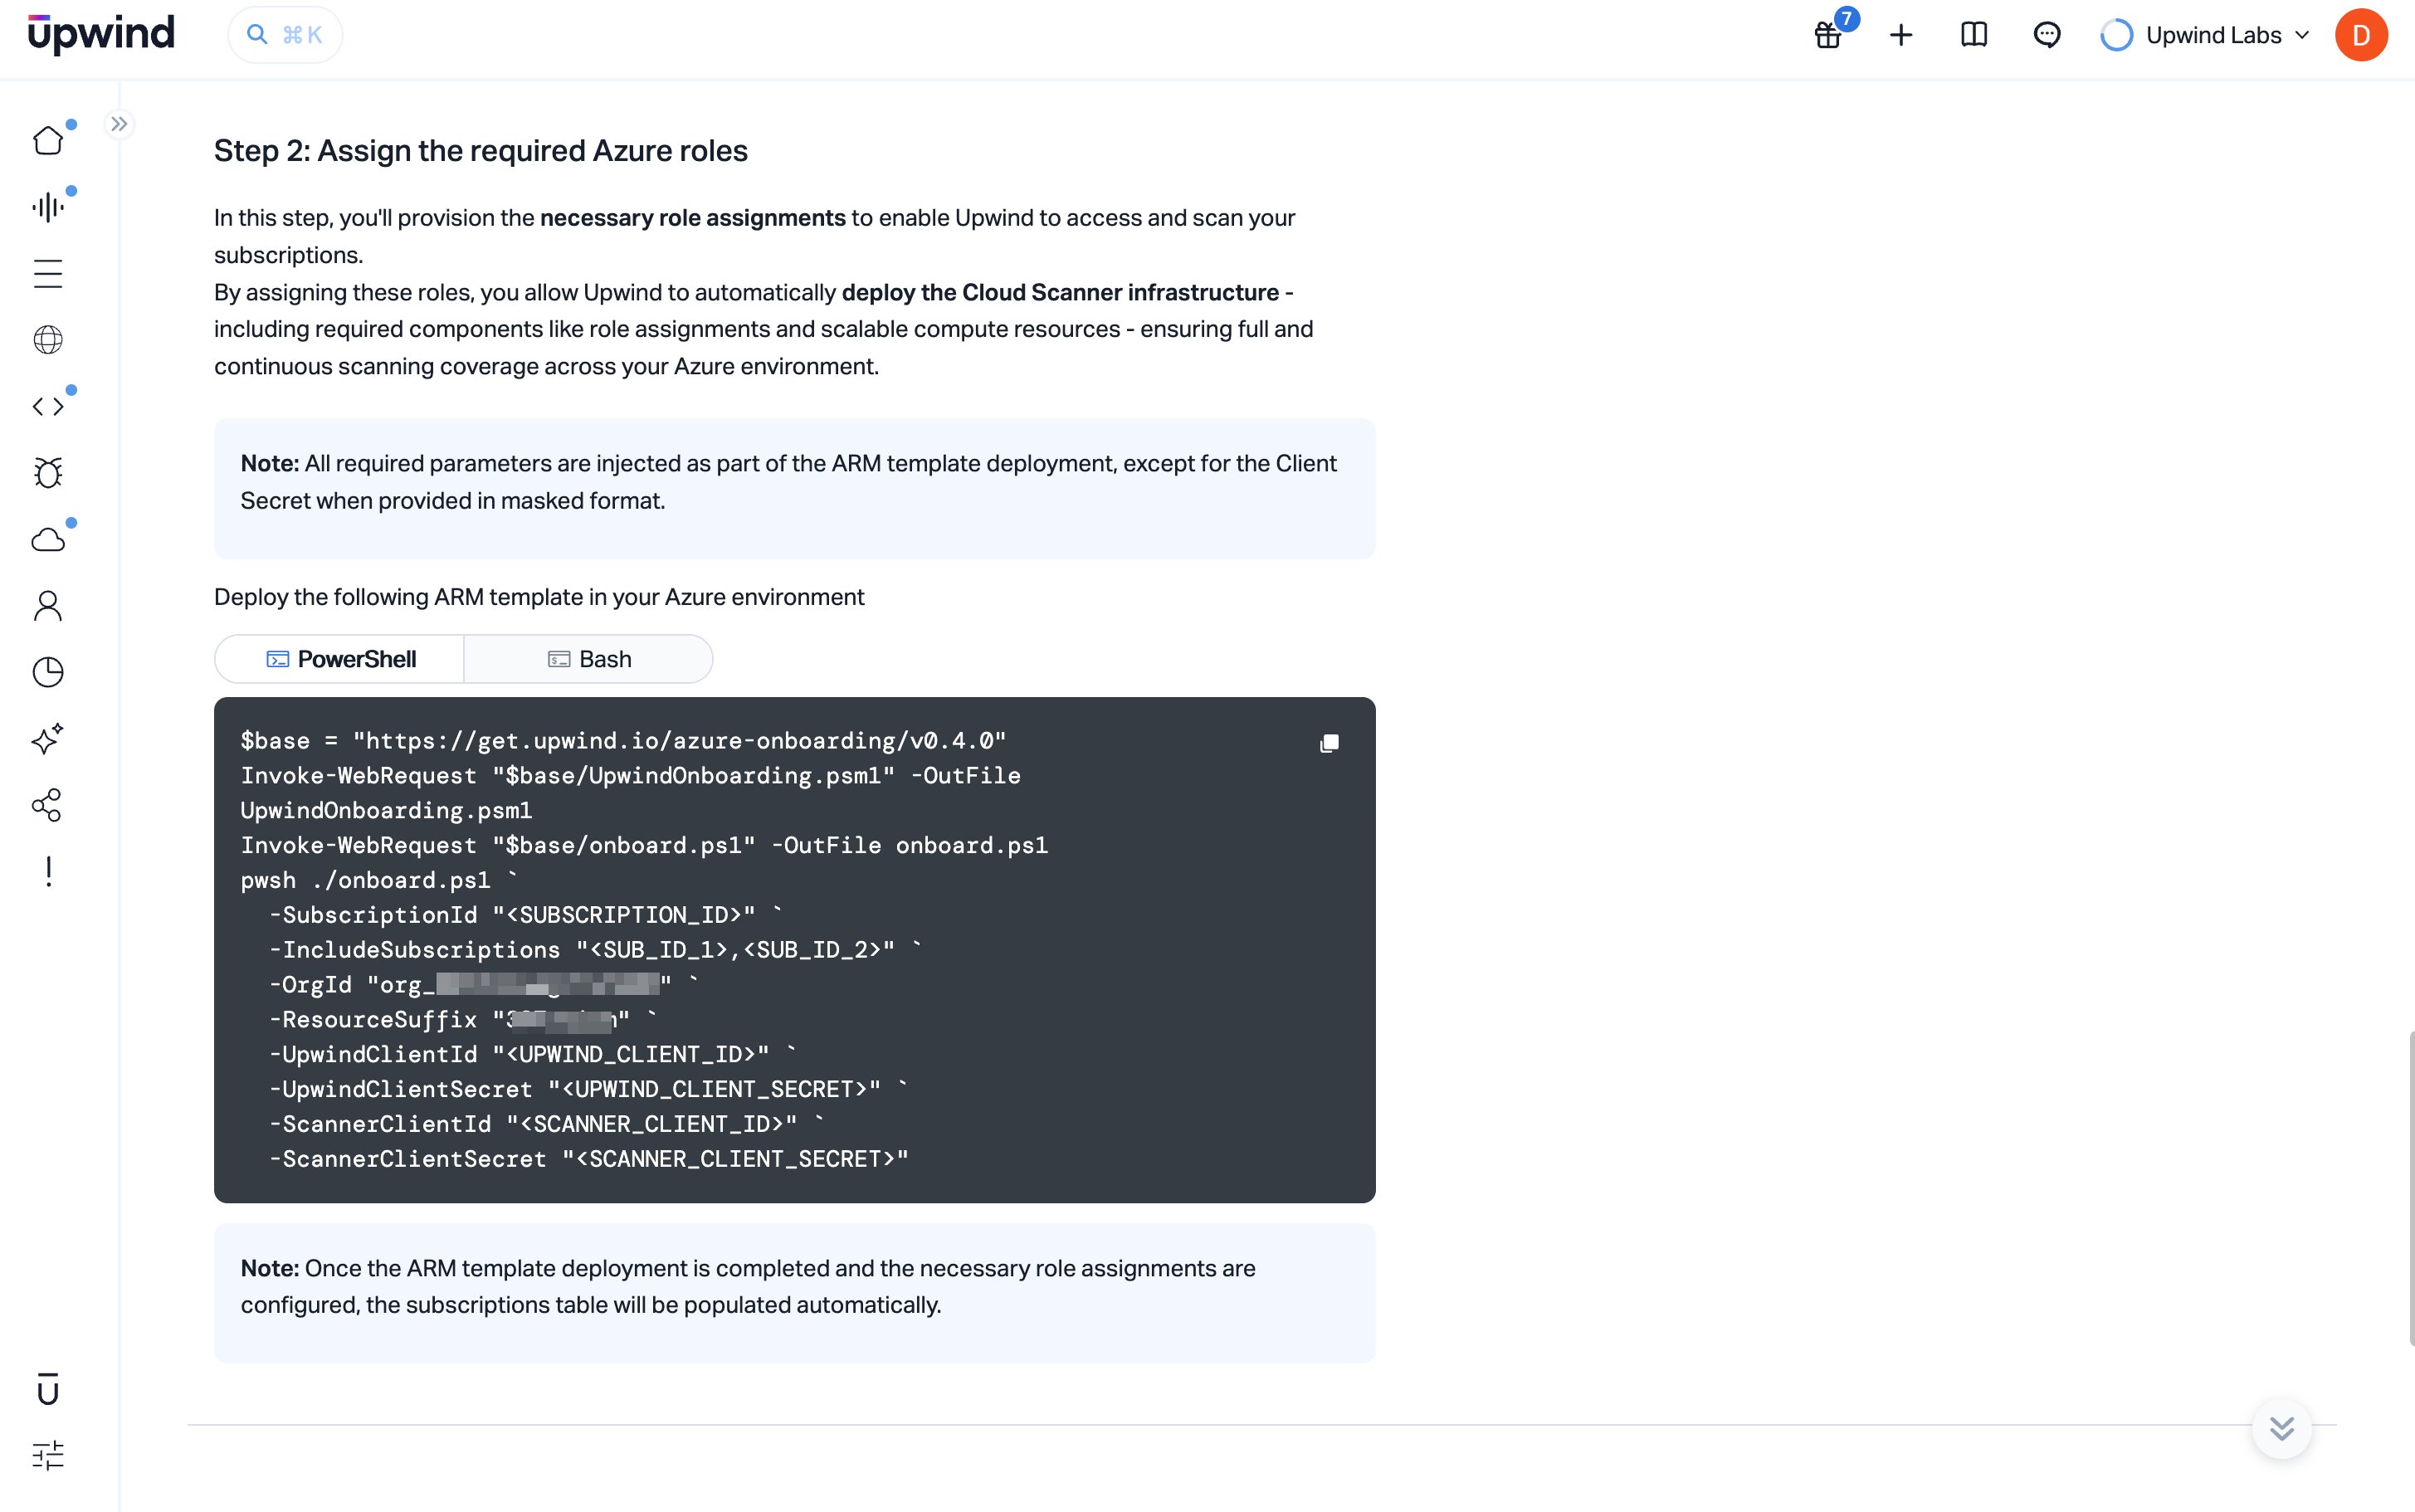
Assign the required Azure roles
Deploy the ARM template script supplied in this step to create the required role assignments. The ARM deployment handles all role assignments and app registration automatically - all required parameters are injected as part of the ARM template deployment.
The UI offers PowerShell and Bash tabs; choose the variant that fits your workstation or automation environment.
The onboarding script bundle version embedded in the download URL may change over time (for example, v0.4.0 in screenshots). Always use the URLs and parameters Upwind shows in your session.
Run the downloaded script according to the block shown by Upwind. Once the ARM template deployment completes and the necessary role assignments are configured, the subscriptions table is populated automatically.
Grant admin consent for Microsoft Graph permissions
After terraform apply creates the Upwind app registration and assigns its Microsoft Graph permissions, an Entra administrator must grant admin consent so Upwind can fetch Entra entities such as service principals.
- In the Azure portal, open Microsoft Entra ID and select
App registrations. - Locate the Upwind app registration. When Terraform creates it, the name follows the pattern
upwindsecurity-{xx}. - Under
Manage, selectAPI permissions. - Click
Grant admin consent for '<tenant\>'and confirm.
After consent is granted, the Status column shows Granted for <tenant> for each Microsoft Graph permission, and Upwind can read directory entities such as service principals.
Test and save
Scroll to the bottom of the onboarding page and click Test & Save. That action stores your scope choices and runs connectivity checks between Upwind and the connected Azure subscription(s) and/or management groups. When the checks pass, the UI confirms success and you can continue exploring the Upwind console or return to the onboarding center.
Unsupported Regions
Some regions are not yet supported for Upwind Cloud Scanner deployments, as Azure Container Jobs are not available in those regions:
- westindia
- koreasouth
- israelcentral
- mexicocentral
- newzealandnorth
- qatarcentral
Troubleshooting
If you encounter issues during deployment or operation, consult the Troubleshooting guide for solutions and best practices.
Resources Created
Azure Resource Group
A resource group named upwind-cs-rg-{orgId} is created containing:
Azure Key Vault
- Contains secrets for scanner authentication (client ID and client secret)
Managed Identities
Three managed identities are created:
-
VMSS Identity (
upwind-cs-vmss-identity-{orgId})- Assigned to virtual machine scale sets
- Manages snapshots and disks
- Has read and snapshot access across subscriptions
- Has Key Vault Secrets User access
-
Scaler Function Identity (
upwind-cs-scaler-function-identity-{orgId})- Assigned to container app jobs
- Manages VMSS scaling
- Manages disks and snapshots cleanup
- Has Key Vault Secrets User access
-
Disk Encryption Identity (
upwind-cs-disk-encryption-identity-{orgId})- Assigned to disk encryption sets
- Has Key Vault Crypto Service Encryption User access
RBAC Configuration
Service Principal
Tenant-wide roles:
- Reader
- Key Vault Reader
- Security Reader
- Cosmos DB Account Reader Role
- Backup Reader
- Log Analytics Reader
- Custom role:
upwindsecurity-{random-hex}
VMSS Managed Identity
Tenant-wide roles:
- Storage Blob Data Reader
- Custom role:
CloudScannerTargetRole-{suffix}-{managementGroup}
Scaler Managed Identity
Orchestrator subscription role:
- Custom role:
CloudScannerScalerRole-{suffix}
Disk Encryption Set Managed Identity
Role:
- Key Vault Crypto Service Encryption User
If you encounter issues during deployment or operation, consult the Troubleshooting guide for solutions and best practices.